
React Native's new architecture introduces Turbo Modules, which significantly improve native module communication with JavaScript. This guide will walk you through creating a Swift-based Turbo Module for iOS, ensuring smooth interaction with React Native.
React Native 0.76 stabilizes the new architecture, making Turbo Modules the default. Turbo Modules replace legacy Native Modules, eliminating the React Native bridge's performance overhead. Previously, native-to-JS communication was always asynchronous, even when unnecessary.React Native 0.76 introduces Turbo Modules as the default, replacing legacy Native Modules and removing the performance overhead of the React Native Bridge. Previously, communication between JavaScript and the native layer was always asynchronous, even for operations that didn’t require it.
With Turbo Modules, synchronous communication is now possible, improving performance and reducing complexity. On iOS, while React Native officially supports Objective-C for Native Modules, Swift can be used for implementation with Objective-C as the entry point for compatibility. On Android, Java remains widely used, but Kotlin is preferred for modern development.
Overall, Turbo Modules enhance efficiency, maintainability, and performance in React Native applications.
What is a Turbo Module?
A Turbo Module is an advanced native module that offers:
✅ Faster execution: Direct invocation via JSC/Hermes.
✅ Automatic TypeScript/Flow integration: Generates native code automatically.
✅ Efficient memory management: Modules are loaded only when needed.
Prerequisites: Basic React Native knowledge is required. No prior Swift or Objective-C experience is necessary.
Official Documentation
Before diving in, you must go through the official Turbo Modules documentation, which provides comprehensive coverage of Android, Objective-C, JavaScript/TypeScript, and specifications. In this guide, we'll focus specifically on the iOS Swift implementation to streamline your learning process:
🔗 React Native Turbo Modules Introduction
For more insights into the old/new native bridging architecture, explore these articles:
🔗 Android Native Bridging in React Native - Part 1
🔗 Android Native Bridging in React Native - Part 2
🔗 Build-native-and-turbo-modules
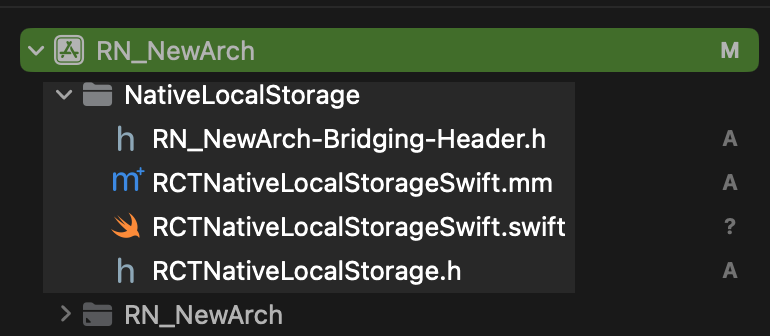
Project Structure
We will create a NativeLocalStorage Turbo Module using Swift.
How to Create These Files in Xcode?
1) Create a New Group (Optional but Recommended)
To keep your project organized, you can create a new group in Xcode:
- Right-click on the project navigator (left panel in Xcode).
- Select New Group.
- Name it NativeLocalStorage (or any preferred name).
- Move all related files into this group.
2) Create a New File
- Right-click on the
NativeLocalStoragefolder (group) in Xcode. - Select New File from Template.
3) Bridging Header (RN_NewArch-Bridging-Header.h)
- When you create a new Swift file in an Objective-C project, Xcode will automatically prompt you to create a bridging header(Only One is Needed).
-
If it is not created automatically, follow these steps:
- Select Header File (.h) from the template list.
- Name it
<ProjectName>-Bridging-Header.h. - Navigate to Build Settings → Swift Compiler - General.
- Set Objective-C Bridging Header to:
$(SRCROOT)/<ProjectName>/<ProjectName>-Bridging-Header.h
4) Objective-C Interface (RCTNativeLocalStorage.h)
- Select Objective-C File (.h) from the template list.
- Name it
RCTNativeLocalStorage.h.
5) Swift Implementation (RCTNativeLocalStorageSwift.swift)
- Select Swift File (.swift) from the template list.
- Name it
RCTNativeLocalStorageSwift.swift.
6) Objective-C Implementation (RCTNativeLocalStorage.mm)
- Select Objective-C File (.mm) from the template list.
- Name it
RCTNativeLocalStorage.mm.
1️⃣ Bridging Header (RN_NewArch-Bridging-Header.h)
📌 Code Explanation:
// RN_NewArch-Bridging-Header.h
#import "RCTAppDelegate.h"
- This bridging header allows Swift code to interact with Objective-C components in React Native.
- The
#import "RCTAppDelegate.h"ensures compatibility with the React Native app delegate.
2️⃣ Objective-C Interface (RCTNativeLocalStorage.h)
📌 Code Explanation:
#import <Foundation/Foundation.h>
#import <NativeLocalStorageSpec/NativeLocalStorageSpec.h>

@interface RCTNativeLocalStorage : NSObject <NativeLocalStorageSpec>
@end
-
@interface RCTNativeLocalStorage: Declares the native module class. -
<NativeLocalStorageSpec>: Ensures the class conforms to the required React Native module interface. -
@end: Marks the end of the class declaration.
3️⃣ Swift Implementation (RCTNativeLocalStorageSwift.swift)
📌 Code Explanation:
import Foundation

@objcMembers
class RCTNativeLocalStorageImpl: NSObject {
    private let userDefaults: UserDefaults

    override init() {
        userDefaults = UserDefaults(suiteName: "local-storage") ?? UserDefaults.standard
        super.init()
    }

    func getItem(_ key: String) -> String? {
        return userDefaults.string(forKey: key)
    }

    func setItem(_ value: String, forKey key: String) {
        userDefaults.set(value, forKey: key)
    }

    func removeItem(_ key: String) {
        userDefaults.removeObject(forKey: key)
    }

    func clear() {
        for (key, _) in userDefaults.dictionaryRepresentation() {
            userDefaults.removeObject(forKey: key)
        }
    }
}
-
@objcMembers: Ensures all methods are accessible in Objective-C. -
UserDefaults: Provides persistent storage for key-value pairs. -
CRUD Operations:
-
getItem: Fetches a stored value. -
setItem: Stores a value. -
removeItem: Deletes a specific item. -
clear: Removes all stored items.
-
4️⃣ Objective-C Implementation (RCTNativeLocalStorage.mm)
📌 Code Explanation:
#import "RCTNativeLocalStorage.h"
#import "RN_NewArch-Swift.h" // Import Swift implementation class

@implementation RCTNativeLocalStorage

/**
When you use RCT_EXPORT_MODULE() without parameters, React Native automatically
uses the class name (RCTNativeLocalStorage) as the module name when
exposing it to JavaScript. If you pass a custom string like
RCT_EXPORT_MODULE("MyModuleName"), React Native will use "MyModuleName" instead
of the class name.
**/
RCT_EXPORT_MODULE("NativeLocalStorage") // Export module to Objective-C runtime

// Create an instance of the Swift class
RCTNativeLocalStorageImpl *nativeLocalStorage =
    [[RCTNativeLocalStorageImpl alloc] init];

- (std::shared_ptr<facebook::react::TurboModule>)getTurboModule:
    (const facebook::react::ObjCTurboModule::InitParams &)params {
  return std::make_shared<facebook::react::NativeLocalStorageSpecJSI>(params);
}

#pragma mark - Swift Storage Methods

- (NSString *_Nullable)getItem:(nonnull NSString *)key {
  return [nativeLocalStorage getItem:key]; // Call Swift method
}

- (void)setItem:(nonnull NSString *)value key:(nonnull NSString *)key {
  [nativeLocalStorage setItem:value forKey:key]; // Call Swift method
}

- (void)removeItem:(nonnull NSString *)key {
  [nativeLocalStorage removeItem:key]; // Call Swift method
}

- (void)clear {
  [nativeLocalStorage clear]; // Call Swift method
}

@end
-
RCT_EXPORT_MODULE("NativeLocalStorage"): Registers the module with React Native. -
RCTNativeLocalStorageImpl: Calls the Swift implementation. -
TurboModule Integration:
- Uses
std::shared_ptrto efficiently manage memory.
- Uses
Bridges Swift functions to Objective-C, allowing React Native to interact with them.
🎯 Summary
✅ Turbo Modules enhance React Native’s performance by enabling direct communication.\
✅ We built a Swift-based Turbo Module for local storage.\
✅ Objective-C wrappers ensured React Native compatibility.\
✅ This setup allows Swift-based Turbo Modules to be used in React Native projects seamlessly.
🚀 Now you can build custom Turbo Modules in Swift! 🚀

Top comments (0)