
Co-authored with @kindadailybren
Sometimes, the best way to learn a new technology is to start building something.
What better way to do this than to pick a stack, spin up a project, and figure things out along the way?
For this project, the stack is simple but powerful: Vue for the frontend and Supabase for the backend. Vue makes it easy to create responsive, dynamic interfaces, while Supabase handles the database, API, and even real-time functionality — all without needing to write a full backend from scratch.
This article walks through the entire process — from setting things up to building core features like adding, updating, and deleting data, and finally exploring what could be improved or added next. Along the way, you’ll find practical examples, key takeaways, and code snippets that break down how each component works, helping you build a solid grasp of these technologies. By the end, you’ll (hopefully) feel confident enough to take what you’ve learned and start building your own projects using Vue and Supabase.
Stack Breakdown
This project is built using two main technologies: Vue and Supabase.
Vue is a progressive JavaScript framework that is great for building reactive user interfaces. It’s lightweight, easy to learn, and provides a clean syntax that makes frontend development feel intuitive.
Supabase is an open-source Firebase alternative that provides a full backend out of the box — including a PostgreSQL database, authentication, file storage, and auto-generated APIs. It’s developer-friendly, easy to set up, and integrates smoothly with frontend frameworks like Vue.
Together, Vue and Supabase make a solid stack for quickly building modern web apps — without needing to spin up an entire backend from scratch.
Vue, Supabase, and Why We Chose Them
When trying to dive into something new, we knew we wanted a stack that was both easy to use and powerful enough to build something real. Vue and Supabase ended up being the perfect combo for that.
We picked Vue because of how intuitive it is — the syntax is clean, straightforward, and just makes sense. It didn’t feel overwhelming to dive into, and building dynamic UIs felt smooth from the start.
For the backend, we went with Supabase. It’s open source and super easy to set up — no complicated config or boilerplate. We got a fully functional backend out of the box, complete with a PostgreSQL database, authentication, file storage, and even real-time updates.
Together, these two tools let us focus on actually building the project instead of getting stuck on setup. They gave us a fast way to go from an idea to a working app, while learning a lot in the process.
Creating the Frontend
Alright, for this project, we’re keeping things light and fast by using Vite.
What is Vite?
Think of it as a modern build tool that makes setting up and running your frontend super quick.
Difference between Vite and Vue?
Vite is just the tool that runs your Vue app behind the scenes. Vue handles the UI stuff, Vite handles the dev server and bundling.
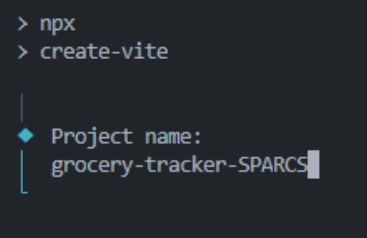
We’ll be using npm as our package manager, so make sure that’s installed. To get started, run:
npm create vite@latest
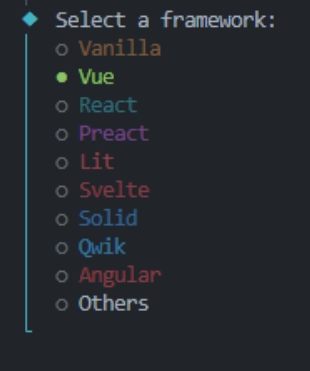
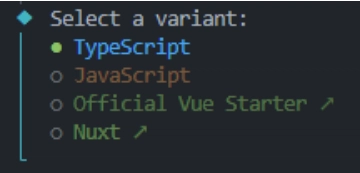
Follow the prompts:
Next up, we’ll set up Pinia for state management (a fancy way of saying “shared data between components”):
npm install pinia
Once that's installed, use this code in the main.ts:
import { createPinia } from 'pinia'
const pinia = createPinia()
const app = createApp(App)
app.use(pinia)
This code sets up Pinia, which is a tool that helps your app share data between different components. First, it brings in Pinia, then creates a "store" (like a central place to keep your app's data). After that, it starts your Vue app and tells it to use that store so every part of the app can access and update shared data easily.
After that, feel free to do a little cleaning. Delete any of the default files you’re not using. And that's it. Your frontend is ready to roll!
Next up, backend!
Setting up Supabase
Create a Supabase Account
First, you'll need a Supabase account. Just sign up, it's quick and they are offering a free tier. Once you're in, create a new project from the dashboard. For this project, we are going to use just the Supabase dashboard to configure our database.
Configure the Database
Head over to the "Table Editor" section. Here you can create new tables. Make a table called “product”. Add a few attributes or columns: id (UUID), name (varchar), quantity (int4), and price (numeric).
Column Name     | Type
id          | UUID
name        | varchar
quantity    | int4
price       | numeric
That's all we need for this app.
Connect Supabase to Vue JS
Next, in your frontend project, make a directory called supabase and inside it, create a file named supabaseClient.ts. And, drop the following code:
import { createClient } from "@supabase/supabase-js";
const supabase_url = import.meta.env.VITE_SUPABASE_URL;
const supabase_key = import.meta.env.VITE_SUPABASE_KEY;
export const supabase = createClient(supabase_url, supabase_key);
What this does is it sets up a connection between your app and your Supabase backend by creating a client using the project URL and API Key (p.s. store the url and key in your .env file for security). With that client, you are now connected to your hosted Supabase backend.
Components Structure
In this section, you will see how the main components of the web app are implemented. Each code snippet is followed by an explanation to help you understand how the components work together to build interactive UI features.
Button Component:
<script lang="ts" setup>
defineProps<{ msg?: string }>()
</script>

<template>
    <button class="border-[1px] border-dashed px-4 py text-2xl cursor-pointer hover:bg-gray-300 transition-all duration-150">{{ msg }}</button>
</template>
- This is a reusable button component. It accepts an optional msg prop to display text on the button. The button is styled with a dashed border, padding, large text, and a hover effect that changes the background color. It is used across different components for consistent styling and interactivity.
Forms Component:
<template>
<section>
<div>
<div class="flex flex-col gap-4">
<div class="flex justify-between text-2xl xl:text-3xl items-center">
<p>{{ nameRef }}</p>
<div class="flex gap-10">
<div class="flex gap-2 xl:gap-4">
<p>₱ {{ priceRef }}</p>
<p>x</p>
<p>{{ quantityRef }}</p>
</div>
<div>
<button class="hover:cursor-pointer" @click="isEditing = !isEditing">
Edit
</button>
</div>
</div>
</div>
</div>
</div>
</section>
</template>
- This part of the Forms component displays the product's name, price, and quantity in a well-structured layout. There’s an "Edit" button that toggles the editing mode by changing the isEditing value.
<!-- edit state -->
<div v-if="isEditing" class="flex flex-col gap-2">
  <div class="flex items-center justify-between text-2xl gap-4">
    <input v-model="nameRef" type="text" :placeholder="product?.name" class="w-full border-b border-dashed px-4" @keydown.enter="update" />
    <div class="flex items-center justify-center gap-1">
      <Button @click="decrement" msg="-" />
      <Button @click="quantityRef++" msg="+" class="hover:bg-green-400" />
      <button @click="deleteProd" class="border-[1px] border-dashed px-4 py-1 text-2xl cursor-pointer hover:bg-red-400 transition-all duration-150">
        <Trash class="w-6 h-6" />
      </button>
    </div>
  </div>
  <Button @click="update" msg="Save" class="hover:bg-green-400" />
</div>
- When editing is enabled, the user can change the product name, increase or decrease the quantity, or delete the product. It uses the Button component for interactivity and consistent styling.
<script setup lang="ts">
import { ref, computed } from 'vue'
import { updateProduct, deleteProduct } from '../utils/actions.ts'
import Button from './Button.vue'
import Trash from './Trash.vue'
import { useAllProductsStore } from '../stores/allProducts.ts'

const productStore = useAllProductsStore()

const props = defineProps({
  id: { type: String, required: true },
});

const product = computed(() =>
  productStore.products.find((p) => p.id === props.id)
)

const nameRef = ref(product.value?.name ?? "")
const priceRef = ref(product.value?.price ?? 0)
const quantityRef = ref(product.value?.quantity ?? 0)

const update = async () => {
  isEditing.value = !isEditing.value
  if (!product.value) return;
  await updateProduct(product.value.id, nameRef.value, quantityRef.value, priceRef.value)
  isEditing.value = false
}

const deleteProd = async () => {
  await deleteProduct(props.id);
};

const decrement = () => {
  if (quantityRef.value > 1) quantityRef.value--
}
const isEditing = ref(false)
</script>
- This script defines the reactive variables and functions used in the component. It connects with the Pinia store to find and update products. It also handles product deletion and quantity adjustment, toggled by the edit state.
Music Player Component:
<template>
  <div class="flex gap-10">
    <div>
      <button v-if="isPlaying" @click="() => { play(); isPlaying = false; }" class="bg-green-400 px-8 py-2 hover:bg-green-500 cursor-pointer">PLAY</button>
      <button v-else @click="() => { stop(); isPlaying = true; }" class="bg-red-400 px-8 py-2 hover:bg-red-500 cursor-pointer">STOP</button>
    </div>
    <div>
      <button v-if="isPlaying2" @click="() => { play2(); isPlaying2 = false; }" class="bg-yellow-400 px-8 py-2 hover:bg-orange-500 cursor-pointer">PLAY</button>
      <div v-else class="flex flex-col justify-center">
        <button @click="() => { pause(); isPlaying2 = true; }" class="bg-red-400 px-8 py-2 hover:bg-red-500 cursor-pointer">PAUSE</button>
        <div class="flex-col text-center text-white hidden">
          <p class="text-2xl">Playing Naaalala Ka</p>
          <p>by</p>
          <p class="text-2xl">Rey Valera</p>
        </div>
      </div>
    </div>
  </div>
</template>
- This component provides buttons to control two separate audio tracks. One plays background music, and the other plays a specific song. Buttons toggle between play and stop/pause modes
<script lang="ts" setup>
import { ref } from 'vue';
import { useSound } from '@vueuse/sound';
import bgMusic from '../assets/sound/bg-music-grocery-store.mp3'
import reyValera from '../assets/sound/naaalala-ka-rey-valera.mp3'

const isPlaying = ref(true);
const isPlaying2 = ref(true);

const { play, stop } = useSound(bgMusic, {
  volume: 0.5,
  loop: true,
  autoplay: true,
})

const { play: play2, pause } = useSound(reyValera, {
  volume: 0.2,
  loop: false,
  autoplay: true,
})
</script>
- This music player provides play/pause functionality for two audio tracks. It uses the @vueuse/sound library to control audio playback and manages playback states with Vue's reactivity system.
CRUD Functionalities
In this section of the article, you will see how the CRUD functionalities of the web app are implemented with the following code. The code may look intimidating, but this section will also explain key terms and syntax for your understanding.
An important concept and syntax that needs to be understood to fully grasp the code is async and await.
async is a keyword used to declare a function as asynchronous. It allows the use of await inside it and ensures the function returns a promise.
await is used inside an async function to pause the execution of the function until the awaited promise is resolved or rejected. This helps write asynchronous code in a cleaner, more readable way, as if it were synchronous.
Now that you know the basics of async and await, let's proceed with the code implementation of the CRUD.
Read/Fetch Items:
async fetchProducts() {
  this.loading = true;
  const { data, error } = await supabase.from("product").select("*");
  if (error) {
    console.error("Error fetching products:", error);
    this.loading = false;
    return;
  }
  this.products = data as Product[];
  this.loading = false;
};
- This function retrieves all items from the product table using Supabase. It sets a loading flag to true while fetching and resets it afterward. If there's an error during the fetch, it logs the error; otherwise, it stores the result in the products variable.
Add Items:
export const addItem = async (
  name: string,
  price: number,
  quantity: number,
) => {
  const { data, error } = await supabase
    .from("product")
    .insert([{ name, price, quantity }]);
  if (error) console.error("Insert failed", error);
  else console.log("Inserted item", data);
};
- This function inserts a new product into the
producttable. It accepts the item's name, price, and quantity as arguments. If the insertion fails, it logs an error; otherwise, it confirms the item was successfully inserted.
Update Items:
export const updateProduct = async (
  id: string,
  productName: string,
  quantity: number,
  price: number,
) => {
  const { data, error } = await supabase
    .from("product")
    .update({
      name: productName,
      quantity: quantity,
      price: price,
    })
    .eq("id", id);

  if (error) {
    console.error("Update error:", error.message);
  } else {
    console.log("Updated successfully:", data);
  }
};
- This function updates an existing product in the table. It uses the product's id to find the specific item and updates its name, quantity, and price. An error message is shown if the update fails, otherwise it logs the updated data.
Delete Items:
export const deleteProduct = async (id: string) => {
  const { data, error } = await supabase
    .from("product") // your table name
    .delete()

    .eq("id", id);

  if (error) {
    console.error("Delete error:", error.message);
  } else {
    console.log("Deleted row:", data);
  }
};
- This function deletes a product from the table using its id. It filters the product to delete using the .eq("id", id) method. If an error occurs, it logs the error message; otherwise, it confirms the deletion.
Wrapping Up
Now that you've seen the essential features of this app, here are some ideas you can implement on your own to go even further. They're great opportunities to deepen your knowledge of Vue and Supabase:
Authentication System (Auth): Try adding user login and registration. It’s a great way to learn about route protection and Supabase auth integration.
Advanced Filtering and Sorting: Add features like search bars or dropdowns to filter and sort items by name, price, or quantity.
Different Lists for Different Users: Modify your database structure to include a column that assigns each item to a specific user. Then filter data based on who's logged in so each user sees only their own list.
Thanks for checking out our article! We hope this gave you not just insight into building with Vue and Supabase, but also ideas you’re excited to try out.
If you're curious to explore the actual code or want to see the app in action, feel free to check out our GitHub repository and live demo:
GitHub Repo:
🛒 groceryTracker_SPARCS
A simple and efficient grocery tracking app built with Vue 3, TypeScript, and Vite. This project is designed to help users manage grocery items through a clean interface, with fast performance powered by Vite and strong type safety from TypeScript.
🚀 Features
✅ Add and remove grocery items 📦 View list of tracked items
📦 Tech Stack
Framework: Vue 3
Build Tool: Vite
Language: TypeScript
State Management: Pinia (planned/included)
Backend: Supabase (optional, based on context)
🛠️ Project Setup
# Clone the repository
git clone https://github.com/kindadailybren/groceryTracker_SPARCS.git
cd groceryTracker_SPARCS

# Install dependencies
npm install

# Start development server
npm run dev
🧪 Scripts
Command Description
npm run dev Start local dev server
npm run build Build for production
npm run lint Lint the code
👨💻 Author
Errol Minguez
UP Mindanao · BS Computer Science
Breindel Medina
UP Mindanao · BS Computer Science
📄 License
This project is licensed under the…
Live Demo:
Explore the codebase, try running it locally, or even fork it and start building your own version!


Top comments (0)