Building a Secure Authentication System in Node.js using JWT
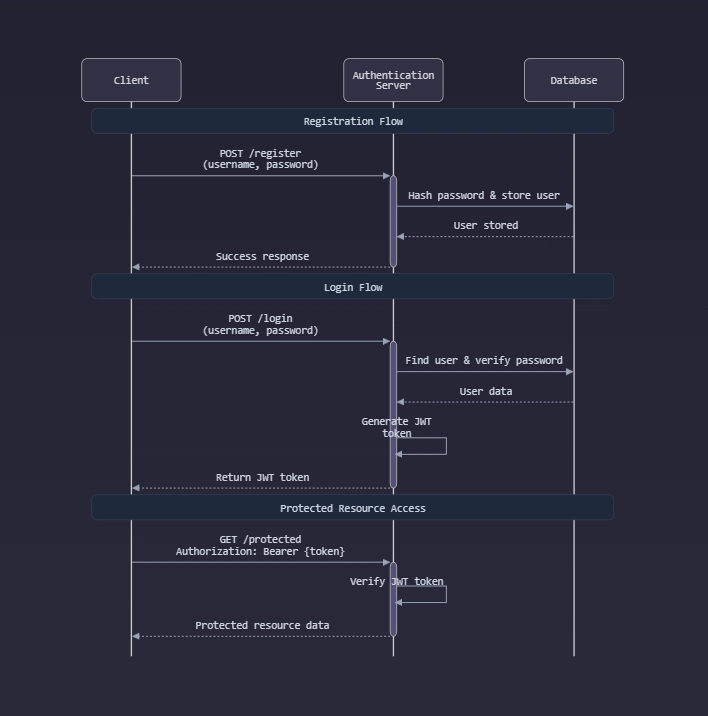
Authentication is a crucial aspect of backend development, ensuring secure access to resources. In this tutorial, we'll build a secure authentication system in Node.js using JSON Web Tokens (JWT).
Prerequisites
- 📌 Basic knowledge of JavaScript and Node.js
- 📌 Node.js installed on your system
- 📌 A package manager like npm or yarn
Step 1: Setting Up the Project
First, create a new Node.js project:
mkdir jwt-auth-system
cd jwt-auth-system
npm init -y
This initializes a new Node.js project with a default package.json file.
Next, install the required dependencies:
npm install express jsonwebtoken bcryptjs dotenv cors mongoose
Also, install nodemon for development:
npm install --save-dev nodemon
Step 2: Setting Up Express Server
Create an index.js file and set up a basic Express server:
require('dotenv').config();
const express = require('express');
const mongoose = require('mongoose');
const cors = require('cors');
const authRoutes = require('./routes/auth');

const app = express();
app.use(express.json());
app.use(cors());

mongoose.connect(process.env.MONGO_URI, {
  useNewUrlParser: true,
  useUnifiedTopology: true,
})
.then(() => console.log('MongoDB Connected'))
.catch(err => console.log(err));

app.use('/api/auth', authRoutes);

app.listen(5000, () => console.log('Server running on port 5000'));
Step 3: Creating User Model
Create a new folder models and a file User.js inside it:
const mongoose = require('mongoose');

const UserSchema = new mongoose.Schema({
  username: { type: String, required: true, unique: true },
  email: { type: String, required: true, unique: true },
  password: { type: String, required: true }
});

module.exports = mongoose.model('User', UserSchema);
Step 4: Implementing Authentication Routes
Create a routes folder and an auth.js file inside it:
const express = require('express');
const bcrypt = require('bcryptjs');
const jwt = require('jsonwebtoken');
const User = require('../models/User');

const router = express.Router();

// 📝 Register
router.post('/register', async (req, res) => {
  try {
    const { username, email, password } = req.body;
    const hashedPassword = await bcrypt.hash(password, 10);
    const newUser = new User({ username, email, password: hashedPassword });
    await newUser.save();
    res.status(201).json({ message: 'User registered successfully' });
  } catch (error) {
    res.status(500).json({ error: error.message });
  }
});

// 🔑 Login
router.post('/login', async (req, res) => {
  try {
    const { email, password } = req.body;
    const user = await User.findOne({ email });
    if (!user) return res.status(404).json({ message: 'User not found' });

    const isMatch = await bcrypt.compare(password, user.password);
    if (!isMatch) return res.status(400).json({ message: 'Invalid credentials' });

    const token = jwt.sign({ id: user._id }, process.env.JWT_SECRET, { expiresIn: '1h' });
    res.json({ token });
  } catch (error) {
    res.status(500).json({ error: error.message });
  }
});

module.exports = router;
Step 5: Protecting Routes
Create a middleware for authentication:
const jwt = require('jsonwebtoken');

const authMiddleware = (req, res, next) => {
  const token = req.header('Authorization');
  if (!token) return res.status(401).json({ message: 'Access denied' });

  try {
    const verified = jwt.verify(token, process.env.JWT_SECRET);
    req.user = verified;
    next();
  } catch (error) {
    res.status(400).json({ message: 'Invalid token' });
  }
};

module.exports = authMiddleware;
Step 6: Testing the API
Use Postman or any API testing tool to test:
- 📝 Register a user:
POST /api/auth/register - 🔑 Login a user:
POST /api/auth/login - 🔒 Access protected routes with the received token
Conclusion
✅ You've successfully built a secure authentication system in Node.js using JWT. This setup ensures users can securely authenticate and access protected resources.


Top comments (2)
Great explanation. Thanks for sharing.
No problem , always there to help . Feel free if you have any other doubt .