
Table of Contents
- Introduction
- Prerequisites
- Step 1: Configure the AWS CLI
- Step 2: Create a Terraform Configuration File
- Step 3: Initialize Terraform
- Step 4: Plan, Format, and Validate Configuration
- Step 5: Create the Infrastructure (EC2 instance)
- Step 6: Inspect and Verify the EC2 Instance
- Step 7: Delete the EC2 Instance (After Use)
- Conclusion
Introduction
It is important to have efficient cloud infrastructure management because it enhances the scalability, reliability, and also reduces the cost. Terraform and AWS CLI are great tools that allow you to automate and simplify the cloud resource provisioning process.
In this guide, we will guide you on how to set up an Amazon EC2 instance using Terraform and AWS CLI, how to define, deploy, and manage infrastructure as code. When you go through this tutorial, you will be able to set up an EC2 instance that is fully functional and be able to scale and automate the deployment process for future projects.
Prerequisites
Before setting up an EC2 instance with Terraform and AWS CLI, ensure you have the following:
AWS CLI Installed (Official documentation). Confirm installation by running the command below in your terminal:
aws --version
- Terraform Downloaded and Installed (Terraform’s official site). Confirm installation by running the command below in your terminal:
terraform --version
- A Code Editor and Terminal (VS Code, Vim, or any code editor with a terminal). We would be using VS Code in this tutorial.
After setting all these up, we can start managing and automating your AWS EC2 instance or any other infrastructure! 🚀
Step 1: Configure the AWS CLI
In your AWS account, click your Username at the top-right.
Select Security Credencials.
Click the Create access key button.
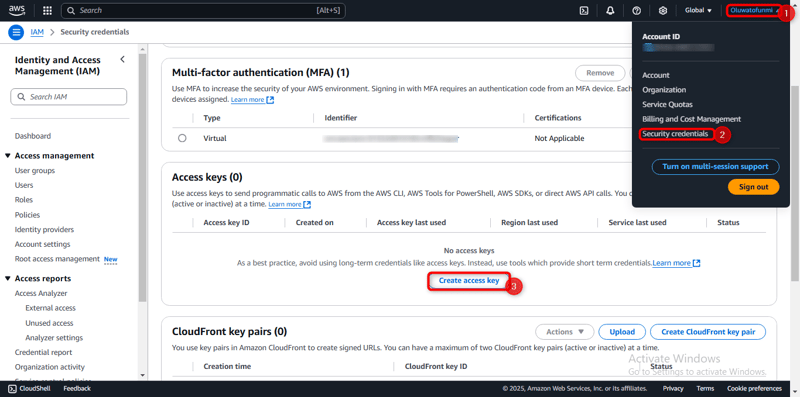
- Check the box and click the Create access key button, and then your keys will be created.


- Open your VS code terminal and enter the command below:
aws configure
- Now enter your access key ID and secret key.
Step 2: Create a Terraform Configuration File
- Create a working directory with the command:
mkdir terraform-ec2

- Change directory into it with the command:
cd terraform-ec2
- Create a Terraform file to define the infrastructure (main.tf):
touch main.tf
- Open
main.tfand paste in the configuration below, and save the file.
terraform {
  required_providers {
    aws = {
      source  = "hashicorp/aws"
      version = "~> 4.16"
    }
  }

  required_version = ">= 1.2.0"
}

provider "aws" {
  region  = "us-west-2"
}

resource "aws_instance" "app_server" {
  ami           = "ami-830c94e3"
  instance_type = "t2.micro"

  tags = {
    Name = "ExampleAppServerInstance"
  }
}

Step 3: Initialize Terraform
After the configuration has been created run the command below to initialize the directory:
terraform init

This downloads and installs the AWS plugins in the configuration
Step 4: Plan, Format, and Validate Configuration
- Preview the configuration plan with the command below:
terraform plan

- Format to automatically update the configurations in the
terraform-ec2directory for readability and consistency with the command:
terraform fmt
- Verify syntax and internal consistency of the configurations with the command:
terraform validate

Step 5: Create the Infrastructure (EC2 instance)
- Apply the configuration to create the EC2 instance with the command:
terraform apply

- Enter yes to confirm action.

Step 6: Inspect and Verify the EC2 Instance
- Inspect the current state of the Instance using the command:
terraform show

- To verify the instance navigate to the AWS Management Console in EC2 Dashboard. Make sure you're in the right region
us-west-2.

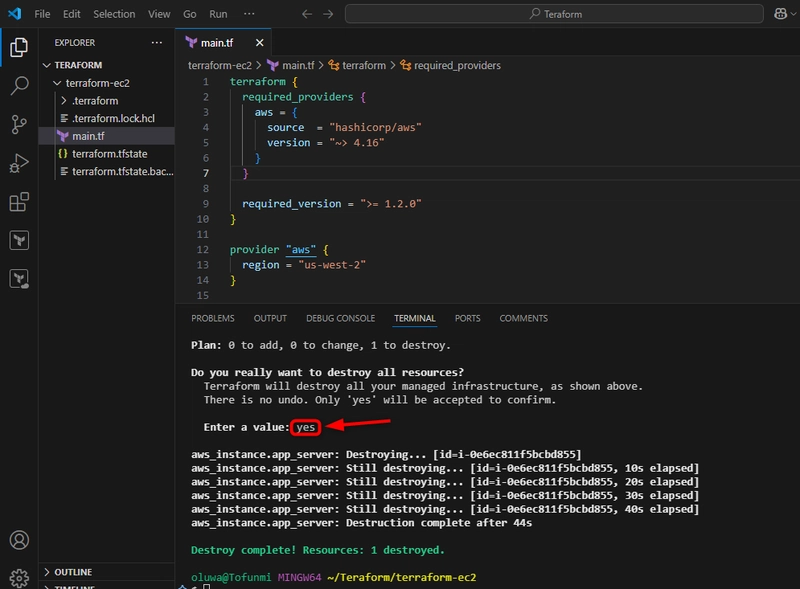
Step 7: Delete the EC2 Instance (After Use)
For best practice, you can destroy the instance and resources with the command:
terraform destroy

- Enter yes to confirm action.
Conclusion
After following all of these steps, you would have deployed an AWS EC2 instance with the use of Terraform and AWS CLI successfully.
NOTE: You can also SSH into the instance as long as you have a key pair associated with ssh -i my-key.pem ec2-user@<instance-public-ip>.
Thank you for reading my blog.😊😊
If you need further assistance, feel free to reach out in the comment or hit me up on Twitter. You can also follow me on GitHub. My DM's are open and love discussions on cloud topics!😁
Oluwatofunmi Emmanuel Oluwaloseyi


Top comments (0)