
TL;DR: This guide provides a step-by-step process for building a simple To-Do list application using the .NET MAUI framework. It details the creation of a data model and a view model to manage task information. The guide explains how to utilize the MAUI ListView control for displaying tasks and the MAUI Popup control for adding new ones. It also covers implementing features like editing, deleting, and reordering tasks within the application’s user interface.
Creating a robust and interactive To-Do app enhances how we manage daily tasks. In this guide, we’ll walk through developing a To-Do app using .NET MAUI’s ListView and Popup control, providing an interactive app to organize tasks effectively.
The Syncfusion .NET MAUI Popup control displays alert messages with customized buttons or a desired view inside a pop-up.
Let’s get started!
Step 1: Creating a data model
Create a simple data model class to hold the data values like content and status of a ToDoItem used as a simple data source for binding in SfListView
Refer to the following code example.
public class Model : INotifyPropertyChanged
{
    public string ToDoDetails
    {
        get
        {
            return _toDoContent;
        }
        set
        {
            _toDoContent = value;
            RaisePropertyChanged("ToDoDetails");
        }
    }

    public TaskStatus Status
    {
        get
        {
            return _taskStatus;
        }
        set
        {
            _taskStatus = value;
            RaisePropertyChanged("Status");
        }
    }
}
Step 2: Creating the ViewModel
Let’s create a ViewModel class that defines a ToDoItems collection and required ICommand properties such as AddCommand, DeleteCommand, and EditCommand to perform data manipulation such as add, remove, and modify on the ToDoItems collection.
Refer to the following example code.
public class ViewModel : INotifyPropertyChanged
{
    . . .
    . . .

    public ObservableCollection ToDoItems
    {
        get { return _toDoItems; }
        set { _toDoItems = value; }
    }

    public ICommand AddCommand
    {
        get; set;
    }

    public ICommand EditCommand
    {
        get; set;
    }

    public Command? DeleteCommand
    {
        get; set;
    }

    . . .
    . . .
}
Step 3: Defining UI to list to-do items
The .NET MAUI ListView presents data lists in either a vertical or horizontal orientation. This blog post provides instructions on how to get started with the SfListView component.
Next, install the required package and include the namespace for the ListView control.
Finally, initialize the ListView, bind the ViewModel’s ToDoItems collection, and define the ItemTemplate with custom views tailored to your needs for displaying data items.
Refer to the following example code.
xmlns:listView="clr-namespace:Syncfusion.Maui.ListView;assembly=Syncfusion.Maui.ListView"
. . .
. . .
<listView:SfListView x:Name="listView"
                     Grid.Row="1"
                     AutoFitMode="DynamicHeight"
                     ItemsSource="{Binding ToDoItems}">
    <listView:SfListView.ItemTemplate>
        <DataTemplate x:DataType="local:Model">
            <Border Stroke="Transparent"
                    Background="{Binding ItemBackground}"
                    Margin="10,5,10,5">
                . . .
                . . .
                . . .
                <Label
                    Text="{Binding ToDoDetails}"
                    TextColor="{Binding IsDone,Converter={StaticResource boolToColorConverter}}"
                    FontSize="{OnPlatform Default=18,WinUI=14}"
                    LineBreakMode="WordWrap"
                    VerticalTextAlignment="Center"
                    FontFamily="Roboto-Regular"/>
            </Border>
        </DataTemplate>
    </listView:SfListView.ItemTemplate>
</listView:SfListView>
Refer to the following image.

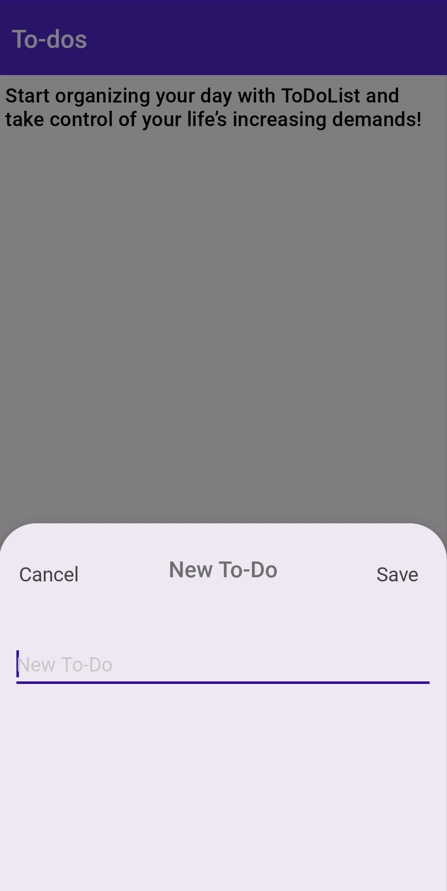
Step 4: Defining UI to create/add a new to-do item
In this application, the Button at the bottom displays the Popup view containing options to enter and save To-Do task details in the list upon clicking.
Initialize the .NET MAUI Button (SfButton) control and wire the Clicked event to display the Popup view.
Refer to the following example code.
xmlns:buttons="clr-namespace:Syncfusion.Maui.Buttons;assembly=Syncfusion.Maui.Buttons"
. . .
. . .
<buttons:SfButton x:Name="btnToDo"
                  HorizontalOptions="End"
                  VerticalOptions="End"
                  HeightRequest="60"
                  WidthRequest="60"
                  Margin="0,0,40,40"
                  CornerRadius="30"
                  Text="+"
                  FontSize="35">
</buttons:SfButton>
For a comprehensive guide, refer to this blogto get started with the .NET MAUI Popup control.
Install the required package and include the namespace for the .NET MAUI Popup control. Finally, initialize the Popup and define the HeaderTemplate and ContentTemplate based on your needs.
Refer to the following example code.
xmlns:popup="clr-namespace:Syncfusion.Maui.Popup;assembly=Syncfusion.Maui.Popup"
. . .
. . .
<popup:SfPopup x:Name="ToDoSheet"
               Grid.Row="1"
               IsOpen="{Binding IsOpen, Mode=TwoWay}"
               ShowHeader="True"
               ShowFooter="False"
               HeightRequest="300"
               AnimationMode="SlideOnBottom">
    <popup:SfPopup.PopupStyle>
        <popup:PopupStyle CornerRadius="30,30,0,0" HasShadow="True"/>
    </popup:SfPopup.PopupStyle>
    <popup:SfPopup.HeaderTemplate>
        <DataTemplate>
            <Grid ColumnDefinitions="0.2*,0.5*,0.2*">
                <buttons:SfButton Text="Cancel"
                                  Style="{StaticResource CommonButtonStyle}"
                                  VerticalTextAlignment="Center"
                                  HorizontalTextAlignment="Center">
                </buttons:SfButton>
                . . .
                . . .
                . . .
            </Grid>
        </DataTemplate>
    </popup:SfPopup.HeaderTemplate>

    <popup:SfPopup.ContentTemplate>
        <DataTemplate>
            <StackLayout VerticalOptions="Fill">
                <Editor Placeholder="{Binding PlaceHolderText}"
                        Text="{Binding CurrentText}"
                        FontSize="16"
                        FontFamily="Roboto-Regular"
                        AutoSize="TextChanges"
                        VerticalOptions="StartAndExpand"
                        Margin="10,20,10,20"/>
            </StackLayout>
        </DataTemplate>
    </popup:SfPopup.ContentTemplate>
</popup:SfPopup>
Refer to the following image.
In this application, we have additionally included the logic to edit items, mark them as Done, reorder them via drag-and-drop, automatically sort them by task status, and delete items by swiping on a specific item within the ListView control.
The final output will resemble the following image.

GitHub reference
For more details, refer to create ToDo list application using .NET MAUI ListView.
Conclusion
Thanks for reading! This guide empowers you to create a dynamic To-Do app using Syncfusion .NET MAUI’s ListView and Popup control, enhancing task management and user interactivity. Try out the steps in this blog and leave your feedback in the comments section below!
Existing customers can access the new version of Essential Studio® on the License and Downloads page. If you aren’t a Syncfusion customer, try our 30-day free trial to experience our fantastic features.
If you have any questions or require assistance, you can contact us through our support forums, support portal, or feedback portal. We are always happy to assist you!
Related Blogs
- .NET MAUI in .NET 10 Preview: A Focus on Quality and the Developer Experience
- Visualize Multi-Dimensional Data Using the .NET MAUI Parallel Coordinate Chart
- Save Chat History to Firebase Realtime Database using the .NET MAUI Chat Control
- Create 3D Column Charts in .NET MAUI to Display America’s Top 10 Sports


Top comments (0)