
When you’re building an app, one of the first challenges is figuring out how to handle user authentication. Should you build it yourself? Use a library? How do you handle password resets, security, and all the little edge cases?
That’s where Okta comes in. It’s a platform that helps manage identity and access so you can focus on building your app. Here’s what I learned as I set it up for the first time.
🔍 What is Okta?
Okta is a service that helps you:
• Let users log in with Single Sign-On (SSO)
• Add Multi-Factor Authentication (MFA)
• Manage who has access to what
Basically, Okta makes it easier and safer to handle user identities.
Step 1: Creating a Free Okta Developer Account
Start by going to developer.okta.com and creating a free account. No credit card required.
Once you sign up, you’ll get your own Okta domain, like:
https://dev-123456.okta.com
Tip: Bookmark this, it’s where you’ll manage your users and apps.
Step 2: Setting Up a New App
In your Okta dashboard:
1. Go to Applications and click Create App Integration

2. Choose OIDC - OpenID Connect
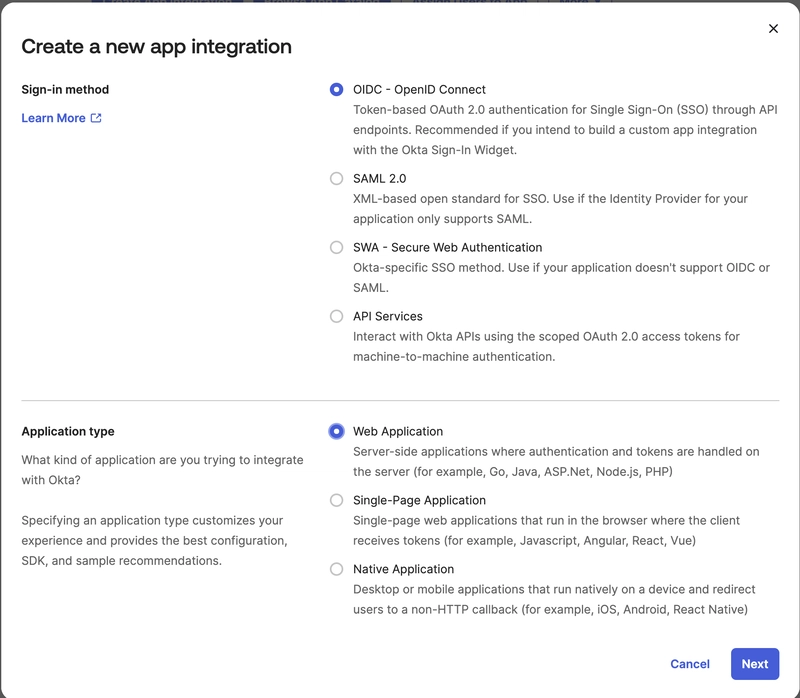
3. Pick Web as your platform
Add your redirect URI, like:
http://localhost:3000/callback
Okta then gives you:
• Client ID
• Client Secret
• Issuer URL
These are the details you’ll need to connect your app.

🔐 Step 3: Connecting Okta to a Node.js App
To set up authentication in a Node.js + Express app, we’ll use @okta/okta-oidc-middleware. This middleware handles login, logout, and session management for you.
Install the Required Packages
npm install express express-session @okta/okta-sdk-node @okta/okta-oidc-middleware
Here’s a quick sample Express App Configuration example:
const express = require('express');
const session = require('express-session');
const { ExpressOIDC } = require('@okta/okta-oidc-middleware');

const app = express();

app.use(session({
  secret: 'a long, random string',
  resave: true,
  saveUninitialized: false
}));

const oidc = new ExpressOIDC({
  issuer: 'https://{yourOktaDomain}/oauth2/default',
  client_id: '{yourClientId}',
  client_secret: '{yourClientSecret}',
  redirect_uri: 'http://localhost:3000/authorization-code/callback',
  scope: 'openid profile email'
});

app.use(oidc.router);

app.get('/', (req, res) => res.send('Home Page'));
app.get('/protected', oidc.ensureAuthenticated(), (req, res) => res.send('Protected Route'));

oidc.on('ready', () => {
  app.listen(3000, () => console.log('App is running on http://localhost:3000'));
});

oidc.on('error', err => {
  console.error('OIDC error:', err);
});
This setup allows your app to:
Redirect users to log in
Handle callbacks securely
Protect specific routes like /protected
🔄 Step 4: Trying It Out
After setting up the code, create a few test users in the Okta dashboard and try logging in.
✅ You should see:
A secure login redirect
Session handling
Profile info available in your app
Okta’s admin dashboard lets you view activity, manage users, and tweak policies as needed.
The Okta Dashboard

🤔 Final Thoughts
I expected a tricky setup, but Okta turned out to be beginner-friendly with great docs. Within an hour, I had a secure login flow up and running.
If you’re building an app and want secure login without the headache, Okta is definitely worth a look.
🚀 What’s Next?
Now that the basics are in place, I'm excited to dig deeper into what Okta can really do. Here's what I'm exploring next:
🔐 Multi-Factor Authentication (MFA): Enabling stronger security using push notifications, TOTP, or biometric prompts.
⚙️ Role-Based Access Control (RBAC): Managing access to routes and resources based on user roles or groups.
⚛️ Integrating with React: Building a modern frontend using Okta's React SDK for seamless login experiences.
🔄 Token Handling & Refresh: Implementing secure access token flows, silent refresh, and handling token expiration gracefully.
🧩 API Authorization: Using Okta to secure backend APIs with access tokens and scopes.
Each of these adds more depth, power, and security to your app. I’ll be sharing more detailed walkthroughs as I tackle them, so stay tuned!
🏷️ Tags


Top comments (0)