Tutorial for 'Pure CSS Range Slider with custom variables'

Please follow me on Instagram and Youtube for the latest and more detailed CSS updates!
Let's Begin! Create img element and 3 range sliders
Image Element
<img src="img/1.jpg" alt="">Sliders
Each slider is enclosed in a<div>with a class for styling and functionality.
- Slider 1: Alpha (Transparency)
- Slider 2: Color Adjustment
- Slider 3: Border Thickness
Below is the html code
<img class="image" src="img/1.jpg" alt="">

<div class="slider slider1">
    <input type="range" name="alpha" value="100"
        style="--img:--_a"><span></span>
</div>
<div class="slider slider2">
    <input type="range" name="color" value="50"
        style="--img:--_c"><span></span>
</div>

<div class="slider slider3">
    <input type="range" name="border" value="100"
        style="--img:--_b"><span></span>
</div>
We have assigned custom variables to every range slider:
--img:a affects opacity
--img:c affects filter like : grayscale() hue-rotate(), contrast() etc
--img:b changes border-width
CSS
Let's create @property CSS for alpha(opacity) which defines custom properties (CSS variables) with specific types, inheritance behavior, and default values. Let's create for --_a(alpha), --_c(color), --_b(border).
Also the following CSS code snippet defines a custom property (--alpha) that dynamically interpolates between a minimum (--alpha-min) and maximum (--alpha-max) value based on a control variable (--_a). So lets make it for --color and --border too.
Also create @keyframes for variables --_a, --_c, --_b by assigning at (0%), setting it to 1.
@property --_a {
    syntax: "<number>";
    inherits: true;
    initial-value: 0;
}
@property --_c {
    syntax: "<number>";
    inherits: true;
    initial-value: 0;
}
@property --_b {
    syntax: "<number>";
    inherits: true;
    initial-value: 0;
}

:root {
    /* alpha */
    --alpha-min: 0; --alpha-max: 1;
    --alpha: calc(var(--alpha-max) * var(--_a) +
              var(--alpha-min) * (1 - var(--_a)));

    /* color */
    --color-min: 1; --color-max: 0;
    --color: calc(var(--color-max) * var(--_c) +
              var(--color-min) * (1 - var(--_c)));

    /* border */
    --border-min: 0; --border-max: 50;
    --border: calc(var(--border-max) * var(--_b) +
              var(--border-min) * (1 - var(--_b)));

   timeline-scope: --_a, --_c, --_b;
   animation: linear both;
   animation-timeline: --_a, --_c, --_b;
   animation-name: --_a, --_c, --_b;
   animation-range: entry 100% exit 0%;
}

@keyframes --_a { 0% { --_a: 1 }}
@keyframes --_c { 0% { --_c: 1 }}
@keyframes --_b { 0% { --_b: 1 }}
Let's create page styling with below CSS
body {
    display: flex;
    flex-direction: column;
    align-items: center;
    justify-content: center;
    height: 100vh;
    background: lab(30 9.9 -22.11);
    font-family: -apple-system, BlinkMacSystemFont, 'Segoe UI', Roboto,
    Helvetica, Arial, sans-serif, 'Apple Color Emoji', 'Segoe UI Emoji',
    'Segoe UI Symbol';
    color: bisque;
    font-size: 20px;
    font-weight: 500;
    line-height: 1.6;
}

h2 { font-size: 50px}

.slider {
    position: relative;
    width: 300px;
    margin-top: 50px;
    background: white;
    height: 10px;
    border-radius: 5px;
}

.slider1 span,
.slider2 span,
.slider3 span {
    position: absolute;
    left: -140px;
    top: -10px;
    width: 125px;
    text-align: right;
    color: bisque;
}

input[type="range"] {
    overflow: hidden;
    position: absolute;
    top: -7px;
    left: -2px;
    width: 300px;
    background: transparent;
    -webkit-appearance: none;
}

input[type="range"]::-webkit-slider-thumb {
    width: 20px;
    height: 20px;
    border-radius: 50%;
    cursor: pointer;
    -webkit-appearance: none;
    background: rgb(244, 114, 166);
    view-timeline: var(--img) inline;
}

input[type="range"]::-moz-slider-thumb {
    view-timeline: var(--img) inline;
}

.slider1 span:before {
    content:'alpha(' counter(a) '%)';
    counter-reset: a calc(var(--alpha) / 0.01);
}

.slider2 span:before {
    content:'color(' counter(b) '%)';
    counter-reset: b calc(100 * (1 - var(--color)));
}

.slider3 span:before {
    content:'border(' counter(c) '%)';
    counter-reset: c var(--border);
}
Now let's assign the custom variables to image to control opacity, color and border.
.image {
    width: 300px;
    border: 5px solid bisque;
    filter: opacity(var(--alpha))
            grayscale(var(--color));
    border-radius: calc(var(--border) * 1%);
}
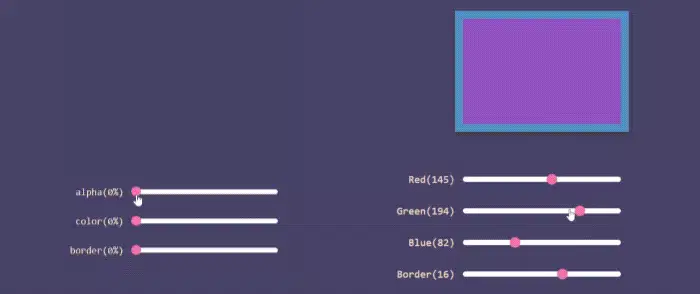
Result
Please follow me on Instagram and Youtube for the latest and more detailed CSS updates!
watch Codepen Demo


Top comments (0)