
Introduction
We will demonstrate how Jenkins can automate the build and test processes for a Node.js and React application using npm, while enabling distinct workflows for development and production environments.
Requirements
- Jenkins installation
- Docker
- Docker compose
- Git and optionally GitHub Desktop
- VS Code
Fork and Clone sample repository

- Click create a new fork
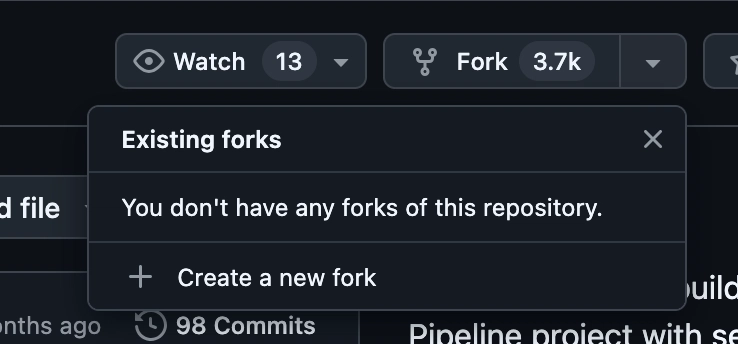
Click create fork


Open VS code and create a folder. cd into the folder by running the following command:
mkdir [folder-name]
cd [folder-name]

- To clone the repo, run the following command:
git clone [HTTPS URL]

- To get the HTTPS URL, click Code in your forked repo in your GitHub and copy the HTTPS URL.

Create development and production branches in your repository
Before setting up your Pipeline project in Jenkins, create development and production branches in your locally cloned Git repository. You’ll use a single Jenkinsfile—initially placed in the master branch—which will later be merged into the other branches. This file will contain conditional logic to execute specific pipeline stages based on the branch Jenkins is building from.
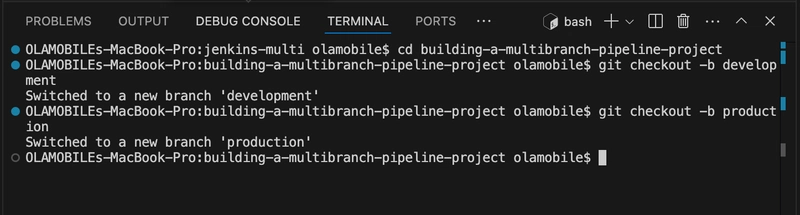
- Within the building-a-multibranch-pipeline-project directory, create two branches i.e. development and production by running the following command:
git checkout -b development
git checkout -b production
Change to building-a-multibranch-pipeline-project directory by running
cd building-a-multibranch-pipeline-project

- Push the development branch and set it to track the remote branch:
git push -u origin development

- Push the production branch and set it to track the remote branch:
git push -u origin production

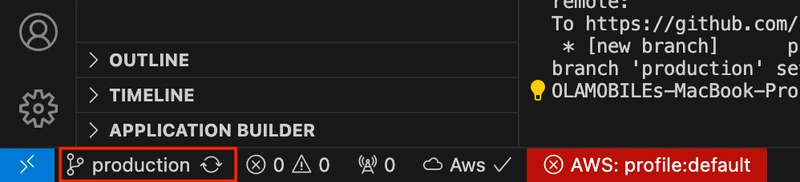
You can confirm your current branch by checking the left hand corner as shown.
- Get back to the master branch:
git checkout master
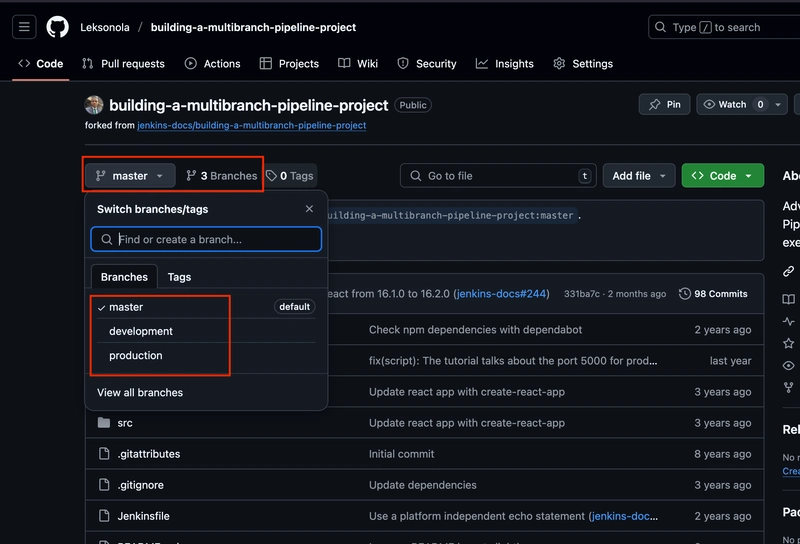
- Check that these branches now exist by running the command:
git branch

- Also confirm that the branches has been pushed successfully to your GitHub
Start your Jenkins controller
- Obtain the latest Jenkins deployment, customized for this tutorial, by cloning the quickstart-tutorials repository

- After cloning, navigate to the quickstart-tutorials directory, and execute the command:
docker compose --profile multi up -d

N.B: Make sure that Docker Desktop is running before executing this command.

- Open a new browser and enter http://localhost:8080/

Create a Multi-branch Pipeline Project
- Login to your Jenkins, use admin as username and admin as password.

- Enter a name for your pipeline and select Multibranch pipeline. Click OK after.

- Enter a Display name

- Click Add source under Branch Sources and select GitHub.

- In the GitHub section, paste the HTTPS URL of your GitHub repo. Click validate and Save after.

- Jenkins will now scan your remote repository for branches and create a Pipeline for each branch that contains a Jenkinsfile.

- Jenkins has successfully detected all three branches of your repository, and there are currently no open pull requests.
- To proceed, scroll up and select "Building a Multibranch Pipeline Project" to return to the main dashboard of your newly created Multibranch Pipeline project.

- Jenkins found a Jenkinsfile in each branch, and it has already built each branch.
Create your initial Pipeline as a Jenkinsfile with build and test stages
You are now prepared to create the Jenkins Pipeline that will automate building your Node.js and React application. This Pipeline will be defined in a Jenkinsfile that you'll commit to the master branch of your forked and locally cloned Git repository (building-a-multibranch-pipeline-project).
We will begin by creating a basic Pipeline in Jenkins to build your Node.js and React application.
- Open the existing Jenkinsfile at the root of your local building-a-multibranch-pipeline-project Git repository in your VS code and clear its contents entirely. Make sure you’re working on the master branch of your repository when performing this step.
- Copy the following Declarative Pipeline code and paste it into your empty Jenkinsfile:
pipeline {
    agent any
    environment {
        CI = 'true'
    }
    stages {
        stage('Build') {
            steps {
                sh 'npm install'
            }
        }
        stage('Test') {
            steps {
                sh './jenkins/scripts/test.sh'
            }
        }
    }
}

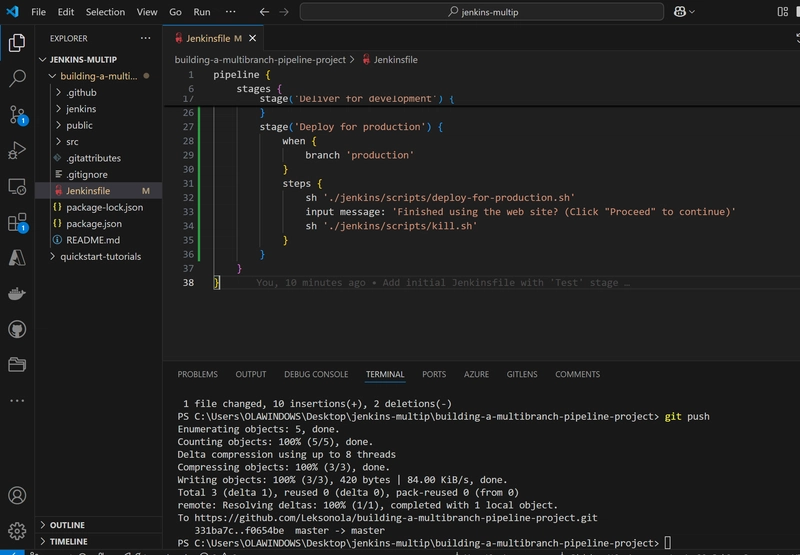
- Save your edited Jenkinsfile and commit it to your local building-a-multibranch-pipeline-project Git repository. Run the commands:
git add Jenkinsfile
then
git commit -m "Add initial Jenkinsfile with 'Test' stage"
and finally
git push
to push your changes to your forked repository on GitHub, so it can be picked up by Jenkins.

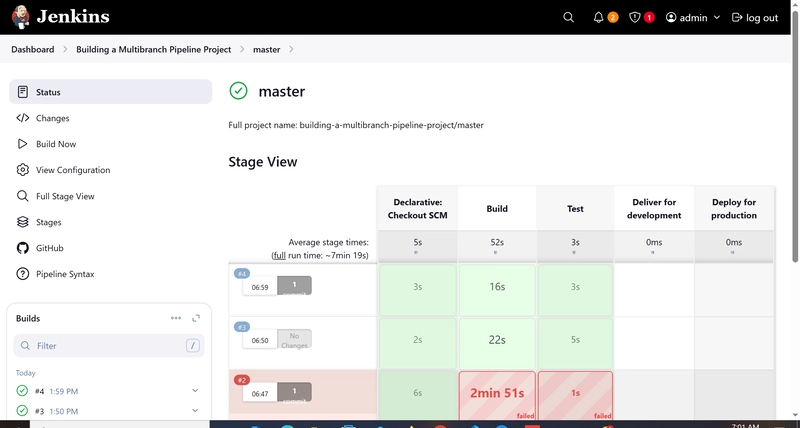
- Head back Jenkins UI and click the green triangle in front of master branch.

- Click on master to see the new pipeline built.

- Click #2, in my case it is #3 because my second build failed due to network.

- Click Pipeline overview on the left to view the Pipeline stages.

- Click Test, then the green section to view the stage details.


Add deliver and deploy stages to your Pipeline.
Next, add the Deliver for Development and Deploy for Production stages to your Pipeline. Jenkins will execute these stages selectively based on the branch it is building from.
- Return to your VS Code and open your Jenkinsfile.
- Copy and paste the following Declarative Pipeline syntax immediately below the Test stage in your Jenkinsfile:
stage('Deliver for development') {
            when {
                branch 'development'
            }
            steps {
                sh './jenkins/scripts/deliver-for-development.sh'
                input message: 'Finished using the web site? (Click "Proceed" to continue)'
                sh './jenkins/scripts/kill.sh'
            }
        }
        stage('Deploy for production') {
            when {
                branch 'production'
            }
            steps {
                sh './jenkins/scripts/deploy-for-production.sh'
                input message: 'Finished using the web site? (Click "Proceed" to continue)'
                sh './jenkins/scripts/kill.sh'
            }
        }
Your new Jenkinsfile should look like this:
pipeline {
    agent any
    environment {
        CI = 'true'
    }
    stages {
        stage('Build') {
            steps {
                sh 'npm install'
            }
        }
        stage('Test') {
            steps {
                sh './jenkins/scripts/test.sh'
            }
        }
        stage('Deliver for development') {
            when {
                branch 'development'
            }
            steps {
                sh './jenkins/scripts/deliver-for-development.sh'
                input message: 'Finished using the web site? (Click "Proceed" to continue)'
                sh './jenkins/scripts/kill.sh'
            }
        }
        stage('Deploy for production') {
            when {
                branch 'production'
            }
            steps {
                sh './jenkins/scripts/deploy-for-production.sh'
                input message: 'Finished using the web site? (Click "Proceed" to continue)'
                sh './jenkins/scripts/kill.sh'
            }
        }
    }
}
- Save your edited Jenkinsfile and commit it to your local building-a-multibranch-pipeline-project Git repository on VS code using the command:
git add .

git commit -m "Add 'Deliver...' and 'Deploy...' stages"

git push

This will push your changes to your forked repository on GitHub, allowing Jenkins to detect and process them.
- Head back to Jenkins UI. Click Building a Multibranch Pipeline Project to access the main page of your Multibranch Pipeline project.
- Click the run icon of the master branch of your Pipeline project.

- Click on master to see a new pipeline being built.
- Click the build number to see details of the build and select Pipeline overview.

- Notice that Jenkins skips the last two stages because the current branch (master) doesn’t meet the branch conditions defined in their when directives.
Pull your updated Jenkinsfile into the other repository branches
- Now that your Jenkinsfile is complete and ready to build your application in Jenkins, you can pull this file from the master branch of your local repository into the development and production branches.
- Head back to your VS Code and run the following command to pull changes from master to development.
git checkout development

git pull . master

git push
This will push your changes to your forked repository on GitHub, allowing Jenkins to detect and process them.

- Repeat the command again but this time around on the production branch by using
git checkout production
Your development and production branches should now include all the Jenkinsfile updates made in the master branch.

Run your Pipeline on the development branch
- Head over to Jenkins UI and navigate to Building a Multibranch Pipeline Project.
- Click the Run icon next to the development branch of your Pipeline project on the far right to watch Jenkins build the development branch using the updated Jenkinsfile.

- Select development to view the new Pipeline being built.

- Select the build number and then click Pipeline overview.

- Select the Deliver for Development stage, then click the top green Shell Script step to expand its contents. Scroll down until you find the http://localhost:3000 link.

- Once you are done viewing the page/site, return to the Jenkins UI, select the latest build number and then click Paused for Input on the left-hand side.

- Select the Proceed button to complete the Pipeline's execution.

- Once more, select the last build number and then Pipeline overview on the left hand side to see the stages of the pipeline.

- Notice that the Deliver for Development stage was executed, while the Deploy for Production stage was skipped, as it did not meet the branch conditions specified in the when directive.
Run your Pipeline on the production branch
- Head back to Jenkins UI and select Building a Multibranch Pipeline Project.

- Click the Run icon of the production branch.

- Select production to see a new Pipeline being built.

- Select #2 and then Pipeline overview on the left.

- Select the Deploy for production stage and then the top green shell script step to expand its content and scroll down until you see the http://localhost:5000 link.


- Once you are done viewing the page/site, return to the Jenkins UI, select the latest build number and then click Paused for Input on the left-hand side.
- Select the Proceed button to complete the Pipeline's execution.

- Once more, select the last build number and then Pipeline overview on the left hand side to see the stages of the pipeline.

- The 'Deploy for production' stage succeeds (green) when Jenkins builds your Node.js and React app from the production branch. Note that while this stage runs, the 'Deliver for development' stage is skipped automatically.


Top comments (0)