
Optical Character Recognition (OCR) has come a long way from simply pulling raw text out of images, and Nanonets-OCR-s is the perfect proof. This cutting-edge image-to-markdown OCR model doesn’t just extract content, it transforms documents into semantically rich, structured markdown that’s ready for downstream use by Large Language Models (LLMs). If you're working with academic papers, legal contracts, business reports, or scanned forms, Nanonets-OCR-s ensures your image or PDF data is perfectly readable even in HTML/markdown formats and it's contextually understood. With features like LaTeX equation recognition (handling both inline and block-level math), intelligent image description using structured tags, and powerful table extraction in markdown/HTML formats, this model offers precision and structure at an unmatched level. It even handles special elements like checkboxes, watermarks, and signatures with semantic tagging that makes them machine-friendly and human-readable.
If you're building AI pipelines, automating document workflows, or just looking for beautifully structured OCR output, installing Nanonets-OCR-s locally or on the cloud is a game-changer worth exploring. In this guide, we'll dive into the same.
Prerequisites
The minimum system requirements for running this model are:
GPU: 1x RTX3090 or 1xRTX4090
Storage: 20GB (preferable)
VRAM: At least 16GB
Step-by-step process to install and run Nanonets-OCR-s
For the purpose of this tutorial, we’ll use a GPU-powered Virtual Machine by NodeShift since it provides high compute Virtual Machines at a very affordable cost on a scale that meets GDPR, SOC2, and ISO27001 requirements. Also, it offers an intuitive and user-friendly interface, making it easier for beginners to get started with Cloud deployments. However, feel free to use any cloud provider of your choice and follow the same steps for the rest of the tutorial.
Step 1: Setting up a NodeShift Account
Visit app.nodeshift.com and create an account by filling in basic details, or continue signing up with your Google/GitHub account.
If you already have an account, login straight to your dashboard.

Step 2: Create a GPU Node
After accessing your account, you should see a dashboard (see image), now:
1) Navigate to the menu on the left side.
2) Click on the GPU Nodes option.
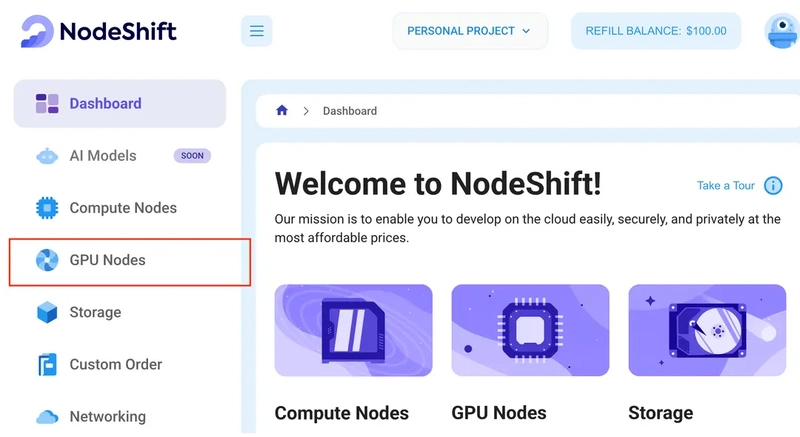
3) Click on Start to start creating your very first GPU node.
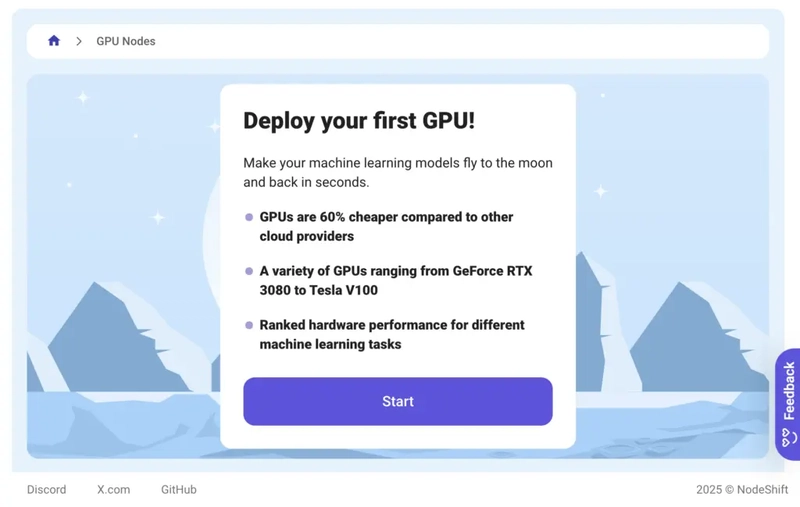
These GPU nodes are GPU-powered virtual machines by NodeShift. These nodes are highly customizable and let you control different environmental configurations for GPUs ranging from H100s to A100s, CPUs, RAM, and storage, according to your needs.
Step 3: Selecting configuration for GPU (model, region, storage)
1) For this tutorial, we’ll be using 1x RTX A6000 GPU, however, you can choose any GPU as per the prerequisites.
2) Similarly, we’ll opt for 200GB storage by sliding the bar. You can also select the region where you want your GPU to reside from the available ones.

Step 4: Choose GPU Configuration and Authentication method
1) After selecting your required configuration options, you'll see the available GPU nodes in your region and according to (or very close to) your configuration. In our case, we'll choose a 1x RTX A6000 48GB GPU node with 64vCPUs/63GB RAM/200GB SSD.

2) Next, you'll need to select an authentication method. Two methods are available: Password and SSH Key. We recommend using SSH keys, as they are a more secure option. To create one, head over to our official documentation.

Step 5: Choose an Image
The final step is to choose an image for the VM, which in our case is Nvidia Cuda.

That's it! You are now ready to deploy the node. Finalize the configuration summary, and if it looks good, click Create to deploy the node.


Step 6: Connect to active Compute Node using SSH
1) As soon as you create the node, it will be deployed in a few seconds or a minute. Once deployed, you will see a status Running in green, meaning that our Compute node is ready to use!
2) Once your GPU shows this status, navigate to the three dots on the right, click on Connect with SSH, and copy the SSH details that appear.

As you copy the details, follow the below steps to connect to the running GPU VM via SSH:
1) Open your terminal, paste the SSH command, and run it.
2) In some cases, your terminal may take your consent before connecting. Enter ‘yes’.
3) A prompt will request a password. Type the SSH password, and you should be connected.
Output:

Next, If you want to check the GPU details, run the following command in the terminal:
!nvidia-smi
Step 7: Set up the project environment with dependencies
1) Create a virtual environment using Anaconda.
conda create -n ocr python=3.11 -y && conda activate ocr
Output:

2) Once you're inside the environment, install necessary dependencies to run the model.
pip install torch torchvision torchaudio einops timm pillow
pip install git+https://github.com/huggingface/transformers
pip install git+https://github.com/huggingface/accelerate
pip install git+https://github.com/huggingface/diffusers
pip install huggingface_hub
pip install sentencepiece bitsandbytes protobuf decord numpy
Output:

3) Install and run jupyter notebook.
conda install -c conda-forge --override-channels notebook -y
conda install -c conda-forge --override-channels ipywidgets -y
jupyter notebook --allow-root
4) If you're on a remote machine (e.g., NodeShift GPU), you'll need to do SSH port forwarding in order to access the jupyter notebook session on your local browser.
Run the following command in your local terminal after replacing:
<YOUR_SERVER_PORT> with the PORT allotted to your remote server (For the NodeShift server - you can find it in the deployed GPU details on the dashboard).
<PATH_TO_SSH_KEY> with the path to the location where your SSH key is stored.
<YOUR_SERVER_IP> with the IP address of your remote server.
ssh -L 8888:localhost:8888 -p <YOUR_SERVER_PORT> -i <PATH_TO_SSH_KEY> root@<YOUR_SERVER_IP>
Output:

After this copy the URL you received in your remote server:

And paste this on your local browser to access the Jupyter Notebook session.
Step 8: Download and Run the model
1) Open a Python notebook inside Jupyter.

2) Download model checkpoints and run the model for inference.
from PIL import Image
from transformers import AutoTokenizer, AutoProcessor, AutoModelForImageTextToText

model_path = "nanonets/Nanonets-OCR-s"

model = AutoModelForImageTextToText.from_pretrained(
    model_path,
    torch_dtype="auto",
    device_map="auto",
)
model.eval()

tokenizer = AutoTokenizer.from_pretrained(model_path)
processor = AutoProcessor.from_pretrained(model_path)


def ocr_page_with_nanonets_s(image_path, model, processor, max_new_tokens=4096):
    prompt = """Extract the text from the above document as if you were reading it naturally. Return the tables in html format. Return the equations in LaTeX representation. If there is an image in the document and image caption is not present, add a small description of the image inside the <img></img> tag; otherwise, add the image caption inside <img></img>. Watermarks should be wrapped in brackets. Ex: <watermark>OFFICIAL COPY</watermark>. Page numbers should be wrapped in brackets. Ex: <page_number>14</page_number> or <page_number>9/22</page_number>. Prefer using ☐ and ☑ for check boxes."""
    image = Image.open(image_path)
    messages = [
        {"role": "system", "content": "You are a helpful assistant."},
        {"role": "user", "content": [
            {"type": "image", "image": f"file://{image_path}"},
            {"type": "text", "text": prompt},
        ]},
    ]
    text = processor.apply_chat_template(messages, tokenize=False, add_generation_prompt=True)
    inputs = processor(text=[text], images=[image], padding=True, return_tensors="pt")
    inputs = inputs.to(model.device)

    output_ids = model.generate(**inputs, max_new_tokens=max_new_tokens, do_sample=False)
    generated_ids = [output_ids[len(input_ids):] for input_ids, output_ids in zip(inputs.input_ids, output_ids)]

    output_text = processor.batch_decode(generated_ids, skip_special_tokens=True, clean_up_tokenization_spaces=True)
    return output_text[0]

image_path = "ocr-test-1.png"
result = ocr_page_with_nanonets_s(image_path, model, processor, max_new_tokens=15000)
print(result)
Here’s the output generated by the model for the given image:

Output:


This is how the above generated HTML code would look once rendered as web page:

Conclusion
In this guide, we explored how Nanonets-OCR-s redefines OCR by not only extracting text but also adding semantic structure through intelligent features like LaTeX formatting, image tagging, signature detection, and complex table parsing. This makes it an invaluable tool for AI workflows, especially those involving LLMs. If you're deploying locally for maximum control or scaling in the cloud for performance and collaboration, NodeShift Cloud offers the intuitive, and simple to use infrastructure, making setup seamless, resource management effortless, and deployment production-ready. Combining the power of Nanonets-OCR-s with the flexibility of NodeShift ensures you can build smarter, faster, and more scalable document processing pipelines.
For more information about NodeShift:


Top comments (0)
Some comments may only be visible to logged-in visitors. Sign in to view all comments.