1.Entity:
package com.example.demo.entity;

import jakarta.persistence.Entity;
import jakarta.persistence.GeneratedValue;
import jakarta.persistence.GenerationType;
import jakarta.persistence.Id;
import jakarta.persistence.Table;
import lombok.AllArgsConstructor;
import lombok.Getter;
import lombok.NoArgsConstructor;


@Entity
@NoArgsConstructor
@AllArgsConstructor
@Getter
@Table(name="product")
public class Product {
    @Id
    @GeneratedValue(strategy=GenerationType.IDENTITY)
    private Long id;
    public Long getId() {
        return id;
    }
    public void setId(Long id) {
        this.id = id;
    }
    public String getName() {
        return name;
    }
    public void setName(String name) {
        this.name = name;
    }
    public String getDescription() {
        return description;
    }
    public void setDescription(String description) {
        this.description = description;
    }
    public String getImg() {
        return img;
    }
    public void setImg(String img) {
        this.img = img;
    }
    public Integer getRating() {
        return rating;
    }
    public void setRating(Integer rating) {
        this.rating = rating;
    }
    public Integer getStock() {
        return stock;
    }
    public void setStock(Integer stock) {
        this.stock = stock;
    }
    public Long getPrice() {
        return price;
    }
    public void setPrice(Long price) {
        this.price = price;
    }
    private String name, description, img;
    private Integer rating, stock;
    private Long price;

}
2.repository:
package com.example.demo.repository;

import org.springframework.data.jpa.repository.JpaRepository;
import org.springframework.stereotype.Repository;

import com.example.demo.entity.Product;

@Repository
public interface ProductRepository extends
JpaRepository<Product, Long>{

}
3.Service:
package com.example.demo.service;

import java.util.List;

import org.springframework.stereotype.Service;

import com.example.demo.entity.Product;
import com.example.demo.repository.ProductRepository;

@Service
public class ProductService {

    private final ProductRepository repository;

    public ProductService(ProductRepository repository)
    {
        this.repository = repository;
    }

    public List<Product> getAllProducts()
    {
        return repository.findAll();
    }
    public Product addProduct(Product product)
    {
        return repository.save(product);
    }

}
4.Controller:
package com.example.demo.controller;

import java.util.List;

import org.springframework.web.bind.annotation.GetMapping;
import org.springframework.web.bind.annotation.PostMapping;
import org.springframework.web.bind.annotation.RequestBody;
import org.springframework.web.bind.annotation.RequestMapping;
import org.springframework.web.bind.annotation.RestController;

import com.example.demo.entity.Product;
import com.example.demo.service.ProductService;

@RestController
@RequestMapping("/api/products")
public class ProductController {

    private final ProductService service;

    public ProductController(ProductService service)
    {
        this.service = service;
    }

    @GetMapping
    public List<Product> showAllProducts()
    {
        return service.getAllProducts();
    }

    @PostMapping
    public Product addProduct(@RequestBody Product product)
    {
        return service.addProduct(product);
    }

}
neelakandan@neelakandan-HP-Laptop-15s-eq2xxx:~$ sudo -i -u postgres
[sudo] password for neelakandan:
postgres@neelakandan-HP-Laptop-15s-eq2xxx:~$ psql
psql (16.8 (Ubuntu 16.8-0ubuntu0.24.04.1))
Type "help" for help.

postgres=# \c ecommerce
You are now connected to database "ecommerce" as user "postgres".
ecommerce=# \d
             List of relations
 Schema |      Name      |   Type   | Owner
--------+----------------+----------+-------
 public | cart           | table    | ecom3
 public | cart_id_seq    | sequence | ecom3
 public | payment        | table    | ecom3
 public | payment_id_seq | sequence | ecom3
 public | product        | table    | ecom3
 public | product_id_seq | sequence | ecom3
(6 rows)

ecommerce=# \d product
ecommerce=# SELECT * FROM product
ecommerce-# SELECT * FROM product
ecommerce-# \l
ecommerce-# ^C

ecommerce=# SELECT * FROM product;
 id | description |  img   |  name  | price | rating | stock
----+-------------+--------+--------+-------+--------+-------
  1 | Good prod   | link-1 | prod-1 | 10000 |      4 |    10
(1 row)

ecommerce=#
ERROR:  database "ecommerce" is being accessed by other users
DETAIL:  There are 10 other sessions using the database.

**
*Create file called APP.js and base below code *
import logo from './logo.svg';
import './App.css';
import ProductCard from './components/ProductCard';
import { getProducts } from './api';
import { useEffect, useState } from 'react';

function App() {

  const [productList,setProductList]  = useState([]);

  useEffect(()=>{
    getProducts()
      .then((res)=>setProductList(res.data))
        .catch((err)=>console.log(err));
  },[])


  return (
    <div className="App">
      <header className="App-header">
        {
          productList.map((prod)=><ProductCard items={prod}/>)
        //  <ProductCard items = {productList[3]}/>

        }


      </header>
    </div>
  );
}

export default App;
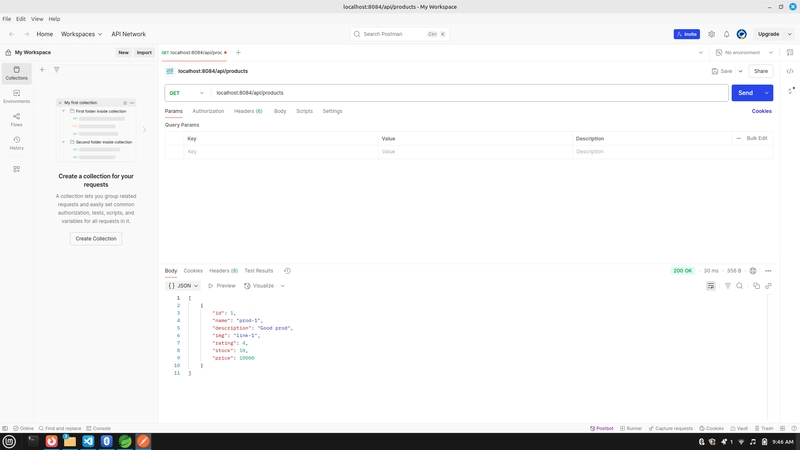
API Endpoint URL** :localhost:8084/api/products
In a React application, you can send data to a backend server (like a Spring Boot API) using a POST request. To do this, we use the fetch() method or a library like axios. In the example above, we created a simple form that accepts a product's name and price. When the form is submitted, the handleSubmit function is called. Inside handleSubmit, we send a POST request to http://localhost:8084/api/products, with the form data converted into JSON format. The server is expected to accept this data, save it (e.g., into a database), and return a response. To allow this, the Spring Boot backend must have a controller method with @PostMapping("/api/products") and accept the incoming JSON using @RequestBody. This setup allows the React frontend and Spring Boot backend to communicate, making it possible to add new products dynamically from the user interface.
*Create file called API.js and base below code *
import axios from "axios";

export const getProducts = ()=> axios.get("http://localhost:8084/api/products");
Create file component file and create file called name.jsx
function ProductCard({items})
{
return(
<div>
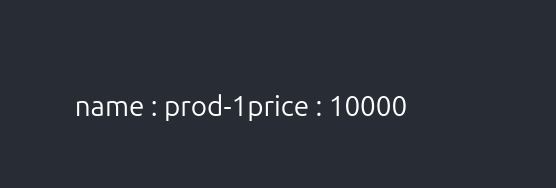
<img src={items.img} alt="" />
name : {items.name}
price : {items.price}
</div>
)
}
export default ProductCard;


Top comments (3)
pretty solid walkthrough ngl- i always mess up somewhere connecting backend and frontend, so this helps. you think making everything from scratch is worth the hassle or nah?
Great job! Thanks for sharing!
Hi! I recently built an e-commerce project using Spring Boot 3 and would love your feedback or suggestions on how I can expand and improve it.
🔗ecommerce-render-2.onrender.com