This is a submission for the Pulumi Deploy and Document Challenge: Fast Static Website Deployment
My Objective of making this submission
As an experienced professional and a strong advocate for using Infrastructure as Code (IaC) with Pulumi, I aim to show how easy and straightforward it can be to deploy infrastructure using Pulumi on your favorite cloud platform—using any general-purpose programming language.
Over the past few days, I’ve explored 10 to 20 different applications and deployment ideas to find the simplest yet most effective approach. My goal is to create a solution that’s easy to understand, even for beginners with little or no background in coding, cloud platforms, or IaC tools like Pulumi. This demonstration will highlight a complete, step-by-step process that enables anyone to start using Pulumi to provision cloud services as code. Pulumi supports over 170 Cloud and SaaS providers, according to its documentation, giving users the flexibility to work with their preferred tools and platforms.
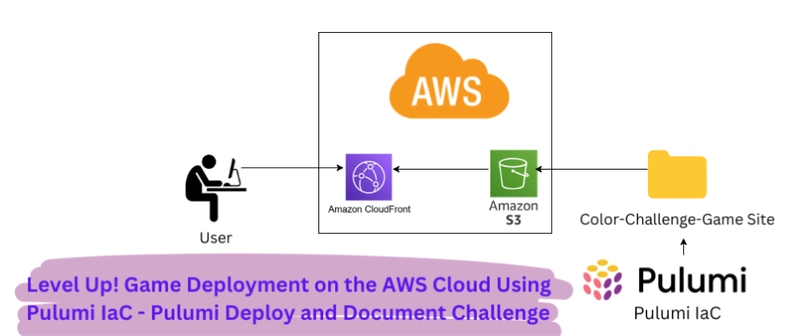
Table of Contents
- What I Built
- Color Recall Challenge Demo
- Live Demo Link
- GitHub Repository
- My Journey of Moving Color Challenge Game
- Prerequisites
- 👉 Step 01 - Installing Pulumi
- 👉 Step 02 - Creating an AWS IAM User
- 👉 Step 03 - Deploying Color Challenge Game to AWS
- Reflection on Using Pulumi and Best Practices
- Conclusion
What I Built - Color Recall Challenge Game
As a result, I’ve developed a simple and elegant Single Page Color Recall Game to challenge users’ color memory and visual recall skills. This beginner-friendly game is designed as a static website to demonstrate how quickly and easily we can deploy static sites using Pulumi and Infrastructure as Code (IaC).
The game includes 10 levels of increasing difficulty. With each level, the number of colors the user needs to remember and recall grows. If the user selects the wrong color, the game ends—adding a fun and engaging challenge to the experience.
Color Recall Challenge Demo Video
Live Demo Link
-CloudFront URL (https) CloudFront URL
-S3 Bucket Public Access URL (http) S3 Bucket Public URL
Project Repo
 mohamednizzad
/
pulumi-challenge
mohamednizzad
/
pulumi-challenge
This repository is dedicated to host projects for Pulumi IaC Fast Website Deployment Challenge
Level Up! Game Deployment on AWS Cloud Using Pulumi IaC - Pulumi Deploy and Document Challenge
This is a submission for the Pulumi Deploy and Document Challenge: Fast Static Website Deployment.

Objective
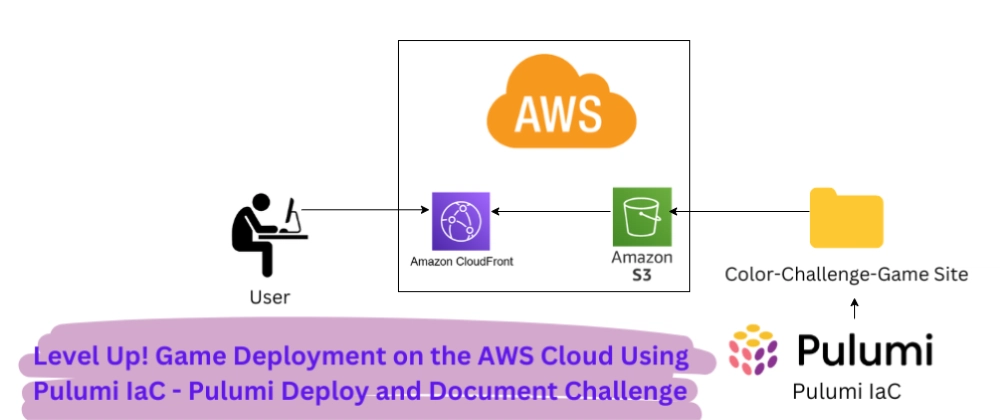
As an advocate for Infrastructure as Code (IaC), my aim is to demonstrate how easy and efficient it can be to deploy cloud infrastructure using Pulumi. In this project, I’m using Pulumi to deploy a static website (Color Recall Challenge Game) on AWS. The goal is to show the power of Pulumi IaC in deploying cloud services programmatically using your favorite programming language, which in this case is Python.
What I Built - Color Recall Challenge Game
I have developed a simple, elegant Single Page Color Recall Game to challenge users’ color memory and visual recall skills. It is designed as a static website to show how we can quickly deploy static websites using Pulumi.
My Journey - Moving Color Challenge Game to Production with Pulumi
⚠️ Assumption: This step-by-step guide assumes you're starting with a fresh installation of Windows. If you're using a different operating system, please refer to Pulumi’s official Get Started guide for instructions specific to your OS.
If you already have any of the tools or requirements listed below, feel free to skip those steps. If not, make sure to install or set them up before proceeding.
🚨 Following this tutorial won’t cost you anything if you use the services listed below. Everything used here is free of charge, and I’ll clearly mention any exceptions where a cost might apply.
📢 Prerequisites
1️⃣ A valid email account (i.e gmail: Create One Here)
2️⃣ Pulumi Account (Sign Up Here for Free)
3️⃣ Access to cloud platform (i.e AWS: Sign Up a free tier AWS account here).
Note: While deploying this demo won't cost as it falls within the free tier, exceeding free tier quota will cost you.
4️⃣ AWS Command Line Interface (CLI) (Download and Install from Here)
5️⃣ VS Code (Download and Install Visual Studio Code) if you don't have it installed
6️⃣ Language Runtime: Additionally, we need the appropriate language runtime to run the code. In this example, I’ll be using Python. So, let’s install Python using the Link Here.
👉 Step 01 - Installing Pulumi
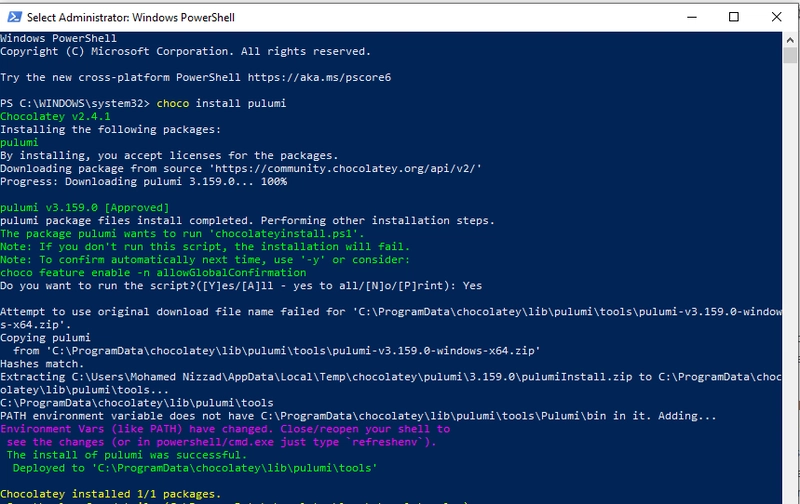
Once everything is set up, we can install the Pulumi CLI tool using Windows PowerShell.
To do this, open Windows PowerShell in Administrator mode and run the following command:
choco install pulumi
Then, press Enter. You’ll be asked to confirm permission to run the installer—go ahead and allow it to continue.
Now, type Yes and press Enter. Pulumi will begin installing smoothly, as shown below.
To check if Pulumi was installed successfully, open PowerShell again, enter the following command, and press Enter.
pulumi version
If everything is set up correctly, you should see the Pulumi version displayed, as shown below.

Video Demo of Step 01
👉 Step 02 - Creating an AWS IAM User with Required Credentials
After installing Pulumi, we need to give it the necessary permissions to deploy and manage cloud resources. To do this, Pulumi requires programmatic access using proper access credentials.
In this case, we need to create an AWS Identity and Access Management (IAM) user with the right permissions.
So, let's create an IAM user that Pulumi can use to manage services on our cloud platform.
We’ll create a new IAM user named pulumi-user and attach the following policies to it:
- AdministratorAccess: This policy provides full access to AWS services and resources.
- AmazonS3FullAccess: This policy provides full access to all buckets via the AWS Management Console.
Video Demo of Step 02 on How to create an IAM User pulumi-user
Now that everything is set up, Pulumi can successfully deploy and manage AWS services programmatically.
Next, let’s move on to deploying the Color Challenge Game to an S3 bucket. We’ll also set it up as a static website and deliver it using CloudFront.
Using Pulumi - To Deploy Color Challenge Game to AWS S3 Bucket
👉 Step 03 - Deploying Color Challenge Game to AWS S3 Bucket
👉 1. Create a Project Directory
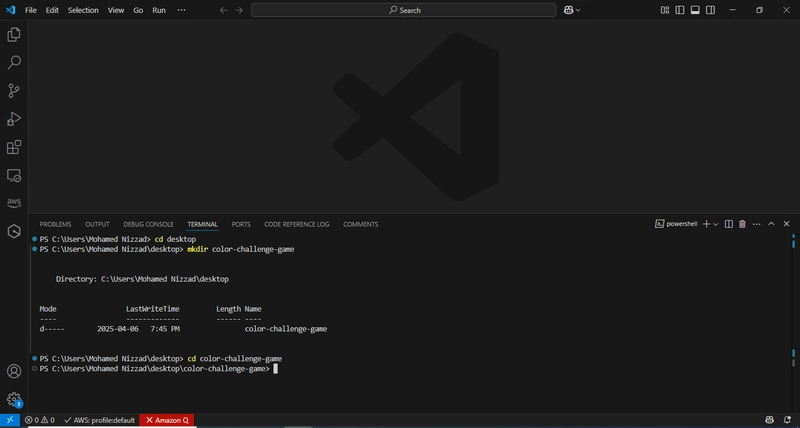
Open VS Code ▶️ From the top menu, go to Terminal and click on New Terminal. Alternatively, you can use the shortcut Ctrl + Shift + ' to open the terminal quickly.
Once the terminal is open, run the following commands to create and navigate to the color-code-challenge directory:
cd desktop
mkdir color-challenge-code
cd color-challenge-code
👉 2. Log in to Pulumi
Log in to your Pulumi account. This will open your browser for authentication.
Run the following command:
pulumi login

👉 3. Initialize a new Pulumi project using AWS and Python as the stack.
- To initialize a new pulumi project, run the following code:
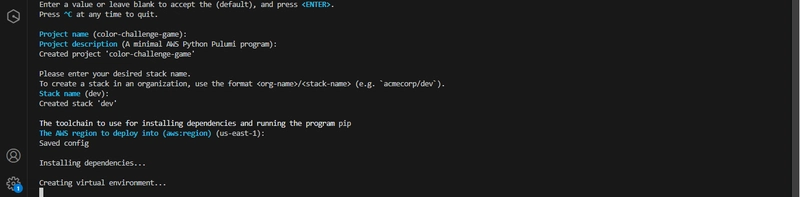
pulumi new aws-python
You’ll be prompted with a few questions. You can simply press Enter to accept the default values, or type in your own preferred values if you wish.
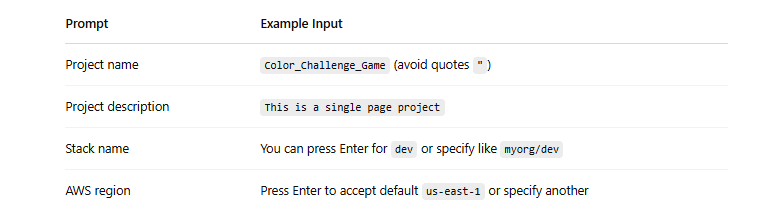
The pulumi new command creates a new Pulumi project with some basic scaffolding based on the cloud and language specified.
👉 4. Configure AWS CLI Credentials
Run the command below to provide your AWS credentials (Access Key and Secret Access Key) that we created in Step 02.
This will allow Pulumi to access your AWS account and deploy the website to the S3 bucket.
aws configure

Using aws configure within Visual Studio Code allows us to set up our AWS credentials and region. These settings are then used by VS Code extensions to interact with our AWS resources.
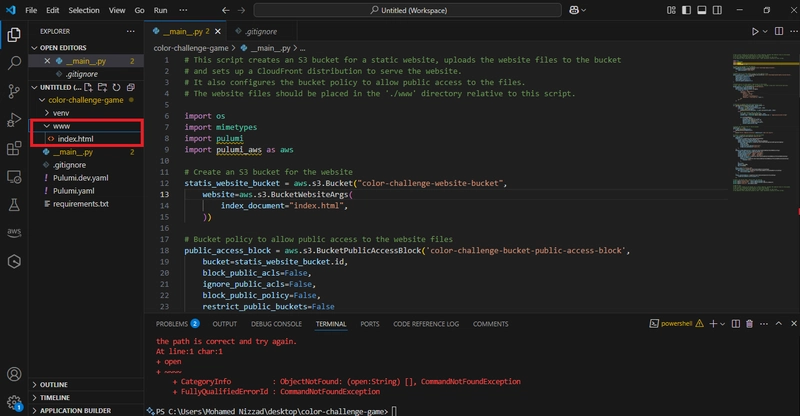
👉 4.1. Add Project Folder to VS Code Workspace
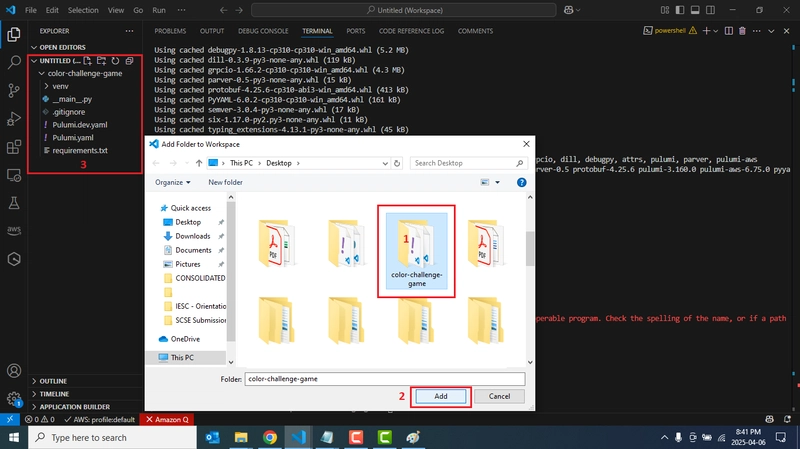
In VS Code, go to the File menu and select Add Folder to Workspace.
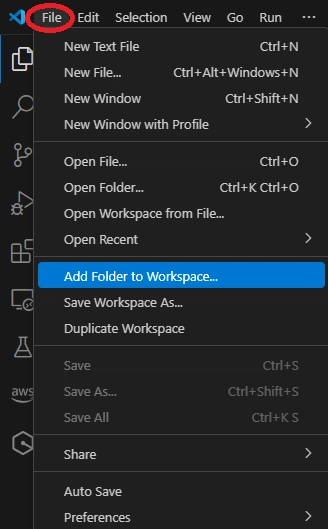
A dialog box will appear titled Add Folder to Workspace. From there, select the Color-Challenge-Game folder and click the Add button.
Now, open the __ main.py __ file. The default __ main.py __ file should contain the following code:
"""An AWS Python Pulumi program"""

import pulumi
from pulumi_aws import s3

# Create an AWS resource (S3 Bucket)
bucket = s3.BucketV2('my-bucket')

# Export the name of the bucket
pulumi.export('bucket_name', bucket.id)
Replace the existing code with the following code (you can also find the file in the GitHub repo) and then save the file.
# This script creates an S3 bucket for a static website, uploads the website files to the bucket
# and sets up a CloudFront distribution to serve the website.
# It also configures the bucket policy to allow public access to the files.
# The website files should be placed in the './www' directory relative to this script.

import os
import mimetypes
import pulumi
import pulumi_aws as aws

# Create an S3 bucket for the website
statis_website_bucket = aws.s3.Bucket("color-challenge-website-bucket",
    website=aws.s3.BucketWebsiteArgs(
        index_document="index.html",
    ))

# Bucket policy to allow public access to the website files
public_access_block = aws.s3.BucketPublicAccessBlock('color-challenge-bucket-public-access-block',
    bucket=statis_website_bucket.id,
    block_public_acls=False,
    ignore_public_acls=False,
    block_public_policy=False,
    restrict_public_buckets=False
)

# Bucket policy to allow public read access to the bucket
# Note: This is a simplified policy. In production, consider using more restrictive policies.
bucket_policy = aws.s3.BucketPolicy("bucket-policy",
    bucket=statis_website_bucket.id,
    policy=statis_website_bucket.id.apply(
        lambda id: f"""{{
            "Version": "2012-10-17",
            "Statement": [{{
                "Effect": "Allow",
                "Principal": "*",
                "Action": ["s3:GetObject"],
                "Resource": ["arn:aws:s3:::{id}/*"]
            }}]
        }}"""
    ))


# Function to upload files and directories to S3
def upload_directory(directory_path, parent_path=""):
    for item in os.listdir(directory_path):
        item_path = os.path.join(directory_path, item)
        if os.path.isdir(item_path):
            upload_directory(item_path, os.path.join(parent_path, item))
        else:
            # Get the content type of the file
            file_path = os.path.join(parent_path, item)
            content_type = mimetypes.guess_type(item_path)[0] or "application/octet-stream"

            aws.s3.BucketObject(
                file_path.replace("\\", "/"),
                bucket=statis_website_bucket.id,
                key=file_path.replace("\\", "/"),
                source=pulumi.FileAsset(item_path),
                content_type=content_type
            )

# Upload the website files to the S3 bucket
website_dir = "./www"
if os.path.exists(website_dir):
    upload_directory(website_dir)
else:
    print(f"Error: Website directory {website_dir} does not exist")

# Create a CloudFront distribution for the S3 bucket
cdn = aws.cloudfront.Distribution("website-cdn",
    enabled=True,
    origins=[aws.cloudfront.DistributionOriginArgs(
        origin_id=statis_website_bucket.arn,
        domain_name=statis_website_bucket.website_endpoint,
        custom_origin_config=aws.cloudfront.DistributionOriginCustomOriginConfigArgs(
            http_port=80,
            https_port=443,
            origin_protocol_policy="http-only",
            origin_ssl_protocols=["TLSv1.2"],
        ),
    )],
    default_cache_behavior=aws.cloudfront.DistributionDefaultCacheBehaviorArgs(
        target_origin_id=statis_website_bucket.arn,
        viewer_protocol_policy="redirect-to-https",
        allowed_methods=["GET", "HEAD", "OPTIONS"],
        cached_methods=["GET", "HEAD", "OPTIONS"],
        forwarded_values=aws.cloudfront.DistributionDefaultCacheBehaviorForwardedValuesArgs(
            query_string=False,
            cookies=aws.cloudfront.DistributionDefaultCacheBehaviorForwardedValuesCookiesArgs(
                forward="none",
            ),
        ),
        min_ttl=0,
        default_ttl=3600,
        max_ttl=86400,
    ),
    price_class="PriceClass_100",
    restrictions=aws.cloudfront.DistributionRestrictionsArgs(
        geo_restriction=aws.cloudfront.DistributionRestrictionsGeoRestrictionArgs(
            restriction_type="none",
        ),
    ),
    viewer_certificate=aws.cloudfront.DistributionViewerCertificateArgs(
        cloudfront_default_certificate=True,
    ))

# Export the Bucket Name, website URL and CDN URL
pulumi.export("bucket_name", statis_website_bucket.id)
pulumi.export("website_url", statis_website_bucket.website_endpoint)
pulumi.export("cdn_url", cdn.domain_name)

# END OF FILE
# This script creates an S3 bucket for a static website, uploads the website files to the bucket
# and sets up a CloudFront distribution to serve the website.
# It also configures the bucket policy to allow public access to the files.
# The website files should be placed in the './www' directory relative to this script.
Next, download the www folder from the GitHub repository and move it into the Color-Challenge-Game project directory.
Note: You can place any static website (with its files and folders) inside the www folder within the Color-Challenge-Game project, and it will work without any issues.
Now that we’ve completed all the steps, our project is ready to be deployed. Check the folder directory to ensure it matches the structure shown in the image below.
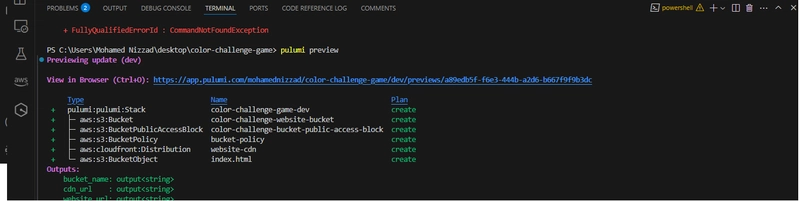
👉 5. Preview the Deployment
Run the following code to preview the deployment. This will list the resources that will be created.
pulumi preview
The output will be as follows:
👉 6. Let's Deploy the Infrastructure
Run the following code and choose Yes to deploy the Color-Challenge-Game project website.
pulumi up
The deployment has been successfully completed, as shown below.
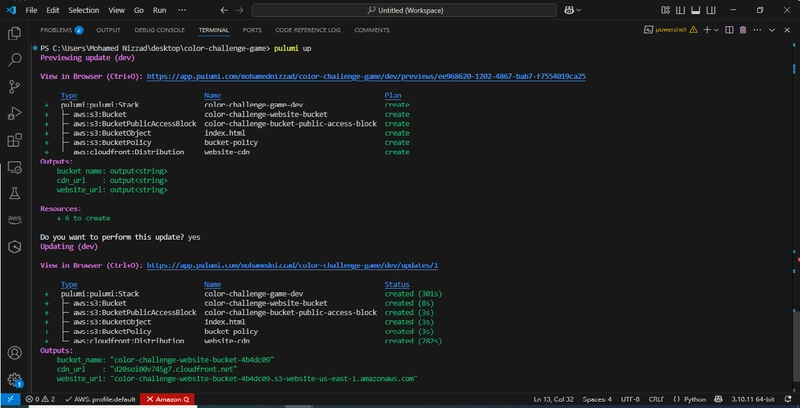
After successful deployment, you’ll get two links:
- S3 Static Site URL (Click Here)
- CloudFront CDN URL (Click Here)
Open the CloudFront URL for best performance and HTTPS support.
👉 7. Destroy the resources provisions by Pulumi
To remove everything provisioned by Pulumi, simply run the following code:
pulumi destroy
To remove the stack, run the following code:
pulumi stack rm
This concludes the step-by-step, beginner-friendly tutorial on how to deploy a static website using Pulumi IaC on an AWS S3 Bucket and provision it through CloudFront.
Video Demo of Step 03 From 1 to 7 on Deploying Color Challenge Game to AWS S3 Bucket
Reflection on Using Pulumi and Best Practices
*Documentation: * What sets a great product apart is clear and well-organized documentation. Pulumi’s official documentation is a prime example — it's comprehensive, beginner-friendly, and makes it easy for anyone to get started, even without prior experience.
Start with Small, Modular Projects
Begin by provisioning simple resources like an S3 bucket or EC2 instance. This allows you to get comfortable with Pulumi's syntax and workflow. Modular code makes it easier to debug, scale, and reuse components in larger projects.
Use Version Control Religiously
Keep all Pulumi code under version control (e.g., Git). This enables easier tracking of changes, collaboration with team members, and rollback capabilities when needed. Combine it with Pulumi's pulumi preview feature to understand the impact of changes before deployment.
Secure Your Secrets
Always use Pulumi’s built-in secrets management for API keys, access tokens, and credentials. Never hard-code sensitive values. You can use pulumi config set --secret to securely store values in encrypted form.
Leverage Pulumi Stacks for Environment Management
Create different stacks (e.g., dev, staging, production) for each environment. This separation reduces risk, allows safe experimentation, and ensures that changes in one environment don’t accidentally affect another.
Use Meaningful Resource Names and Tags
Assign clear, consistent names and tags to resources. This improves traceability, makes resource billing easier to interpret, and simplifies management in cloud consoles.
Take Advantage of Cross-Language Support
Pulumi lets you write IaC in familiar languages like Python, TypeScript, Go, and .NET. Choose the language that best fits your team’s skills to speed up development and reduce learning curves.
**Use Automation API for Advanced Scenarios
**If you're building developer platforms or CI/CD integrations, Pulumi's Automation API allows you to embed IaC directly into applications, enhancing control and scalability.
Regularly Destroy and Reprovision in Development
In non-production environments, periodically destroy and recreate infrastructure to verify that your code accurately provisions everything needed from scratch. This builds confidence in disaster recovery and environment setup scripts.
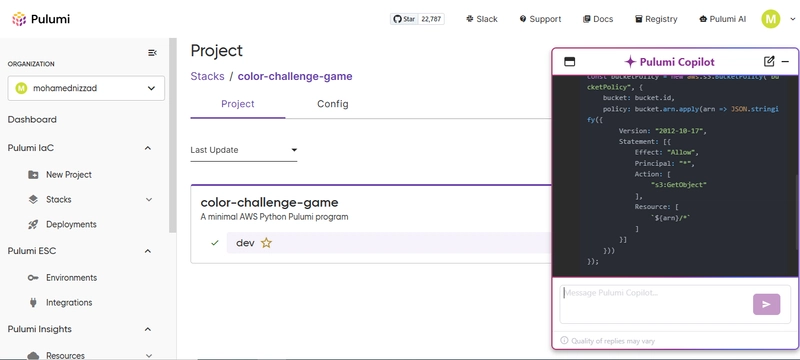
Finally, it is not complete without AI Integration: Pulumi Copilot is AI-Powered and it helped me write, understand, and manage Infrastructure as Code (IaC) more efficiently. It leverages AI to provide intelligent code suggestions, generate infrastructure templates, and answer questions related to Pulumi, cloud services, and IaC best practices — all within pulumi's development environment.
I heavily relied on Pulumi's Copilot to generate Python code block that should disable AWS S3 bucket public access block policy within the *__ main __.py * using the variations of following prompt until it got it right.
Create an AWS S3 bucket using Pulumi and configure a public bucket policy that allows read access to all objects. Use Python and follow best security practices where possible.
The Pulumi generated code below worked like a charm.
# Bucket policy to allow public access to the website files
public_access_block = aws.s3.BucketPublicAccessBlock('color-challenge-bucket-public-access-block',
    bucket=statis_website_bucket.id,
    block_public_acls=False,
    ignore_public_acls=False,
    block_public_policy=False,
    restrict_public_buckets=False
)

# Bucket policy to allow public read access to the bucket
# Note: This is a simplified policy. In production, consider using more restrictive policies.
bucket_policy = aws.s3.BucketPolicy("bucket-policy",
    bucket=statis_website_bucket.id,
    policy=statis_website_bucket.id.apply(
        lambda id: f"""{{
            "Version": "2012-10-17",
            "Statement": [{{
                "Effect": "Allow",
                "Principal": "*",
                "Action": ["s3:GetObject"],
                "Resource": ["arn:aws:s3:::{id}/*"]
            }}]
        }}"""
    ))
✨ Key Features of Pulumi Copilot
Code Generation: It helps write Pulumi programs in your favorite language (Python, TypeScript, Go, etc.) with AI-assisted code generation for cloud resources.
Natural Language to Code: We can simply describe what we want (e.g., “Create a static website using AWS S3 and CloudFront”), and Copilot will generate the code for us.
Inline Guidance: Get real-time suggestions, documentation links, and explanations to help you understand what each line of code does.
Supports Multi-Cloud: Works seamlessly with major cloud providers like AWS, Azure, GCP, and over 170+ other services supported by Pulumi.
Beginner-Friendly: Ideal for developers who are new to cloud infrastructure or Pulumi — it shortens the learning curve significantly.
✅ Why Pulumi Copilot Stands Out:
Pulumi Copilot helps transform cloud ideas into working infrastructure faster, reduces human error, and boosts productivity — all while making the IaC experience more intuitive and accessible.
With Pulumi Copilot, deploying infrastructure becomes as simple as describing what you want — and letting AI do the heavy lifting.
Conclusion
This project not only demonstrates how easy and efficient it is to deploy a static website using Pulumi and AWS, but also showcases the power of Infrastructure as Code (IaC) for developers of all levels. By using Pulumi with Python, I've built and deployed a fully functional static game site—with public access and CDN integration—in a clean, modular, and repeatable manner.
Whether you're new to cloud computing or a seasoned developer, Pulumi empowers you to manage cloud infrastructure using real programming languages and modern development practices. I hope this guide encourages you to explore Pulumi further and inspires you to build and deploy your own cloud-native applications with ease.
It took me 4-5 days to explore and experiment this wonderful IaC Tool Pulumi which I am in love with now...
I am more than happy to answer any questions regarding this step-by-step guide and tutorial to make our life easier with Pulumi IaC.
Navigation to Go Up
- My Objective
- What I Built
- Color Recall Challenge Demo
- Live Demo Link
- GitHub Repository
- My Journey of Moving Color Challenge Game
- Prerequisites
- 👉 Step 01 - Installing Pulumi
- 👉 Step 02 - Creating an AWS IAM User
- 👉 Step 03 - Deploying Color Challenge Game to AWS
- Reflection on Using Pulumi and Best Practices
- Conclusion
Let's use Pulumi for seamless IaC deployment and Beyond


Top comments (35)
Awesome tutorial! I followed along and was able to build a similar static site setup using your step-by-step guide. The clear explanation of configuring the S3 bucket and using Pulumi Deploy made the whole process smooth. Really appreciate the hands-on approach.
Dear @ahamed_ahnaf_84f1b6cdf9de
Thank you very much for your comment and experimenting pulumi with my step by step guide. Hope you enjoyed the experiment. Looking forward to see what you have built.
Great walkthrough! I really appreciate how clearly you broke down deploying a static website to AWS S3 using Pulumi. The step-by-step structure, especially integrating Pulumi Deploy and managing IaC, makes it super accessible—even for folks newer to cloud automation. The addition of the Pulumi Documentation Challenge angle adds an extra layer of motivation to get hands-on. Looking forward to more content like this.
Thank you everyone for your lovely comments and encouraging remarks. This post has been selected as one of the 3 winning submissions for the Pulumi Deploy and Document Challenge. I am happy to mention @jasondunn here for the AWS Journey.
This article brilliantly showcases the power of Pulumi using Python, making infrastructure as code both accessible and elegant. The hands-on example with S3 and CloudFront is practical and easy to follow. A must-read for anyone diving into modern cloud automation!
Thank you. I am overwhelmed by the response. Keep reading my articles.
I appreciate your effort in simplifying Pulumi IaC deployment with AWS with a step-by-step walkthrough supported by video demo which is way easy to follow for beginners like me.
Thanks
Dear @oliviaaaron
It's my pleasure to write posts that are simple and easy to follow with step by step guide and instructions backed by video. I hope to follow this approach in my future posts as well so that it is beginner friendly.
Keep reading
Thank you Olivia.
The choice to deploy a static game site on AWS using S3 and CloudFront was spot on for demonstrating real-world value in a lightweight, cost-effective way. Your emphasis on best practices like version control, secret management, and modular design reflects a strong engineering mindset.
Thanks. I would like to know how it went
That's a great article, explain each and every part very clearly, thank you for amazing guide. Also i would like to suggest, give a try to AWS cdk even all these things can be done in fewer lines of code.
Thank you Arun. And I truly appreciate your feedback! I actually omitted CDK it on purpose this time to keep the focus on foundational concepts, but it’s definitely worth a deep dive in a follow-up article. Thanks again for the thoughtful suggestion!
This tutorial really helped me explore the AWS world. In fact, I started to explore AWS services recently, Thanks to that. I'm still trying to keep up with your guide. Soon, I'll catch up.
@sihanas
Thanks and looking forward to see what you have implemented.
Great videos
Thank you @adamgordonbell.
Excellent piece of writing. I am a great fan of video tutorials. Thanks for Including videos as well.
I am happy to know that the backing with video has helped you