
Written by Emmanuel John✏️
The Node.js team just released Node.js 24 with significant updates and new features. Over the years, Node.js has become known for its dependence on third-party libraries for executing most of its tasks, from TypeScript support to testing to environment variable handling.
Node.js 24 ships with native features that improve developer experience, security, and reduce dependency overhead. You can check out our general overview of the Node.js 24 release here. But the subtlety of some of these new features is something I’m concerned many developers will miss.
In this tutorial, we’ll explore 10 Node.js features you might not be using yet — but absolutely should be. The good news is that from October 2025 onward, Node.js 24 becomes a Long-Term Support (LTS) release_._ At that point, most of these features will be stable and ready for production use and long-term projects.
Getting started with Node.js 24
I recommend using Node Version Manager (nvm) to install Node.js 24. We’ll switch between Node.js 24 and previous versions when comparing certain features. Install nvm on Mac with the following command:
brew install nvm
To verify that nvm is installed, run the following command:
nvm --version
To install Node.js 24, run the following:
nvm install 24
Run the following command to use a specific node version:
nvm use <version>

// To use Node.js 24
nvm use 24
1. TypeScript support
The first feature I want to explore is the Node.js built-in support for TypeScript. The latest LTS, Node.js 22, didn’t offer the best experience here. If you tried to run a TypeScript file directly using the node command like node index.ts, you’d see a bunch of errors: 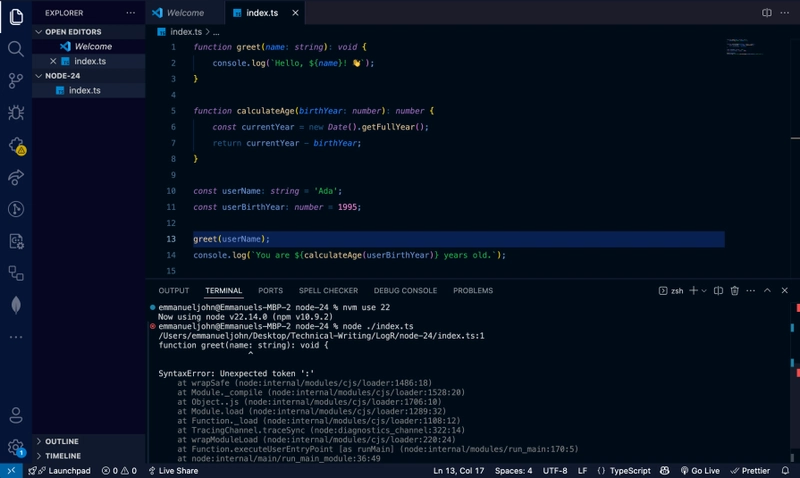 That’s because Node.js didn’t natively understand TypeScript syntax and types.
However, with Node.js 24, you can enable runtime TypeScript support with the new built-in support for type stripping:  Node.js 24 can execute
 .ts files that contain only erasable TypeScript syntax. These are type annotations that don't need to be converted into actual JavaScript.
For TypeScript features that require actual JavaScript code generation — enum declarations, public/private parameter properties in constructors, namespace, and const enum — the Node.js 24 compiler will fail with a runtime error using the node command like node index.ts: 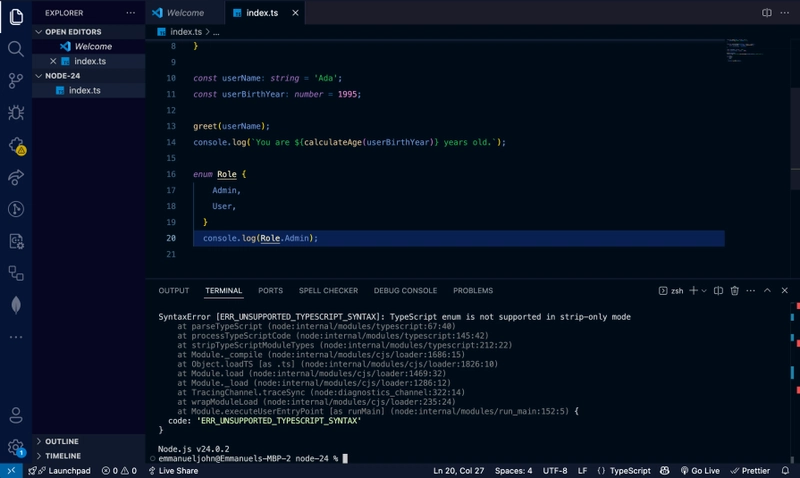
This is because enum isn't just erased; it must be transformed into JavaScript. To allow Node.js to handle these cases, add this flag:
node --experimental-transform-types index.ts
Now Node.js will generate the necessary JavaScript code for enum Role. For now, this feature focuses on skipping type checking and erasable syntax so that Node.js can execute TypeScript code faster and avoid generating source maps.
This does not add full TypeScript support. If you need full TypeScript support (e.g., for decorators, JSX, path aliases, or strict typing), you should still use the TypeScript compiler (tsc).
2. Promise-based standard packages
Standard packages such as the fs, path, http, https modules now have synchronous, callback, and promise-based forms. If you prefer promises and [async/await](https://blog.logrocket.com/async-await-typescript/), use the promise-based APIs:
import * as fs from 'node:fs/promises';
const content = await fs.readFile('file.txt', 'utf-8');
console.log(content);
If you're working with older code or prefer callbacks, use the callback and sync APIs:
import * as fs from 'node:fs';
fs.readFile('file.txt', 'utf-8', (err, data) => {
  if (err) throw err;
  console.log(data);
});
Node.js also supports top-level await for promise-based operations. You can use the await keyword directly at the top level of your script in an ES module without wrapping it in an async function.
3. The --env-file flag
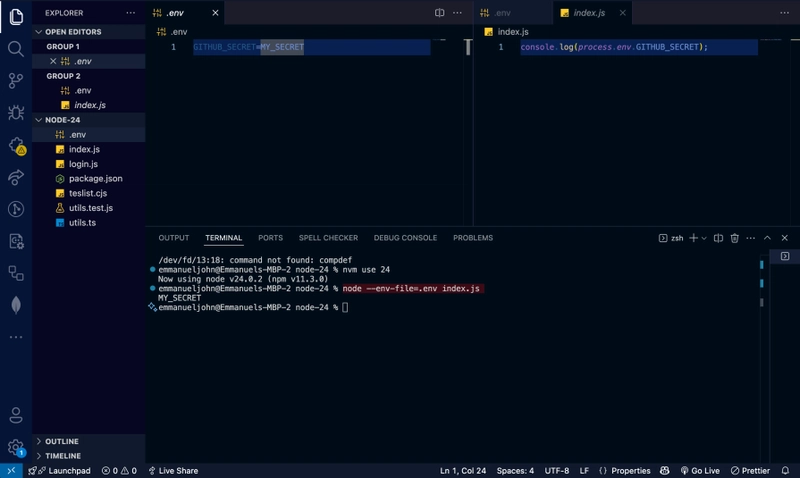
Another heavily dependent external library for Node.js apps is the .env, a library for working with secrets stored in environmental variables. With the Node.js --env-file feature flag, you can remove .env from your app dependencies. To see this in practice, create a .env file with the following:
GITHUB_SECRET=MY_SECRET
Add the following to index.js file:
console.log(process.env.GITHUB_SECRET);
Then set the --env-file feature flag to .env:
node --env-file=.env index.js
 You can also access environment variables using the built-in
 node:process module as follows:
import { env } from 'node:process';
console.log(env.GITHUB_SECRET);
4. ESM support
Node.js 24 now supports ECMAScript modules as its official standard for reusable code. You can now use the ES6 import and export syntax to import or export your modules. All you have to do is set the ["type"](https://nodejs.org/docs/v24.0.0/api/packages.html#type) field in package.json with a value "module", or use .mjs file extension to explicitly run your code as ES modules. Create Login.js and add the following:
export const Login = (user) => {
    return `${user} is logged in`;
}
Update index.js with the following:
import {Login} from "./login.js"
console.log(Login("John Doe"));
Add the following to your package.json file:
{
  "type": "module",
}
Run the script with node index.js:  To avoid the following error, a file extension must be provided when using the
 import keyword: 
Importing a CommonJS module in an ES module
You can use import statements to load either ES modules or CommonJS in ES modules (files with .mjs extension or "type": "module" in package.json). Let’s say you have a CommonJS file:
///login.cjs
module.exports = {
  login(user) {
    return `${user} is logged in`;
  },
};
Now you can import the CommonJS file in your ES module as follows:
import action from './login.cjs';

console.log(action.login("John Doe"));
Importing an ES module in a CommonJS module
Importing an ES module in a CommonJS module is limited to using the dynamic import() syntax to load ES modules:
// index.cjs
(async () => {
  const action = await import('./login.mjs');
  console.log(action.Login("John Doe"));
})();
The import() syntax returns a promise, which can be used in CommonJS to dynamically load ES modules. Node.js has greatly improved interoperability between ES and the CommonJS module system.
5. Built-in test runners
Goodbye to Mocha, Chai, Jest, and other third-party test runners. Node.js now ships with built-in test runners, which means you can run tests with just Node without relying on third-party libraries.
These test runners live in the node:test module and support describe, it, and test blocks. You can also implement assertions using node:assert module and implement test coverage reporting. Let’s see this in practice, testing utility functions. Create a file called utils.ts:
export function isEmailValid(email: string): boolean {
  const regex = /^[^\s@]+@[^\s@]+\.[^\s@]+$/;
  return regex.test(email);
}
export function truncateText(text: string, maxLength: number): string {
  if (text.length <= maxLength) return text;
  return text.slice(0, maxLength) + '...';
}
The function isEmailValid checks if an input string is a valid email address using a regular expression. truncateText shortens a string to a specified maximum length and adds an ellipsis (...) at the end if the text exceeds that length. Now, create a test file utils.test.js with the following:
import { describe, it } from 'node:test';
import assert from 'node:assert';
import { isEmailValid, truncateText } from './utils.ts';

describe('isEmailValid function', () => {
  it('returns true for a valid email', () => {
    assert.ok(isEmailValid('john@gmail.com'));
  });

  it('returns false for an invalid email', () => {
    assert.ok(!isEmailValid('invalid-email'));
  });

  it('returns false for empty string', () => {
    assert.ok(!isEmailValid(''));
  });
});

describe('truncateText function', () => {
  it('returns original text if shorter than maxLength', () => {
    assert.strictEqual(truncateText('Hello', 10), 'Hello');
  });

  it('truncates and adds ellipsis if text is longer than maxLength', () => {
    assert.strictEqual(truncateText('This is a long text', 7), 'This is...');
  });

  it('works with empty string', () => {
    assert.strictEqual(truncateText('', 5), '');
  });
});
Here is how you use Node.js's native testing feature to test the utility functions. Like the other popular test libraries, the describe blocks group related tests for each function, while assert confirms the validity of the return values.
The isEmailValid tests confirm that the function correctly returns true for a valid email format, and false for invalid inputs like a malformed email or an empty string. The truncateText tests check that if the input text is shorter than or equal to the specified maximum length, it is returned as-is. Otherwise, it is truncated and appended with an ellipsis (...). Now, run the following command to execute the tests:
node --test
 You can also get test coverage by running:
node --test --experimental-test-coverage
6. The --watch flag
If you’ve worked with frontend libraries like Vue.js, React, and Angular, you’d be familiar with the hot module reload feature, which allows you to run your code on every code change.
In previous Node.js versions, we achieved similar functionality using a third-party library called nodemon. But now, using the --watch flag, you can re-run your code on every code change. With the following command, you can watch and re-run your tests on every code change:
node --watch --test
With this feature, you don’t need to depend on third-party libraries like nodemon for reloading your app on code changes.
7. AsyncLocalStorage defaulting to AsyncContextFrame
In earlier Node.js versions, the AsyncLocalStorage class used to maintain context across asynchronous operations (like keeping track of user sessions) was prone to bugs. This included cases where the session data returned undefined or the wrong user ID due to lost asynchronous context.
Node.js 24 improves AsyncLocalStorage performance by switching its internal implementation to use AsyncContextFrame. Here is a practical application of AsyncLocalStorage to track user sessions across asynchronous HTTP requests in Node.js:
import http from 'node:http';
import { AsyncLocalStorage } from 'node:async_hooks';
import { randomUUID } from 'node:crypto';

const asyncLocalStorage = new AsyncLocalStorage();

function logWithRequestId(message: string) {
  const requestId = asyncLocalStorage.getStore();
  console.log(`[${requestId}] ${message}`);
}

const server = http.createServer((req, res) => {
  const requestId = randomUUID();

  asyncLocalStorage.run(requestId, () => {
    logWithRequestId('Request received');

    setTimeout(() => {
      logWithRequestId('Processed after timeout');
      res.writeHead(200, { 'Content-Type': 'text/plain' });
      res.end(`Hello! Your request ID is ${requestId}\n`);
    }, 100);
  });
});

server.listen(3000, () => {
  console.log('Server is running on http://localhost:3000');
});
Here, each request is assigned a unique requestId, and we maintain that ID throughout asynchronous operations like setTimeout. Switching AsyncLocalStorage internal implementation to use AsyncContextFrame ensures each async call maintains its isolated context. This way, logs are always correct, even in deeply nested or delayed async operations. Visiting http://localhost:3000/ you should show the following: 
8. Built-in SQLite database
Node.js now supports SQLite databases with its built-in node:sqlite module. This means your Node.js app no longer has to depend on external database libraries like better-sqlite3 or sqlite3 for interacting with a SQLite database. node:sqlite module is lightweight and simplifies deployment by eliminating the need for additional database setup.
This feature is still experimental and can be accessed by running your app with the --experimental-sqlite flag Let’s look at a practical example that demonstrates how to use the built-in node:sqlite module:
import { DatabaseSync } from 'node:sqlite';
const database = new DatabaseSync(':memory:');

// Execute SQL statements.
database.exec(`
  CREATE TABLE data(
    key INTEGER PRIMARY KEY,
    value TEXT
  ) STRICT
`);
// Create a prepared statement to insert data into the database.
const insert = database.prepare('INSERT INTO data (key, value) VALUES (?, ?)');
// Execute the prepared statement with bound values.
insert.run(1, 'hello');
insert.run(2, 'world');
// Create a prepared statement to read data from the database.
const query = database.prepare('SELECT * FROM data ORDER BY key');
// Execute the prepared statement and log the result set.
console.log(query.all());
// Prints: [ { key: 1, value: 'hello' }, { key: 2, value: 'world' } ]
In Node.js v22.5.0 and later, you can use the built-in SQLite support to work with databases either stored in a file or in memory. To use a file-backed database, provide a file path, and for an in-memory database, use the special path ':memory:'. The database.close() method safely closes the database connection, throwing an error if the database isn't open.
To execute one or more SQL statements without expecting results (e.g., from a SQL file), you can use database.exec(sql), which wraps sqlite3_exec(). Starting in Node.js v24.0.0, you can also register custom aggregate functions using database.aggregate(name, options) and check if a transaction is active with the boolean property database.isTransaction.
9. Built-in debugger
Node.js ships with a built-in debugger that allows you to easily debug Node.js applications using the Chrome DevTools debugger. To enable this, run your Node.js app with the --inspect flag like so:
node --inspect index.js
However, this might cause your app to start and finish execution before you can attach the debugger. To fix that, use --inspect-brk instead:
node --inspect-brk index.js
This tells Node.js to pause execution on the first line, giving you time to connect the debugger. You’ll see output like:  Open Chrome and go to:
 chrome://inspect, then click on “Open dedicated DevTools for Node”: 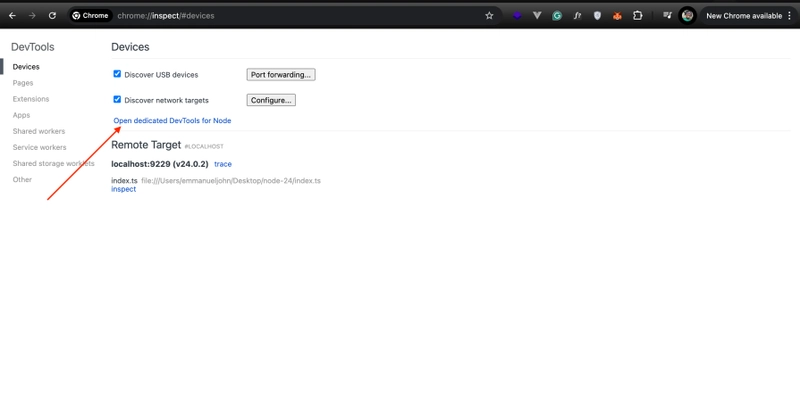 Now you can debug your app, step through your code line by line, set breakpoints, and use the Console tab to evaluate expressions.
10. Native WebSocket client
Another heavily dependent external library for Node.js apps is the ws or Socket.IO for client connections to real-time data feeds or interacting with other WebSocket servers.
With the Node.js native new WebSocket constructor, you can remove ws or Socket.IO from your app dependencies if your app depends on its WebSocket client implementation. Let’s look at a practical example that demonstrates how to use the built-in WebSocket client:
const socket = new WebSocket('ws://localhost:8080');
socket.addEventListener('open', event => {
  console.log('WebSocket connection established!');
  // Sends a message to the WebSocket server.
  socket.send('Hello Server!');
});

socket.addEventListener('message', event => {
  console.log('Message from server: ', event.data);
});

socket.addEventListener('close', event => {
  console.log('WebSocket connection closed:', event.code, event.reason);
});

socket.addEventListener('error', error => {
  console.error('WebSocket error:', error);
});
If you run a WebSocket server on port 8080 and execute this client code, you’ll see a series of events logged in the console. Initially, a message confirming the WebSocket connection will appear. Then, the client sends a greeting message ("Hello Server!") to the server.
Any response sent back from the server will also be displayed in the console. Also, if the server closes the connection or an error occurs during communication, those events will be logged with details such as the close code, reason, or error message.
Conclusion
This is just a glimpse of what's possible with Node.js and its growing list of new features. However, features like the built-in TypeScript support should be viewed as partial support rather than a full replacement for tools like ts-node or build systems such as esbuild or tsc.
This is especially true for larger codebases that rely on advanced TypeScript configurations. Similarly, the node:sqlite module doesn’t replace the need for full-featured, production-grade databases like PostgreSQL or MySQL, as it’s best suited for lightweight applications or prototyping.
200’s only ✔️ Monitor failed and slow network requests in production
Deploying a Node-based web app or website is the easy part. Making sure your Node instance continues to serve resources to your app is where things get tougher. If you’re interested in ensuring requests to the backend or third party services are successful, try LogRocket.

LogRocket is like a DVR for web apps, recording literally everything that happens on your site. Instead of guessing why problems happen, you can aggregate and report on problematic network requests to quickly understand the root cause.
LogRocket instruments your app to record baseline performance timings such as page load time, time to first byte, slow network requests, and also logs Redux, NgRx, and Vuex actions/state. Start monitoring for free.


Top comments (0)