
When working on a Next.js application during development, it's common to run the app locally at localhost:3000. However, there are situations where you may need to share your local development environment with others—for example, to collect feedback, debug collaboratively, or demonstrate features in progress. Typically, this requires deploying the app to a staging server or a cloud platform, which can be time-consuming or unnecessary for short-term access. An alternative approach is to use a tunneling tool that creates a secure connection between your local machine and the internet. In this guide, we'll use Pinggy, a simple SSH-based tunneling solution, to make a locally hosted Next.js app accessible from anywhere.
What is Next.js?
Next.js is a powerful React framework built by Vercel. It offers everything needed to build fast, modern web applications with minimal setup:
- Static Site Generation (SSG) for SEO-friendly, high-performance pages
- Server-Side Rendering (SSR) for dynamic content
- Incremental Static Regeneration (ISR) to update content without a full redeploy
- Built-in Routing and API routes
- Automatic Code Splitting and Performance Optimization
- Image and Font Optimization, i18n, and Analytics support
Whether you're prototyping a simple page or building a full-scale web app, Next.js streamlines the process.
The Challenge: Sharing a Local App
When developing locally, your Next.js app typically runs at http://localhost:3000. But others can’t access this URL unless they’re on the same network. This is due to network-level restrictions like firewalls or NAT (Network Address Translation), which block incoming traffic to your device.
Deploying to the cloud is a solution, but for quick sharing, it's often:
- Overkill for simple use cases
- Time-consuming and requires configuration
- Potentially expensive if you're just testing or demonstrating features
Pinggy lets you create a secure tunnel from your local environment to the internet using SSH. It’s quick, secure, and doesn’t require deploying to cloud services.
Prerequisites
Before you start, make sure you have the following:
- Node.js and npm installed (Download here)
- SSH client (macOS/Linux come pre-installed; Windows users can install OpenSSH or use Git Bash)
- (Optional) Pinggy account for using custom domains and other advanced features
- Basic familiarity with terminal commands
Step 1: Create and Run Your Next.js App
First, create a new Next.js app:
npx create-next-app@latest my-app
cd my-app
npm run dev

Open a browser and go to http://localhost:3000 to verify the app is running locally.

Step 2: Share Your App with Pinggy
Open a new terminal window and run the following command:
ssh -p 443 -R0:localhost:3000 a.pinggy.io
Once you connect, Pinggy will generate a public URL like:
https://your-app.pinggy.link
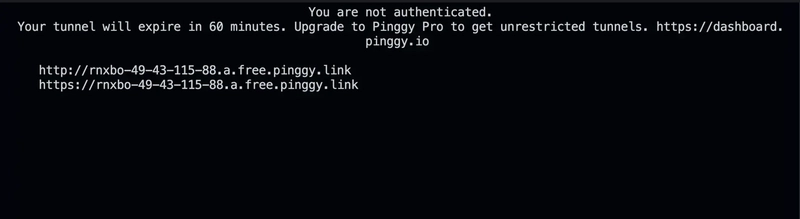

You can now share this link with anyone, and they’ll be able to access your app from anywhere.
Command Breakdown
Here’s what the command does:
-
ssh -p 443: Connects securely to Pinggy over port 443 (HTTPS-compatible, firewall-friendly) -
-R0:localhost:3000: Tunnels your local port 3000 (where your app is running) to the internet -
a.pinggy.io: The Pinggy server that handles the tunnel
Step 3: Optional Customizations
Pinggy supports additional features for more advanced use cases:
Custom Domains
Map your domain (e.g., demo.myapp.com) to the tunnel for a more branded and professional URL.
Password Protection
Add a password to restrict access to your shared app. This is useful for sharing confidential or in-progress work.
More options are available in Pinggy’s official documentation.
Troubleshooting Common Issues
Port Conflict
If the tunnel fails to start, make sure your app is running on port 3000 or adjust the tunnel port in the command.SSH Blocked by Firewall
If the connection fails, your network may block outbound SSH connections. Try switching networks or temporarily allowing port 443.-
Command Not Found (SSH)
If you seessh: command not found, install OpenSSH:- macOS/Linux: Already installed
- Windows: Go to Settings > Apps > Optional Features and install "OpenSSH Client", or use Git Bash
Why Use Pinggy with Next.js?
- No server setup required
- Secure and fast
- Perfect for quick demos, testing, and collaboration
- Works great during development without needing a full deployment pipeline
Conclusion
Sharing your Next.js app online doesn't have to involve complex cloud infrastructure or deployment tools. Pinggy provides a lightweight, secure solution for exposing local apps to the web in seconds.
It's ideal for developers who want to quickly preview work, gather feedback, or run demos—without leaving their local development environment. And when you're ready to go live, deploying to platforms like Vercel, Netlify, or AWS is just as seamless.


Top comments (0)