
INTRODUCTION
In today's cloud-centric world, automating infrastructure deployment is crucial for efficiency, scalability, and reliability. Terraform, an Infrastructure as Code (IaC) tool, allows developers to define and provision cloud resources in a declarative manner. This article explores a Terraform script designed to deploy a scalable and secure web server infrastructure on AWS, including VPC setup, subnets, security groups, an EC2 instance, an Auto Scaling Group (ASG), and an Application Load Balancer (ALB).
By leveraging Terraform, I ensure consistent and repeatable deployments while minimizing manual errors. The script automates the creation of a highly available web server environment, making it ideal for production workloads.

PREREQUISITES
Before running this Terraform script, ensure the following:
AWS Account
AWS CLI & Credentials
Terraform Installed.
KEY DEFINITIONS
1. AWS Provider
The provider "aws" block configures Terraform to interact with AWS, specifying the desired region where resources will be deployed.
provider "aws" {
  region = var.region
}
2. RSA Key Pair
tls_private_key generates an RSA key pair for SSH access.
aws_key_pair uploads the public key to AWS.
local_file saves the private key locally for secure access.
resource "tls_private_key" "rsa" {
  algorithm = "RSA"
  rsa_bits  = 4096
}

resource "aws_key_pair" "web_SERVER" {
  key_name   = var.key_pair_name
  public_key = tls_private_key.rsa.public_key_openssh
}

resource "local_file" "private_key" {
  content  = tls_private_key.rsa.private_key_pem
  filename = "${var.key_pair_name}.pem"
}
3. VPC & SUBNETS
VPC (aws_vpc): A logically isolated network with a defined CIDR block.
Public Subnets (aws_subnet public): Subnets with internet access via an Internet Gateway (IGW).
Private Subnets (aws_subnet private): Subnets without direct internet access, routed through a NAT Gateway.
data "aws_availability_zones" "available" {}

resource "aws_vpc" "web_VPC" {
  cidr_block           = var.vpc_cidr_block
  enable_dns_support   = true
  enable_dns_hostnames = true

  tags = {
    Name = var.vpc_name
  }
}

resource "aws_subnet" "public" {
  count                   = length(var.public_subnet_cidrs)
  vpc_id                  = aws_vpc.web_VPC.id
  cidr_block              = var.public_subnet_cidrs[count.index]
  availability_zone       = data.aws_availability_zones.available.names[count.index]
  map_public_ip_on_launch = true

  tags = {
    Name = "web_PUBLIC_${count.index}"
  }
}

resource "aws_subnet" "private" {
  count             = length(var.private_subnet_cidrs)
  vpc_id            = aws_vpc.web_VPC.id
  cidr_block        = var.private_subnet_cidrs[count.index]
  availability_zone = data.aws_availability_zones.available.names[count.index]

  tags = {
    Name = "web_PRIVATE_${count.index}"
  }
}
4. INTERNET & NAT GATEWAY
Internet Gateway (aws_internet_gateway): Enables public subnets to connect to the internet.
NAT Gateway (aws_nat_gateway): Allows private subnets to access the internet while remaining secure.
resource "aws_internet_gateway" "web_GW" {
  vpc_id = aws_vpc.web_VPC.id

  tags = {
    Name = var.internet_gateway_name
  }
}

resource "aws_eip" "nat" {
  domain     = "vpc"
  depends_on = [aws_internet_gateway.web_GW]
}

resource "aws_nat_gateway" "nat" {
  allocation_id = aws_eip.nat.id
  subnet_id     = aws_subnet.public[0].id
  depends_on    = [aws_internet_gateway.web_GW]

  tags = {
    Name = var.nat_gateway_name
  }
}
5. ROUTE TABLES & ASSOCIATIONS
Public Route Table (aws_route_table public): Routes traffic to the Internet Gateway.
Private Route Table (aws_route_table private): Routes traffic to the NAT Gateway.
Route Table Associations (aws_route_table_association): Links subnets to their respective route tables.
resource "aws_route_table" "public" {
  vpc_id = aws_vpc.web_VPC.id

  tags = {
    Name = var.public_route_table_name
  }
}

resource "aws_route_table" "private" {
  vpc_id = aws_vpc.web_VPC.id

  tags = {
    Name = var.private_route_table_name
  }
}

resource "aws_route" "public_internet_access" {
  route_table_id         = aws_route_table.public.id
  destination_cidr_block = "0.0.0.0/0"
  gateway_id             = aws_internet_gateway.web_GW.id
}

resource "aws_route" "private_nat_route" {
  route_table_id         = aws_route_table.private.id
  destination_cidr_block = "0.0.0.0/0"
  nat_gateway_id         = aws_nat_gateway.nat.id
}

resource "aws_route_table_association" "public_assoc" {
  count          = length(aws_subnet.public)
  subnet_id      = aws_subnet.public[count.index].id
  route_table_id = aws_route_table.public.id
}

resource "aws_route_table_association" "private_assoc" {
  count          = length(aws_subnet.private)
  subnet_id      = aws_subnet.private[count.index].id
  route_table_id = aws_route_table.private.id
}
6. SECURITY GROUP (aws_security_group)
Defines firewall rules to allow:
SSH (Port 22) from a specified IP range.
HTTP (Port 80) for web traffic.
All outbound traffic for updates and external communications.
resource "aws_security_group" "web_SG" {
  name        = var.security_group_name
  description = "Allow Database and SSH"
  vpc_id      = aws_vpc.web_VPC.id

  ingress {
    description = "Allow SSH"
    from_port   = 22
    to_port     = 22
    protocol    = "tcp"
    cidr_blocks = [var.ssh_ingress_cidr]
  }

  ingress {
    description = "Allow HTTP"
    from_port   = 80
    to_port     = 80
    protocol    = "tcp"
    cidr_blocks = [var.HTTP_access_cidr]
  }

  egress {
    description = "Allow all outbound traffic"
    from_port   = 0
    to_port     = 0
    protocol    = "-1"
    cidr_blocks = ["0.0.0.0/0"]
  }

  tags = {
    Name = var.security_group_name
  }
}
7. EC2 INSTANCE (aws_instance)
Deploys an Ubuntu-based web server with Apache installed.
Uses user data to automate software installation and configuration.
resource "aws_instance" "web_server" {
  ami                    = var.instance_ami
  instance_type          = var.instance_type
  key_name               = aws_key_pair.web_SERVER.key_name
  subnet_id              = aws_subnet.public[0].id
  vpc_security_group_ids = [aws_security_group.web_SG.id]

  user_data = <<-EOF
              #!/bin/bash
              sudo apt update -y && sudo apt upgrade -y
              sudo apt install -y apache2
              sudo systemctl start apache2
              sudo systemctl enable apache2
              echo "Hello from Server $(hostname)" > /var/www/html/index.html
              EOF

  tags = {
    Name = "web-SERVER"
  }
}
output "web_server_public_ip" {
  value = aws_instance.web_server.public_ip
}

output "instance_dns_names" {
  value = [aws_instance.web_server.public_dns]
}
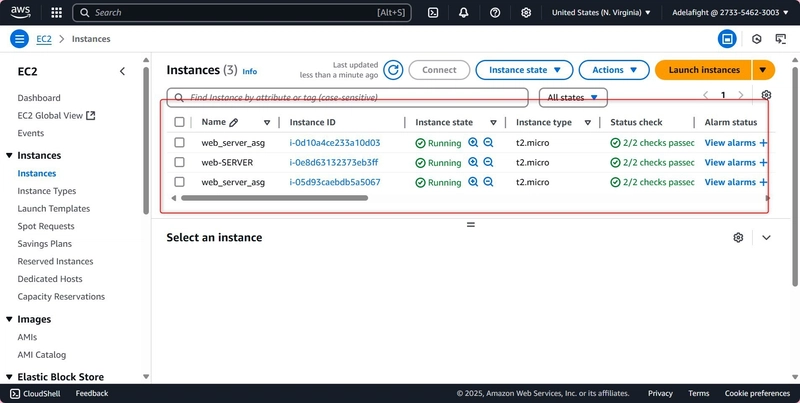
8. AUTO SCALING GROUP (ASG) & LAUNCH TEMPLATE
Launch Template (aws_launch_template): Defines the EC2 configuration for scaling.
ASG (aws_autoscaling_group): Maintains a desired number of instances across availability zones.
#Launch Template for Auto Scaling Group
resource "aws_launch_template" "web_launch_template" {
  name          = "web_server_template"
  image_id      = var.instance_ami
  instance_type = var.instance_type
  key_name      = aws_key_pair.web_SERVER.key_name

  network_interfaces {
    security_groups = [aws_security_group.web_SG.id]
  }

  tag_specifications {
    resource_type = "instance"
    tags = {
      Name = "web_server"
    }
  }
}

#Autoscaling group

resource "aws_autoscaling_group" "web_asg" {
  desired_capacity     = 2
  max_size             = 2
  min_size             = 2
  vpc_zone_identifier  = [for subnet in aws_subnet.public : subnet.id]

  launch_template {
    id      = aws_launch_template.web_launch_template.id
    version = "$Latest"
  }

  target_group_arns = [aws_lb_target_group.web_tg.arn]

  tag {
    key                 = "Name"
    value               = "web_server_asg"
    propagate_at_launch = true
  }
}
9. APPLICATION LOAD BALANCER (ALB)
ALB (aws_lb): Distributes traffic across multiple instances.
Target Group (aws_lb_target_group): Routes requests to healthy instances.
Listener (aws_lb_listener): Handles HTTP traffic on port 80.
#Application Load Balancer
resource "aws_lb" "web_lb" {
  internal                   = false
  load_balancer_type         = "application"
  security_groups            = [aws_security_group.web_SG.id]
  subnets                    = [for subnet in aws_subnet.public : subnet.id]
  enable_deletion_protection = false
}


#Target Group

resource "aws_lb_target_group" "web_tg" {
  name     = "web-target-group"
  port     = 80
  protocol = "HTTP"
  vpc_id   = aws_vpc.web_VPC.id

  health_check {
    path                = "/"
    interval            = 30
    timeout             = 5
    healthy_threshold   = 2
    unhealthy_threshold = 2
    matcher             = "200"
  }
}


#Listerner for Load Balancer
resource "aws_lb_listener" "web_lb_listener" {
  load_balancer_arn = aws_lb.web_lb.arn
  port              = 80
  protocol          = "HTTP"

  default_action {
    type             = "forward"
    target_group_arn = aws_lb_target_group.web_tg.arn
  }
}
CONCLUSION
This Terraform script provides a robust and automated way to deploy a scalable web server infrastructure on AWS. By defining resources such as VPCs, subnets, security groups, EC2 instances, and load balancers in code, we ensure consistency, reduce manual errors, and enable version-controlled infrastructure management.
The inclusion of Auto Scaling and Load Balancing enhances fault tolerance and high availability, making this setup ideal for production environments. With Terraform, infrastructure changes can be tracked, reviewed, and deployed efficiently, aligning with DevOps best practices.


Top comments (0)