The Problem: AI Needs Context, Not Just Code
Modern AI models like Claude 3.5 Sonnet can write code, debug issues, and answer complex questions—but only if they understand your specific context. Without direct access to your tools (Git repositories, project boards, databases), AI assistants operate in the dark, forced to guess about your workflows.
Traditional Solution:

- Custom API integrations for every tool (Jira, gDrive, Slack, GitHub, etc.)
- Hardcoded queries that break with schema changes
- Security risks from exposing raw database access
The MCP Architecture: Universal Data Bridge

MCP standardizes how AI systems access data through three components:
- MCP Servers: Lightweight adapters for tools/databases
- MCP Clients: Built into AI applications (e.g., Claude Desktop).
- Protocol Layer: Type-safe schema definitions
Example: Building a GitHub-Powered Code Assistant
Let’s create an MCP server to give Claude AI access to a GitHub repository.
Step 1: Define the Schema
Create a github-mcp.yaml file describing available data:
# Schema for GitHub MCP Server
schema:
  pull_requests:
    type: List[PR]
    description: "Open PRs in this repository"
    args:
      - name: "label"
        type: string
        optional: true

  file_tree:
    type: List[File]
    description: "Repository directory structure"
Step 2: Implement the MCP Server
# github_mcp_server.py
from mcpsdk import Server, SchemaLoader

class GitHubServer(Server):
    def __init__(self):
        self.schema = SchemaLoader.load("github-mcp.yaml")

    def resolve_pull_requests(self, label: str = None):
        # Connect to GitHub API
        prs = github_api.get_prs(label_filter=label)
        return [
            {
                "id": pr.number,
                "title": pr.title,
                "author": pr.user.login,
                "files_changed": [f.filename for f in pr.get_files()]
            } for pr in prs
        ]

    def resolve_file_tree(self):
        return github_api.get_repo_contents()
Step 3: Query via AI Client
When a developer asks Claude:
"Which open PRs modify src/utils/logger.ts?"
The AI client sends an MCP request:
{
  "server": "github.example.com",
  "query": {
    "pull_requests": {
      "filter": "files_changed INCLUDES 'src/utils/logger.ts'"
    }
  }
}
Step 4: Generate Context-Aware Response
Using MCP data, Claude replies:
“There are 2 open PRs affecting the logger:
Workflow Visualization
GitHub MCP Sequence Diagram
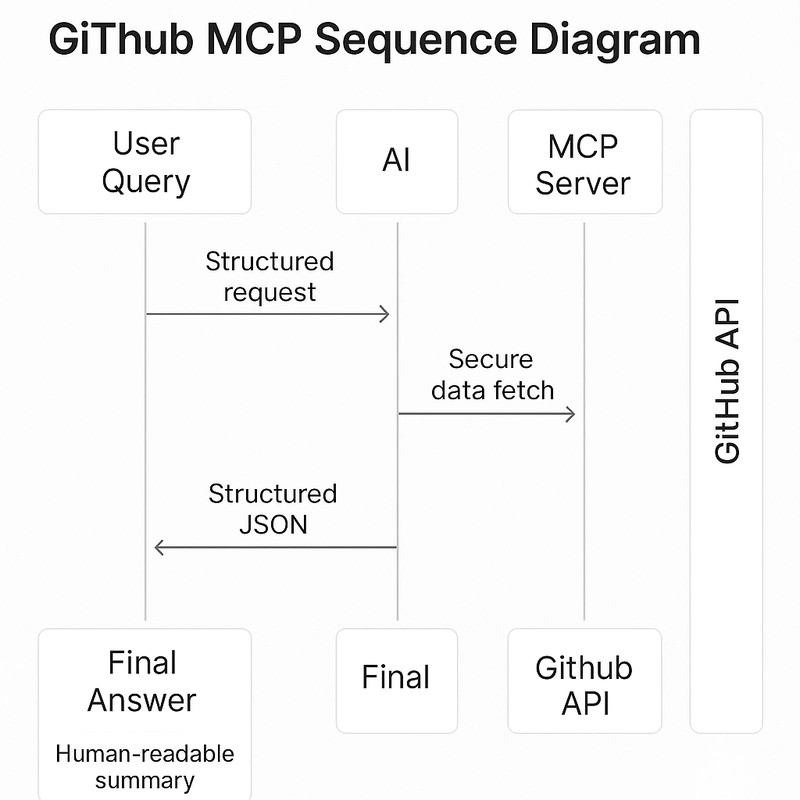
- User Query: Natural language question
- AI → MCP Client: Structured request
- MCP Server → GitHub API: Secure data fetch
- Response → AI: Structured JSON
- Final Answer: Human-readable summary
Why Developers Love MCP
- Zero Hallucinations: AI answers grounded in your actual codebase
- Security First:
- OAuth token management
- Field-level access control
- Tool Agnostic: Same protocol works for Jira, Slack, Postgres, etc.
Step-by-step explanation of the "Get Started in 5 Minutes" workflow with real implementation guidance
1. Install MCP CLI
This installs the Model Context Protocol command-line tools that let you:
- Start/manage MCP servers
- Test connections
- Debug queries
Commands:
# Install package from PyPI
pip install model-context-protocol

# Verify installation
mcp-server --version
# Should output: mcp-server "your version"
Configuration:
# First-time setup (creates ~/.mcp/config.yaml)
mcp-client init
Edit the config to add default servers: yaml file
servers:
  local_github:
    url: http://localhost:8080
    auth_type: none
2. Run Sample GitHub Server
What's Happening:
The --example github flag spins up a preconfigured MCP server that:
- Simulates GitHub API responses
- Includes sample PR data
- Exposes a test schema
Command:
mcp-server --example github
Sample Data Included:
// Sample pull_requests data
[
  {
    "id": 142,
    "title": "Add error tracing",
    "author": "alex",
    "files_changed": ["src/utils/logger.ts"]
  },
  {
    "id": 155,
    "title": "Migrate to Winston v3",
    "author": "sam",
    "files_changed": ["src/utils/logger.ts", "package.json"]
  }
]
3. Test Queries
mcp-client query --server localhost:8080 --query "pull_requests"
Filtered Query:
mcp-client query --server localhost:8080 --query "pull_requests where files_changed includes 'package.json'"
4. Connect to Real GitHub (Production Setup)
Get GitHub Token:
export GITHUB_TOKEN="ghp_your_token_here"
Start Authenticated Server:
mcp-server \
  --schema https://github.com/modelcontextprotocol/servers/github/schema.yaml \
  --auth-type oauth2 \
  --auth-token $GITHUB_TOKEN
Query Real Data:
mcp-client query \
  --server localhost:8080 \
  --query "pull_requests where author='alex' status='open'"
5. Integrate with AI Client (Python Example)
from mcpsdk import Client

def ask_claude(question: str) -> str:
    # 1. Get raw data via MCP
    mcp = Client(server="localhost:8080")
    prs = mcp.query("pull_requests where status='open'")

    # 2. Format context for AI
    context = "\n".join([f"PR#{pr['id']}: {pr['title']}" for pr in prs])

    # 3. Query Claude
    response = claude.chat(
        messages=[{
            "role": "user",
            "content": f"{context}\n\nQuestion: {question}"
        }]
    )

    return response.content
Troubleshooting
Port Conflicts:
mcp-server --port 8081
View Logs:
mcp-server --verbose
Schema Validation:
mcp-client validate --schema localhost:8080/schema.json
Next Steps
Add More Servers:
mcp-server --example slack
mcp-server --example postgres
Persistent Servers:
# Run as background service
nohup mcp-server --example github > mcp.log &
Secure Deployment:
mcp-server \
  --ssl-cert cert.pem \
  --ssl-key key.pem \
  --auth-type jwt \
  --allowed-origins "https://your-domain.com"
This workflow gives you a production-ready foundation to connect AI systems with your actual development environment. For more check the official Full Documentation
☕ Support My Efforts:
If you enjoy this guide, consider buying me a coffee to help me create more content like this!

Top comments (2)
Cool.. I'd be exploring this
Nice piece of write up.