
This project is a lightweight API built with .NET that enables sending emails through a dedicated endpoint. It follows a clean and minimal architecture using controllers, services, and dependency injection. The configuration is handled through appsettings, and error handling is in place to catch issues during the sending process. The API is ready for local testing and future expansion, such as adding authentication, scheduling, or support for attachments.
🔰 Step 0
Create a new project and select the project type "ASP.NET Core Web API"

The NuGet package dependencies used in this project are as follows:
- MailKit
- Microsoft.AspNetCore.OpenApi
- Microsoft.OpenApi
- Newtonsoft.Json
- Swashbuckle.AspNetCore.Swagger
- Swashbuckle.AspNetCore.SwaggerGen
- Swashbuckle.AspNetCore.SwaggerUI
Project Structure Overview
The solution is organized following a clean and modular structure:
Controllers/ – Handles HTTP requests and delegates logic to services.
Models/ – Contains data transfer objects (DTOs) used for passing data.
Services/ – Implements the core logic for sending emails through SMTP.
Program.cs – Configures services, enables basic middleware like HTTPS redirection and Swagger, and sets up the application pipeline.
This layout keeps the responsibilities well-separated and makes the project easy to scale and maintain.

Let's Get Started
💻 Step 1 :
Create a simple model to represent the data sent from the contact form.
The EmailDto class includes three required fields:
-
To: the recipient's email address. -
ContactName: the name of the person submitting the form. -
Body: the actual message content.
These properties will be used when sending emails through the API.
namespace EmailSenderAPI.Models
{
    public class EmailDto
    {
        [Required]
        public string To { get; set; } = string.Empty;

        [Required]
        public string ContactName { get; set; } = string.Empty;

        [Required]
        public string Body { get; set; } = string.Empty;
    }
}
🔄 Step 2 :
Create an interface that defines the contract for the email service.
This interface contains the SendEmail method which will be implemented to handle email sending logic.
using EmailSenderAPI.Models;

namespace EmailSenderAPI.Services.EmailService
{
    public interface IEmailService
    {
        void SendEmail(EmailDto request);
    }
}
📧 Step 3:
Now let’s implement the logic to actually send the emails using MailKit.
In this step, you’ll create the EmailService class that fulfills the IEmailService contract.
This service does the following:
- Sends a confirmation email to the user who filled out the form.
- Sends the actual message to the business inbox.
- Uses configuration values from
appsettings.json(SMTP host, port, credentials). - Logs any errors using
ILogger.
using MailKit.Net.Smtp;
using MailKit.Security;
using MimeKit;
using MimeKit.Text;
using EmailSenderAPI.Models;
using Microsoft.Extensions.Logging;

namespace EmailSenderAPI.Services.EmailService
{
    public class EmailService(IConfiguration config, ILogger<EmailService> logger) : IEmailService
    {
        private readonly IConfiguration _config = config ?? throw new ArgumentNullException(nameof(config));
        private readonly ILogger<EmailService> _logger = logger ?? throw new ArgumentNullException(nameof(logger));

        // Sends both emails: one to the business and one to the customer
        public void SendEmail(EmailDto request)
        {
            ArgumentNullException.ThrowIfNull(request);

            try
            {
                // Send confirmation email to the user
                var confirmationEmail = CreateConfirmationEmail(request);
                SendEmailMessage(confirmationEmail);

                // Send original message to the business
                var businessEmail = CreateBusinessEmail(request);
                SendEmailMessage(businessEmail);
            }
            catch (Exception ex)
            {
                _logger.LogError(ex, "Error sending email to {Recipient}", request.To);
                throw;
            }
        }

        // Email to the customer confirming receipt
        private MimeMessage CreateConfirmationEmail(EmailDto request)
        {
            var email = new MimeMessage();

            email.From.Add(MailboxAddress.Parse(_config["EmailUsername"]));
            email.To.Add(MailboxAddress.Parse(request.To));
            email.Subject = "Thank you for your message";

            email.Body = new TextPart(TextFormat.Html)
            {
                Text = "<p>Thank you for your email. We will get in touch with you shortly.</p>"
            };

            return email;
        }

        // Email to the business with the user's message
        private MimeMessage CreateBusinessEmail(EmailDto request)
        {
            var email = new MimeMessage();

            email.From.Add(MailboxAddress.Parse(_config["EmailUsername"]));
            email.To.Add(MailboxAddress.Parse(_config["EmailUsername"]));
            email.Subject = $"New message from {request.ContactName}";

            email.Body = new TextPart(TextFormat.Html)
            {
                Text = $@"
                    <h2>New contact form submission</h2>
                    <p><strong>From:</strong> {request.ContactName} ({request.To})</p>
                    <p><strong>Message:</strong></p>
                    <p>{request.Body}</p>"
            };

            return email;
        }

        // Connects and sends the email
        private void SendEmailMessage(MimeMessage email)
        {
            using var smtp = new SmtpClient();

            var host = _config["EmailHost"];
            var port = _config.GetValue<int>("Port");
            var username = _config["EmailUsername"];
            var password = _config["EmailPassword"];

            if (string.IsNullOrWhiteSpace(host))
                throw new InvalidOperationException("EmailHost configuration is missing");
            if (port <= 0)
                throw new InvalidOperationException("Invalid Port configuration");
            if (string.IsNullOrWhiteSpace(username))
                throw new InvalidOperationException("EmailUsername configuration is missing");
            if (string.IsNullOrWhiteSpace(password))
                throw new InvalidOperationException("EmailPassword configuration is missing");

            smtp.Connect(host, port, SecureSocketOptions.StartTls);
            smtp.Authenticate(username, password);

            try
            {
                smtp.Send(email);
            }
            finally
            {
                smtp.Disconnect(true);
            }
        }
    }
}
📬 Step 4:
Let’s create a minimal controller to expose a POST endpoint that receives contact form data and triggers the email sending logic.
The controller:
- Accepts POST requests to
/api/email - Receives an
EmailDtoobject from the body - Calls the
SendEmailmethod of the injected service - Returns an HTTP 200 response on success
Here’s the code:
using System.Net;
using EmailSenderAPI.Models;
using EmailSenderAPI.Services.EmailService;
using Microsoft.AspNetCore.Mvc;

namespace EmailSenderAPI.Controllers
{
    [Route("api/[controller]")]
    [ApiController]
    public class EmailController(IEmailService emailService) : ControllerBase
    {
        // Service for sending emails
        private readonly IEmailService _emailService = emailService;

        // POST api/email
        [HttpPost]
        public IActionResult SendEmail(EmailDto request)
        {
            // Call the service to send the email
            _emailService.SendEmail(request);

            // Return success response
            return Ok(new { message = "Email sent successfully" });
        }
    }
}
⚙️ Step 5:
Now let’s configure the application in Program.cs to:
- Register necessary services (controllers, Swagger, HTTP client)
- Register our custom
EmailService - Set up the middleware pipeline for development and HTTPS redirection
Here’s the full code:
using EmailSenderAPI.Services.EmailService;
using Microsoft.OpenApi.Models;

var builder = WebApplication.CreateBuilder(args);

// ------ Service Configuration ------
builder.Services.AddControllers();
builder.Services.AddEndpointsApiExplorer();
builder.Services.AddSwaggerGen(c =>
{
    c.SwaggerDoc("v1", new OpenApiInfo
    {
        Title = "EmailSenderAPI",
        Version = "v1",
        Description = "Email sending API"
    });
});

// Register custom services
builder.Services.AddScoped<IEmailService, EmailService>();
builder.Services.AddHttpClient();

var app = builder.Build();

// ------ Middleware Pipeline ------
if (app.Environment.IsDevelopment())
{
    // Enable Swagger only in Development
    app.UseSwagger();
    app.UseSwaggerUI(); // Default endpoint: /swagger
}

app.UseHttpsRedirection();
app.MapControllers();
app.Run();
🛠️ Step 6:
To keep your email credentials and server details secure and easily manageable, add them to your appsettings.json file:
{
  "EmailHost": "smtp.example.com",
  "EmailUsername": "your@email.com",
  "EmailPassword": "yourEmailPassword",
  "Port": 587,
  "Logging": {
    "LogLevel": {
      "Default": "Information",
      "Microsoft.AspNetCore": "Warning"
    }
  },
  "AllowedHosts": "*"
}
✅ Note: Replace the placeholder values with your actual SMTP server, email address, and credentials.
These values are injected using IConfiguration in the EmailService class.
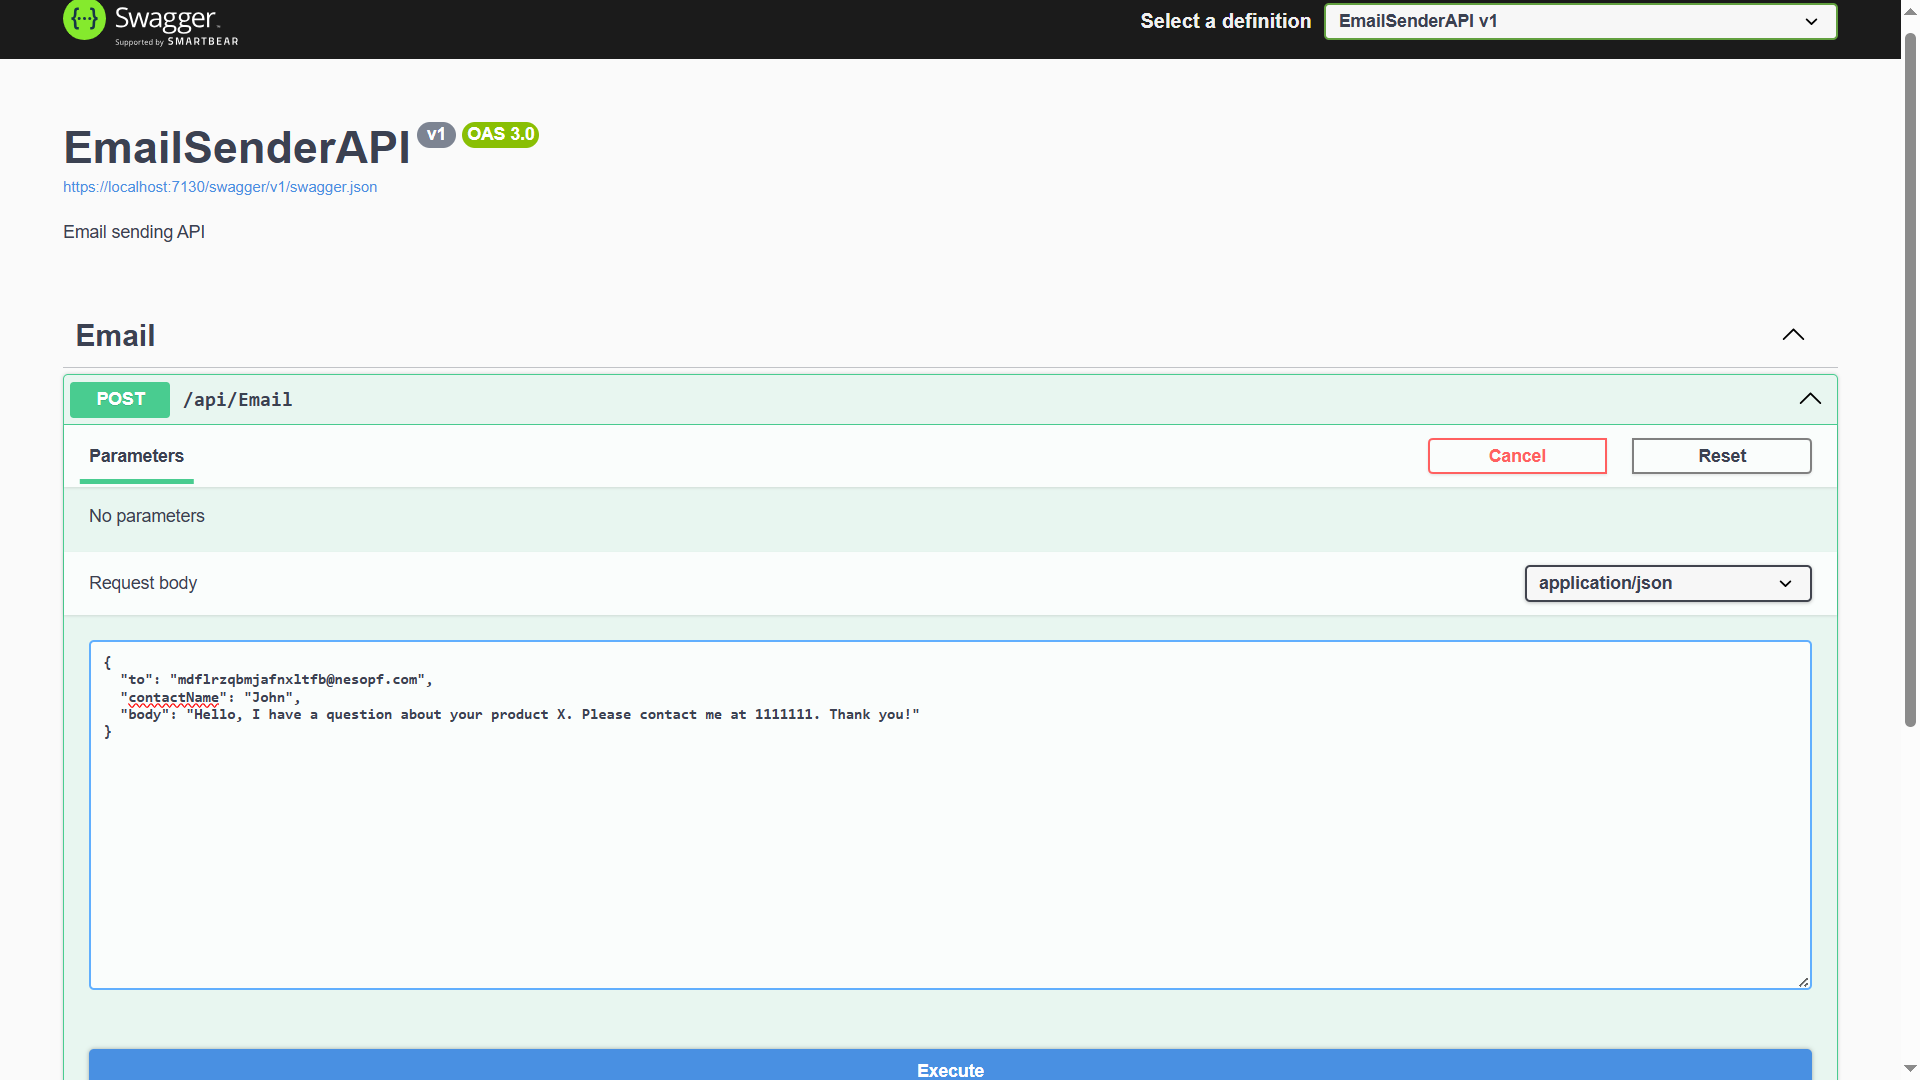
🚀 Now it’s time to test our email sender!
In Swagger, we will enter sample data to perform a test. (📸 Click to enlarge)
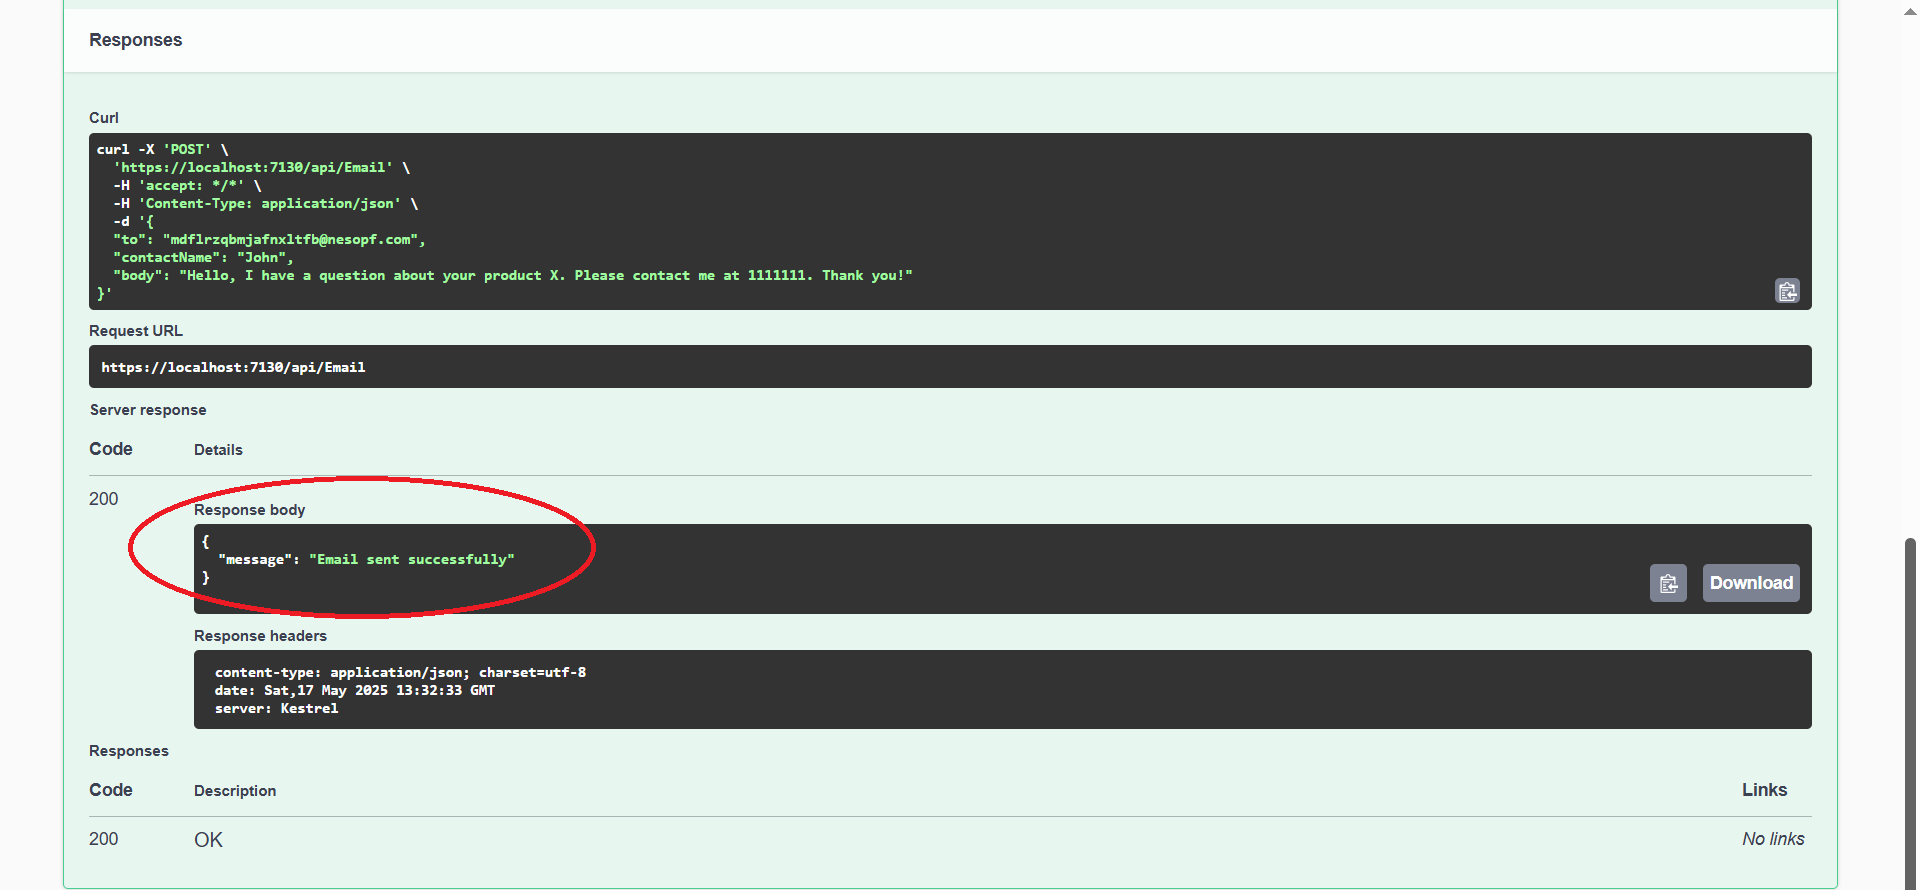
Successful test 🎉 We receive a 200 status code. (📸 Click to enlarge)
📩 Customer Email
Here we see the email that the customer who sent the inquiry would receive.

🏪 Business Email
Here we see the email that the business receives.


Top comments (0)