
In my previous guide, we explored building MCP servers. Today, we'll explore MCP client development (based on a request by readers*),* the critical bridge between AI applications and external systems.
In this blog, we will build a custom client from scratch using available tools.
But before that, a quick refresher on MCP!
Revisiting MCP
MCP stands for Model Context Protocol. It is a universal protocol developed by Anthropic to provide a standardised way to connect to tools, resources, local storage, databases and much more. Think of it as a type-C connector but for LLMS.
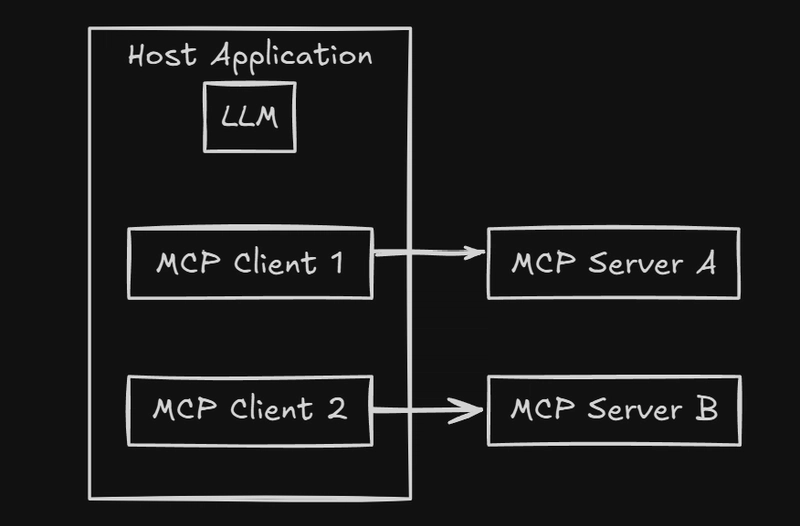
Here is a minor breakdown of the data flow in MCP:
- The AI model sends a request (e.g., "fetch user profile data").
- The MCP client forwards the request to the appropriate MCP server.
- The MCP server retrieves the required data from a database or API.
- The response is sent back to the AI model via the MCP client.
- MCP client displays the output in the terminal / UI
MCP works on client-server architecture, which means you can define your own server and client. In this blog, our focus will be solely on the MCP Client.
But why build one?
Why Custom Client?
Proprietary clients are good and provide support for general use cases. So why opt for custom MCP Clients?
The reason for having a custom MCP Client is that it can help organisations to:
- Connect to internal or proprietary tools that aren’t supported by default.
- Meet strict security or compliance requirements like GDPR.
- Provide real-time data and context to the AI, for more accurate answers within internal tools
- Stay vendor-agnostic to reduce future maintenance, i.e., switch seamlessly between multiple tools.
- Experiment with innovative ai workflows.
However, one should only opt for a custom MCP client when they require tailored integrations, enhanced security, or specific functionalities not addressed by standard solutions.
Having understood the necessity, let’s understand how MCP Client works.
How does the MCP Client work?

MCP client lifecycle can be summarized into three steps: Connect, Exchange, Terminate.
- Connect: The client initiates the connection by sending its protocol version and capabilities.
- Handshake: In response, the server responds with its own, establishing a handshake.
- Exchange: Once connected, the client and server can exchange messages through request-response or one-way notifications/alerts for data exchange.
- Terminate: If something goes wrong, like errors, lost networks or if the client/ server connection is closed, the connection terminates.
To learn more, you can refer to this GitHub repo.
Anyway, theory would be useless without practice, so let’s build a custom MCP client from scratch!
Building a Custom MCP Client using Langchain & Gemini
MCP is built on top of a tool calling and client-server structure, making it ideal for integrating with any LLM that supports Tool Calling.
So, for the sake of simplicity and open source, we will use Google Gemini Models as LLMS and Langchain MCP Adapters to abstract out tool-calling format conversion.
The Client will be a terminal-based client that connects to any MCP Server, enables conversations, and executes the tool process.
Let’s begin by creating our workspace.
Workspace Setup
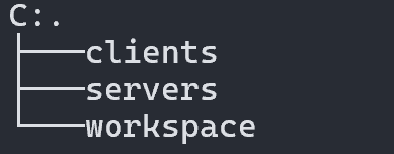
We start by creating a parent directory, mcp, and 3 child directories - services, clients and workspace.
- Servers store all the MCP servers.
- The client stores all clients.
- & Workspace stores the results of the MCP client-server interaction, usually actions.
You can do it manually or open the terminal and execute all the commands one by one:
>mkdir mcp
> cd mcp
> mkdir servers clients workspace
Ensure your directory structure looks similar to image below:
Next create a virtual environment in mcp using:
# windows
cd mcp
python -m venv .venv

# linux/mac
cd mcp
python -m venv --help
sudo apt-get install python3-venv #install venv - optional
python3 -m venv .venv
Now activate the environment with:
# activates env
.venv\\Scripts\\activate

# linux/mac
source .venv/bin/activate
Ensure you see (.venv) infront of the terminal cwd path.
Next add all the required libraries:
pip install langchain langchain_mcp_adapters langgraph langchain_google_genai google-generativeai python-dotenv
You can also use requirements.txt method to perform the same.
Next navigate to the client's folder and create a .env file
> cd clients
> copy con .env # windows
> touch .env # linux/macc
Now populate it with GOOGLE_API_KEY. To get one go to Google AI Studio > Get API Key > Create API Key > Select Project > Create API Key in Existing Product.
A new pop up will open with API Key, copy it and paste it in place of your-api-key .
GOOGLE_API_KEY=your-api-key
Note: You may need to a login to google and create a new project with AI API access to get one.
Finally open the project in any IDE of your choice, I am using VS Code:
> cd ..
> code .
Make sure after all step the directory structure looks similar to the image👇

Now we are ready to code the client.
Add Client Code
In the client's folder, create a new file called client.py and write the following code:
#!/usr/bin/env python
"""
MCP client that connects to an MCP server, loads tools, and runs a chat loop using Google Gemini LLM.
"""

import asyncio
import os
import sys
import json
from contextlib import AsyncExitStack
from typing import Optional, List

from mcp import ClientSession, StdioServerParameters
from mcp.client.stdio import stdio_client

from langchain_mcp_adapters.tools import load_mcp_tools
from langgraph.prebuilt import create_react_agent
from langchain_google_genai import ChatGoogleGenerativeAI

from dotenv import load_dotenv
load_dotenv()  # Load environment variables from .env (e.g., GOOGLE_API_KEY)

# Custom JSON encoder for objects with 'content' attribute
class CustomEncoder(json.JSONEncoder):
    def default(self, o):
        if hasattr(o, "content"):
            return {"type": o.__class__.__name__, "content": o.content}
        return super().default(o)

# Instantiate Google Gemini LLM with deterministic output and retry logic
llm = ChatGoogleGenerativeAI(
    model="gemini-1.5-pro",
    temperature=0,
    max_retries=2,
    google_api_key=os.getenv("GOOGLE_API_KEY")
)

# Require server script path as command-line argument
if len(sys.argv) < 2:
    print("Usage: python client_langchain_google_genai_bind_tools.py <path_to_server_script>")
    sys.exit(1)
server_script = sys.argv[1]

# Configure MCP server startup parameters
server_params = StdioServerParameters(
    command="python" if server_script.endswith(".py") else "node",
    args=[server_script],
)

# Global holder for the active MCP session (used by tool adapter)
mcp_client = None

# Main async function: connect, load tools, create agent, run chat loop
async def run_agent():
    global mcp_client
    async with stdio_client(server_params) as (read, write):
        async with ClientSession(read, write) as session:
            await session.initialize()
            mcp_client = type("MCPClientHolder", (), {"session": session})()
            tools = await load_mcp_tools(session)
            agent = create_react_agent(llm, tools)
            print("MCP Client Started! Type 'quit' to exit.")
            while True:
                query = input("\nQuery: ").strip()
                if query.lower() == "quit":
                    break
                # Send user query to agent and print formatted response
                response = await agent.ainvoke({"messages": query})
                try:
                    formatted = json.dumps(response, indent=2, cls=CustomEncoder)
                except Exception:
                    formatted = str(response)
                print("\nResponse:")
                print(formatted)
    return

# Entry point: run the async agent loop
if __name__ == "__main__":
    asyncio.run(run_agent())
In a nutshell, the code does the following:
- Connects to an MCP server via a stdio connection.
- Loads the available MCP tools using the adapter function
load_mcp_tools. - Creates a React agent using LangGraph's prebuilt agent (
create_react_agent) with the LLM and tools. - Runs an interactive asynchronous chat loop for processing user queries.
Now let’s add the MCP Server code for essential interaction.
Add Server Code
You are free to use the calculator MCP server we made in an earlier blog. Just copy and paste it into the server folder.
However, to demonstrate tool interaction, I am going to create a terminal mcp server that executes CLI commands in the terminal.
In the server folder, create a new file called client.py and write the following code:
# imports
import os
import subprocess
from mcp.server.fastmcp import FastMCP

mcp = FastMCP("terminal")

DEFAULT_WORKSPACE = os.path.join(os.getcwd(), "workspace")

# define tool - llm will create code/ command and pass to this fn
@mcp.tool()
async def run_server_command(command: str) -> str:
    """
    Run a terminal command in workspace.
    Args:
        command: The shell command to run on windows

    Returns:
        The command output or an error message.
    """
    # try catch to handle exception
    try:
        result = subprocess.run(command, cwd= DEFAULT_WORKSPACE, shell=True, capture_output=True, text=True)
        return result.stdout or result.stderr
    except Exception as e:
        return str(e)

if __name__ == "__main__":
    mcp.run(transport="stdio")
Here is a breakdown of what code does:
- It imports necessary modules:
osfor file paths,subprocessfor running shell commands, andFastMCPfor defining an MCP instance. - Creates an instance of
FastMCPnamed "terminal". - Sets a default workspace directory the "workspace". It will hold all the terminal operation results.
- Defines an asynchronous function
run_server_commandas a tool for the MCP server, which:- Takes a shell command as input.
- Runs the command in the workspace directory.
- Returns the command's output or any error message.
- Redefine the standard Python entry-point check to run the script is run directly and pass in
mcp.run(transport = stdio)which starts the MCP server using standard input/output for communication.
Now that we have our server and client ready, let see it in action
Run The Code
Navigate / cd to root folder mcp and run the following command:
# python <path-to-client> <path-to-server>
python "clients\client.py" "servers\terminal_server.py"
This will initiate a client-server mcp session. If everything goes fine you will see a Query: in the terminal.
Let’s try to create a folder test. Within it, create a file data.txt and populate it with the text “MCP Client Building is fun.” Here is a simple prompt to do it.
Create a folder called test, and inside it, create a file named file.txt. In the file, write "MCP Building Is Fun"
This will generate a response and format it using the custom encoder (focus onthe last AI message):

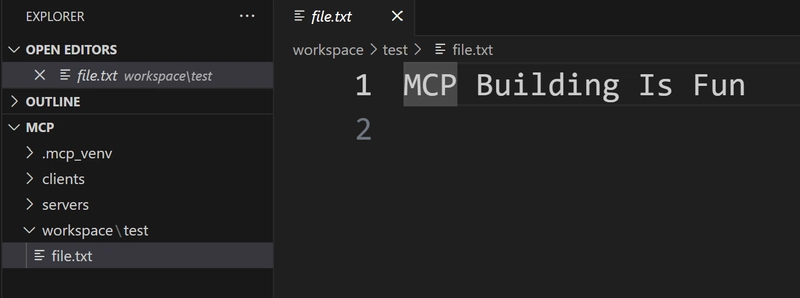
And now if you check the workspace folder you will get a file with the given name and the instructed text:
Now let's delete the test folder and file using next prompt:
Delete the test folder
I have provided no context, let’s see if it can remember our previous conversation
And here are the results (yes it remembers):

And now if you check the workspace folder, no file will be present.

If you like a practical demo, here is one:
This means our client followed the prompt instructions perfectly, just like any agent, such as Copilot, Cursor, or Composer, but now it's all local.
However, this doesn’t end here; you can even integrate and use the custom MCP client with a hosted MCP server and repositories like Composio-MCP, which makes it super easy.
Testing the MCP Client with the Composio SSE Server
Composio is the ultimate integration platform, empowering developers to seamlessly connect AI agents with external tools, 100+ managed MCP servers, and APIS with just a single line of code. This makes it ideal for any use case, including ours.
To test client compatibility with SSE, we will use the Slack MCP server from composio to send messages to a Slack channel.
But first, we need to add the MCP server!
Adding the MCP Server from Composio
Integrating with Composio MCP is incredibly simple and can be done in just five steps:
- Visit the Composio MCP Directory page.
- In this case, select/Search Tools you need, such as Slack.
- Go to the Installation Steps section on the next page and hit Generate.
- Copy the generated URL (private info). Make sure to read all the available functions in the Available Actions section.
- Head to the terminal, paste the copied URL and press Enter. Ensure the environment is activated.
The terminal now installs the tool and configures mcp.json file of (cursor / claude desktop) with the hosted URL:
# mcp.json
{
  "mcpServers": {
    "reddit_composio": {
      "url": "your-private-url"
    }
  }
}
Now let’s create a see-based MCP client.
Creating SSE-Based MCP Client (Terminal usage)
Open the client folder, create a file called sse_client.py and paste the following code:
#!/usr/bin/env python
"""
client_sse.py

MCP client that connects to an SSE-based MCP server, loads tools, and runs a chat loop using Google Gemini LLM.
"""

import os
import sys
import json
import warnings
import logging
import asyncio
from typing import Optional, List

from mcp import ClientSession
from mcp.client.sse import sse_client

from langchain_mcp_adapters.tools import load_mcp_tools
from langgraph.prebuilt import create_react_agent
from langchain_google_genai import ChatGoogleGenerativeAI

from dotenv import load_dotenv
load_dotenv()  # Load environment variables from .env (e.g., GEMINI_API_KEY)

# Suppress specific warnings
warnings.filterwarnings('ignore')

# Custom JSON encoder for objects with 'content' attribute
class CustomEncoder(json.JSONEncoder):
    def default(self, o):
        if hasattr(o, "content"):
            return {"type": o.__class__.__name__, "content": o.content}
        return super().default(o)

# Instantiate Google Gemini LLM with deterministic output and retry logic
llm = ChatGoogleGenerativeAI(
    model="gemini-1.5-pro",
    temperature=0,
    max_retries=2,
    google_api_key=os.getenv("GEMINI_API_KEY")
)

# Require MCP server URL as command-line argument
if len(sys.argv) < 2:
    print("Usage: python client_sse.py <mcp_server_url>")
    sys.exit(1)
server_url = sys.argv[1]

# Global holder for the active MCP session (used by tool adapter)
mcp_client = None

# Main async function: connect, load tools, create agent, run chat loop
async def run_agent():
    global mcp_client
    async with sse_client(url=server_url) as streams:
        async with ClientSession(*streams) as session:
            await session.initialize()
            mcp_client = type("MCPClientHolder", (), {"session": session})()
            tools = await load_mcp_tools(session)
            agent = create_react_agent(llm, tools)
            print("MCP Client Started! Type 'quit' to exit.")
            while True:
                query = input("\nQuery: ").strip()
                if query.lower() == "quit":
                    break
                # Send user query to agent and print formatted response
                response = await agent.ainvoke({"messages": query})
                try:
                    formatted = json.dumps(response, indent=2, cls=CustomEncoder)
                except Exception:
                    formatted = str(response)
                print("\nResponse:")
                print(formatted)
    return

# Entry point: run the async agent loop
if __name__ == "__main__":
    asyncio.run(run_agent())
Here is a breakdown of what the code does:
- It imports necessary modules, including
os,sys,asyncio, and components from MCP and LangChain, to manage communication, tool loading, and agent behaviour. - Loads environment variables from a
.envfile usingdotenv, which includes the Gemini API key. - Suppresses warnings to avoid cluttered console output.
- Defines a custom JSON encoder to format responses containing a
contentattribute properly. - Initialises the Gemini 1.5 Pro LLM with zero temperature (deterministic output) and a retry mechanism in case of failure.
- Checks if the MCP server URL is provided as a command-line argument and exits if it's missing.
- Creates a global holder
mcp_clientthat will store the active session, allowing tools to access it. - Provides SSE (Server-Sent Events) connection support by importing
sse_clientfrommcp.client.sse. - Inside the
run_agentfunction:- Connects to the MCP server using
async with sse_client(url=server_url), which establishes a real-time SSE stream. - Wraps the stream in a
ClientSessionthat initializes and manages the ongoing connection with the server. - Loads available MCP tools using
load_mcp_tools, making them accessible to the agent. - Constructs a ReAct-style agent using
create_react_agentwith the Gemini model and the loaded tools. - Enters a chat loop where:
- It waits for user input.
- Sends the query to the agent.
- Formats and prints the response.
- Loops continuously until the user types
quit.
- Connects to the MCP server using
- Finally, it runs the
run_agentcoroutine usingasyncio.run()when the script is executed directly.
Now that the client is wired up with SSE connection support and real-time interaction, let’s test the custom mcp client.
Test the Client
Now head to terminal, ensure you are in clients directory and run
#python sse_client.py redit_sse_server_url
python sse_client.py your-composio-server-url #use slack ones
You can fetch the SSE URL by going to mcp.json file. Also, you may be prompted to authenticate connection, so do it.
If everything goes fine, you will get the following output:


You can see connection is initiated and connection established.
Now let’s send message to social channel. Ensure you are in clients directory, then enter the following prompt in Query:
Query: "send a message 'hii' to social channel"
Terminal Output: (ignore json schema warnings)

Result:
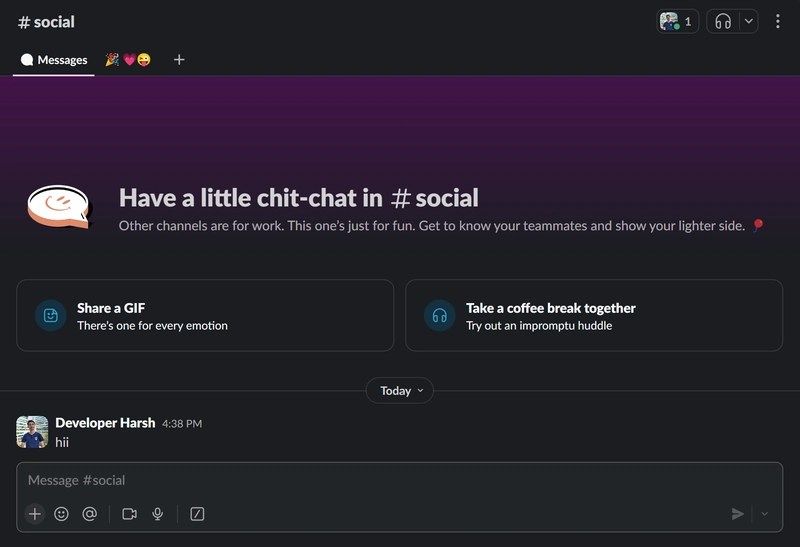
Thus, we have successfully sent the message, means client works as expected.
Congrats on making it so far, with this we have come to an end of the article, here are some of my final thoughts.
Final Thoughts
If you have followed along, you have learnt the following:
- How to develop a powerful custom mcp client, that can utilize STDIO transport for local usage / SSE transport for connecting with multiple local / hosted servers (URL bases)
- Learn’t to use powerful integration tools like composio.
However,
Building production-grade MCP clients requires careful attention to protocol specifics, security, and error handling.
By leveraging modern AI systems like Gemini, OpenAI, Anthropic or any LLM that support tool calls, , robust tooling frameworks like LangChain, and integration tools like composio, developers can now create powerful integrations that bridge AI capabilities with real-world systems.
I am excited to see what all use cases you all will come up with, do share them in comments.
See Ya👋


Top comments (1)
Read the formatted version at
MCP Client from scratch