
Introduction
In my last blog post, I shared how to build a local research assistant using open-source tools. It was a great start, but it had a significant limitation:
- It couldn’t focus on specific topics
- It had limited tool support
- And it didn’t have a good way to save or organise research
So, I went back and redesigned the whole system from scratch.
This updated version can now do domain-specific research, connect easily to external tools, and even save your findings directly to Google Docs via Composio.
In this blog, I’ll show you how to build it yourself—step by step, with no advanced experience needed.
Let’s get started!
Workings
Our local deep researcher agent will follow a 4-step process:
Topic Generation
- The user enters the research topic and domain.
- LLM generates 3 Yes/No research questions based on the input.
Topic Research
- Agent node (LLM) analyzes the question and decides if a tool is needed.
- If tool use is required, control passes to the tool node (e.g., Composio search).
- The tool executes, returns results, and the agent refines the response.
- The final answer for each question is stored.
Report Generation
- After all questions, LLM compiles answers into a structured HTML report.
- Google Docs tool is invoked to create a professional document.
Explicit Tool call
- The user can optionally ask follow-up questions or call for report generation. (sanity check)
- Can be inferred by logs generated during agent runs.
Here is a workflow image for better understanding:
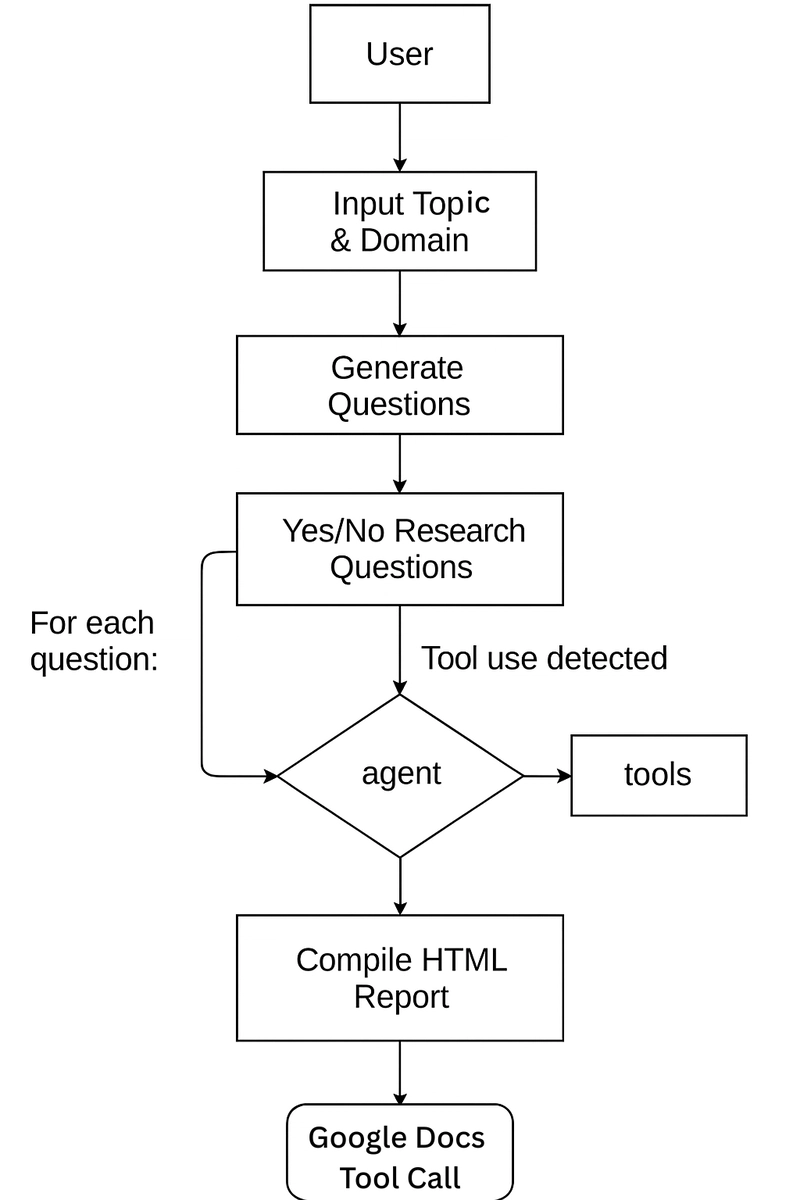
This approach makes the process modular and easy to debug using debug logs.
However, a Couple of caveats here:
- The architecture is changed to support more fine-grained research over a topic
- The agent also includes a human in the loop for explicit tool calls.
- For demo purposes, the blog only includes the backend / terminal version of the program.
- Familiarity with Python and d-type validation is preferred
Having understood the entire workflow, let’s get building the tool
Let’s Get Building!
Workspace
First things first, to keep things isolated let’s create a separate workspace, create virtual environment and install all dependencies.
Create Virtual Environment
Head to the terminal and run commands one by one (ignore #)
mkdir deep-research-agent
cd deep-reseach-agent

python -m venv .venv

# windows
.venv\Scripts\activate

# mac / linux
source .venv/bin/activate

code .
This will create a new folder - deep-research-agent, navigate to it, create a new environment (.venv), and activate it.
Install Dependencies
Inside the editor, create a new file named requirements.txt and paste the following dependencies - ensure not to remove the version number.
tavily-python>=0.5.0
langchain-community>=0.3.9
langchain-ollama>=0.2.1
markdownify>=0.11.0
python-dotenv==1.0.1
composio_core
composio_langchain
composio-langgraph==0.7.15
We will use a handful of dependencies here, the most important ones being compisio_core, langraph, and langchain_ollama, which allow us to implement tool calling and run LLM locally.
Setup Tools
Once libraries are added, head to the terminal and hit
composio add googledocs
and authenticate using OAUTH when prompted.
This adds the Google Docs tool.
NOTE: If you are not logged in, you must do a composio login and authenticate. API KEY must be present in the .env file.
Define Secrets
Next, in the root directory, create a new file called .env to store API keys.
COMPOSIO_API_KEY=YOUR_API_KEY
You can get one for free by going to Composio and creating an API Key. You may need to log in or sign up.
Setup Ollama
Now, set up Ollama by downloading it from the official site and installing it using the default configuration (imp). Then, in the command line, run:
ollama run qwen3:8b-q4_K_M
This pulls the model if it is not present; otherwise, it loads it. You can choose any model except 256 GB (massive compute req). The current model is a 4-bit quantised 8-bit model.
Not done yet;
Finally, head to the environment variables and create a new environment variable.
-
OLLAMA_HOSTwith value127.0.0.1:3030& save the file.
In case you are facing issue kindly follow this easy guide
Once done, you are now ready to write the main agent code.
Creating Research Agent
Create a new file called deep_research_agent.py and follow along or copy and paste the code from the deep_research_agent.py gist.
Anyway’s if you are up for learning, here we go 🚀
We begin by importing all necessary libraries to build the research agent.
These include:
- Standard libraries like
osandtyping, - Environment loading with
dotenv, - LangGraph components for defining workflow logic,
- LLM integration via
langchain_ollama, - Tooling support with
Composio.
# standard libs
import os
import typing
from dotenv import load_dotenv

# data validation & processing
from typing import Annotated, TypedDict
from typing_extensions import TypedDict

# langchain & langraph
from langchain_ollama import ChatOllama
from langgraph.checkpoint.memory import MemorySaver
from langgraph.graph import StateGraph, START
from langgraph.graph.message import add_messages
from langgraph.prebuilt import ToolNode, tools_condition
from langchain_core.runnables.config import RunnableConfig

# composio imports
from composio import ComposioToolSet
from composio_langgraph import Action, ComposioToolSet

# load env data
load_dotenv()
After sorting dependencies, the next step is to define the state—a container for the data that flows between nodes.
class State(TypedDict):
    messages: Annotated[list, add_messages]

graph_builder = StateGraph(State)
In LangGraph, a State defines an agent's system memory. Think of it as storage that maintains and tracks information as AI agents process data.
In this case, the code defines a:
-
State, aTypedDictobject, holds the ongoing conversation (messages). -
graph_builderthen initialises the state based on the definedStateschema.
After preparing the graph structure, configure the language models and external tools.
# define llm
llm = ChatOllama(model="qwen3:8b-q4_K_M")
llm_for_questions = ChatOllama(model="qwen3:8b-q4_K_M")

# define tools and bind
toolset = ComposioToolSet()
tools = toolset.get_tools(actions=[
    Action.COMPOSIO_SEARCH_TAVILY_SEARCH,
    Action.GOOGLEDOCS_CREATE_DOCUMENT_MARKDOWN
])
llm_with_tools = llm.bind_tools(tools)
Here’s what we’re doing:
- Initializing two instances of the Qwen 3 (8B) model locally via Ollama
- Registering tools for search and document generation using Composio
- Binding tools to one model instance for tool-augmented responses
Once tools and models are in place, add the agent nodes.
def call_model(state):
    messages = state["messages"]
    response = llm_with_tools.invoke(messages)
    return {"messages": [response]}

graph_builder.add_node("agent", call_model)

tool_node = ToolNode(tools=tools)
graph_builder.add_node("tools", tool_node)
Nodes define the processing unit in LangGraph.
They can be functional, class-based, tool-based, conditional, or runnable based on their specific purpose.
In this case
- The
agentnode interacts with the LLM and decides whether to call a tool-functional node. - The
toolsnode executes the selected tool action and returns results, in this case, the tool node.
Next, join the nodes together to define how control flows across the graph, along with memory setup.
graph_builder.add_conditional_edges("agent", tools_condition)
graph_builder.add_edge("tools", "agent")
graph_builder.add_edge(START, "agent")

memory = MemorySaver()
graph = graph_builder.compile(checkpointer=memory)

config = typing.cast(RunnableConfig, {
    "configurable": {"thread_id": "1"}
})
The edge in LangGraph determines the flow of the graph.
So, a conditional edge checks if a tool needs to be invoked. If yes, the agent passes the control to the tool node you defined earlier.
In the process:
- Memory Saver saves the interaction in memory,
- Multiple memory checkpoints across the runs are saved
- and the Config object is created with the required key for the check-pointer, cast to
RunnableConfig
With the architecture ready, you must define a clear, instructive prompt for the assistant.
system_message = """
You are a sophisticated research assistant. Perform comprehensive research on the given query and provide detailed analysis. Focus on:
- Key concepts and main ideas
- Current developments and trends
- Important stakeholders and their roles
- Relevant data and statistics
- Critical analysis and implications

Create a detailed report on the research and write it in Google Docs.

Ensure all information is accurate, up-to-date, and properly sourced. Present findings in a clear, structured format suitable for professional analysis.
"""
This prompt sets expectations for tone, format, depth, and tool usage.
Moving forward, let’s add support to prompt the user to input the research topic and domain.
print("🤖: Hi! I can help you research any topic. Let's start!")
topic = input("What topic would you like to research? ")
domain = input("What domain is this topic in? ")
These inputs guide the assistant in crafting tailored and domain-relevant research.
Next, we define the question generator component, which generates 3 specific yes/no research questions based on the user's topic.
questions_prompt = (
    f"Generate exactly 3 specific yes/no research questions about the topic '{topic}' in the domain '{domain}'. "
    f"Respond ONLY with the text of the 3 questions formatted as a numbered list, and NOTHING ELSE."
)

question_generation_messages = [{"role": "user", "content": questions_prompt}]
response = llm_for_questions.invoke(question_generation_messages)
print("[DEBUG] Chat history for question generation:", question_generation_messages)

def extract_questions_after_think(text):
    if "</think>" in text:
        return text.split("</think>", 1)[1].strip()
    return text.strip()

questions_only = extract_questions_after_think(response.content or "")
questions_list = [q.strip() for q in questions_only.split('\n') if q.strip()]
This step transforms an open-ended topic into actionable, researchable questions. A very alternative to IterDag approach from earlier.
Here is what’s happening:
- We Prompt the LLM to generate 3 research questions using defined prompt.
- Then Extracts questions from the response (handling potential "thinking" output)
- Finally Displays the questions to the user after handling the processing (for clarity)
- To debug the agent execution, we also add a print statement.
We now loop through each question, run the graph, and collect answers using the tools.
question_answers = []

for idx, question in enumerate(questions_list):
    print(f"\n🤖: Researching question {idx+1}: {question}")
    memory = MemorySaver()
    per_question_graph = graph_builder.compile(checkpointer=memory)
    per_question_config = typing.cast(RunnableConfig, {
        "configurable": {"thread_id": str(idx+2)}
    })

    question_prompt = (
        f"You are a sophisticated research assistant. Answer the following research question about the topic '{topic}' in the domain '{domain}':\n\n"
        f"{question}\n\n"
        f"Use the COMPOSIO_SEARCH_TAVILY_SEARCH tools to provide a concise, well-sourced answer."
    )

    messages = [{"role": "user", "content": question_prompt}]
    answer = ""

    for chunk in per_question_graph.stream({"messages": messages}, config=per_question_config, stream_mode="values"):
        answer += chunk["messages"][-1].content + "\n"

    question_answers.append({"question": question, "answer": answer})
A lot of code, but here is what it does in a nutshell:
- Creates a new graph instance with its own memory.
- Sets up a configuration with a unique thread ID.
- Crafts a prompt instructing the agent to answer the question using search tools.
- Streams the response and collects the answer.
- Stores question-answer pairs for later use.
Again, to debug tool calls, we add logs for the console/terminal. This will help us later determine whether the tool was called.
Note: Each question is researched in isolation, using a new graph with its own memory context.
With all answers ready, we instruct the assistant to compile a professional HTML report and create a Google Doc.
qa_sections = "\n".join(
    f"<h2>{idx+1}. {qa['question']}</h2>\n<p>{qa['answer']}</p>" for idx, qa in enumerate(question_answers)
)

compile_report_prompt = (
    f"You are a sophisticated research assistant. Compile the following research findings into a professional, McKinsey-style report..."
    # (trimmed for brevity in this view)
)

final_memory = MemorySaver()
final_graph = graph_builder.compile(checkpointer=final_memory)
final_config = typing.cast(RunnableConfig, {"configurable": {"thread_id": "final"}})

compile_report_messages = [{"role": "user", "content": compile_report_prompt}]
print("\n🤖: Compiling report and creating Google Doc...")

for chunk in final_graph.stream({"messages": compile_report_messages}, config=final_config, stream_mode="values"):
    print(chunk["messages"][-1].content)
The assistant:
- Formats all answers using structured HTML. - Good for conversion with Markdown
- Uses the
GOOGLEDOCS_CREATE_DOCUMENT_MARKDOWNtool to convert HTML to markdown. (very important) - Streams the Google Doc link once created. (disable if not req)
- Saves agent interaction and tool call data at checkpoints within the State.
To wrap up, we can optionally ask follow-up questions with context preserved. This allows the user to perform explicit tool calling if the agent workflow fails.
follow_up = input("Anything else you want to ask: ")
follow_up_messages = [{"role": "user", "content": follow_up}]
events = final_graph.stream({"messages": follow_up_messages}, config=final_config, stream_mode="values")

for event in events:
    event["messages"][-1].pretty_print()
This ensures a continuous, contextual dialogue after the report is completed.
With this, the code is now complete, so it's time to test it.
Run The Code
To run the code, open the terminal and type:
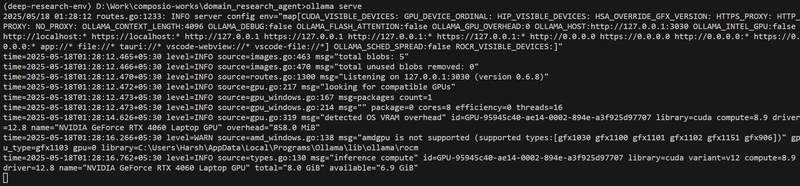
ollama serve
You will get an output of the server running:
If you face any issue, ensure the OLLAMA_HOST env variable is defined! (For details, refer to the workspace setup section)
Now open a new terminal, activate the environment (.venv) and start the agent with
python deep_research_agent.py
In a few seconds, you will be prompted to enter your research topic and domain, and the process will start. Ignore warnings, if any.
Once the research doc is generated, you will get a link to check the file.
If the Google Docs tool execution fails (due to an ambiguous prompt), you will be prompted to enter text to perform the tool call explicitly. (ensures sanity)
Here is a demo of me using it 👇
[deep_learning_researcher_2]
As you can see, the link is generated at the end. You can even inspect logs to find out that Composio Search and Google Docs tools are called as needed!
Final Thoughts
Building your own local research assistant might sound complex, but as demonstrated, it's not.
Combining LangGraph, Ollama, and Composio gives you a powerful, flexible, and private system you control.
This project is just the beginning. You can keep improving it by:
- Adding more tools
- Customising the research flow
- Using different os models/ Qwen models as they come out
- Add MCP support
- Add support for creating a blog post rather than a doc file,
and much more.
If you’re curious about AI or want to build smarter workflows, this is a great hands-on way to learn.
Anyway’s I leave it to you but do share your issues / whatever you built in comments, would love to check it out.
See you in next one,
Bye 👋

Top comments (0)