Using VS Code for Arduino Development offers better code management, debugging, and extensions compared to the Arduino IDE. Here's a step-by-step guide:
1. Install Prerequisites
Arduino IDE (required for compiler/tools):
Download from arduino.cc and install.
VS Code:
Download from code.visualstudio.com.
2. Install the Arduino Extension
- Open VS Code.
- Go to Extensions (Ctrl+Shift+X).
- Search for "Arduino" and install the official extension by Microsoft.
3. Configure Arduino Path
Open VS Code settings (Ctrl+,).
Search for Arduino Path and set it to your Arduino IDE installation folder:
- Windows: C:\Program Files (x86)\Arduino
- macOS: /Applications/Arduino.app/Contents/Java
- Linux: /usr/share/arduino
4. Create/Open an Arduino Project
New Project:
- Press F1 > Arduino: Initialize.
- Select a board (e.g., Arduino Uno).
- Choose a sketch folder.
Existing Project:
Open the folder containing your .ino file.
5. Select Board & Port
- Click the board name in the bottom status bar (e.g., Arduino Uno).
- Select your target board from the list.
- Click the port (e.g., COM3 or /dev/ttyACM0).
6. Build & Upload
- Build (Verify): Ctrl+Alt+R or click the checkmark icon.
- Upload: Ctrl+Alt+U or click the arrow icon.
- Serial Monitor: Ctrl+Alt+Shift+M to debug output.
7. Advanced Features
IntelliSense & Autocomplete
- Install C/C++ Extension (by Microsoft).
- Configure c_cpp_properties.json (auto-generated by Arduino extension).
Debugging
- Install Cortex-Debug extension (for ARM-based boards like Arduino Due).
- Use an external debugger (e.g., J-Link) with launch.json.
Library Management
- Add libraries via Library Manager (F1 > Arduino: Library Manager).
- Manually place libraries in ~/Arduino/libraries (or your sketchbook folder).
8. Example platformio.ini (Alternative with PlatformIO)
For more control, use PlatformIO in VS Code:
ini
[env:uno]
platform = atmelavr
board = uno
framework = arduino
monitor_speed = 9600
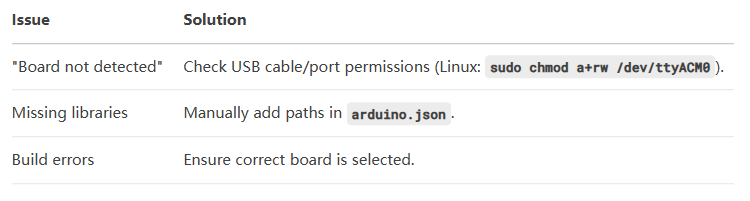
9. Troubleshooting
10. Recommended Extensions
- PlatformIO IDE: Advanced project management.
- GitLens: Version control.
- Code Runner: Quick script testing.
Why VS Code Over Arduino IDE?
- Git Integration: Track code changes.
- Multi-file Projects: Better than Arduino’s single-tab limitation.
- Debugging: Breakpoints/watch variables (with hardware debuggers).
For beginners, start with the Arduino IDE, but switch to VS Code for larger projects!


Top comments (0)