
🔥 Quick Recap
In my previous article , we spun up an EC2 instance, configured Apache, and hosted a static website the traditional way.
Today, we're taking a lighter, serverless approach, hosting a static website using Amazon S3.
No servers to manage. No SSH logins. Just pure, clean static site hosting. Let’s get into it! 🚀
🧰 What You’ll Need
- An AWS account
- A static website (you can build yours or grab a free one from Tooplate.com.
- Basic familiarity with the AWS Console
📖 Walkthrough: Hosting a Static Website on S3
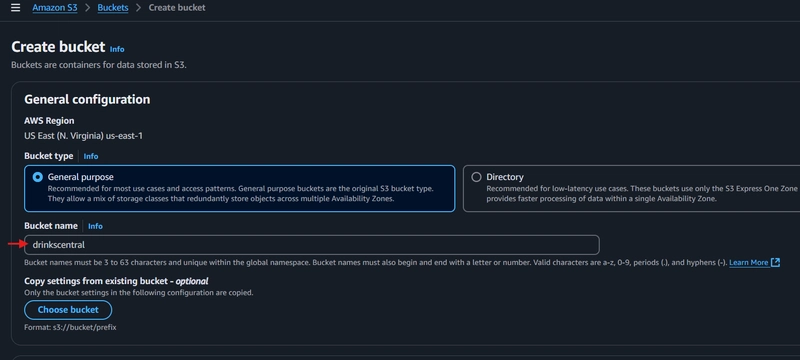
🛒 Step 1: Create an S3 Bucket
- Head over to the AWS S3 Console.
- Click on Create Bucket.
- Give your bucket a globally unique name in my case "drinkscentral".
- Notice that public access is blocked by default, but don't worry, we'll come back to fix that. 😉
- Click Create Bucket.

📤 Step 2: Upload Your Website Files
After creating the bucket:
- Click into your newly created bucket.
- Hit Upload then click Add Files.
- Select the files you downloaded from Tooplate.com (or your own static site).
- Click Upload.


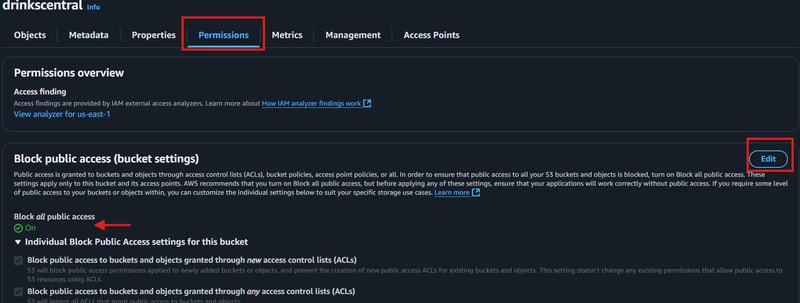
🔓 Step 3: Set Public Access
Remember earlier when I said public access was blocked? Time to fix that.
- Go to the Permissions tab.
- Under Block Public Access, click Edit.
- Untick the options that block public access.
- Save changes.
🛡️ Step 4: Enable ACLs (Access Control Lists)
Why enable ACL?
ACLs let us manually grant permissions to individual objects, like making our uploaded website files publicly readable.
- Still in the Permissions tab, scroll to Object Ownership.
- Click Edit.
- Select ACLs enabled.
- Acknowledge and save changes.

🌍 Step 5: Make Objects Public
Now that ACLs are enabled:
- Go back to the Objects tab.
- Select all uploaded files.
- Click Actions then Make public using ACL.


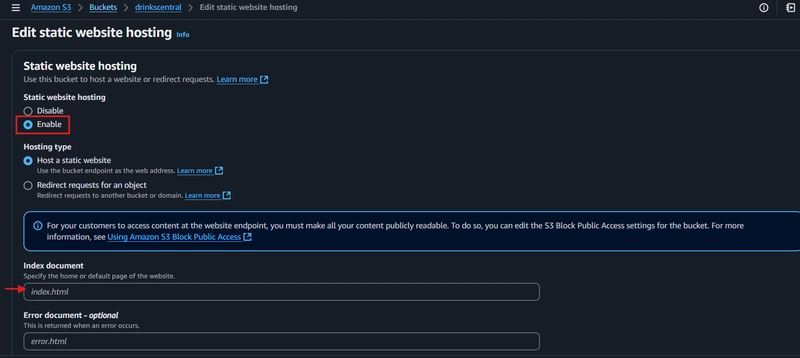
⚙️ Step 6: Enable Static Website Hosting
Finally, let's tell S3 that this bucket is a website.
- Go to the Properties tab.
- Scroll down to Static website hosting.
- Click Edit then Enable.
- Enter:
-
Index document:
index.html - (Optional) Error document:
error.html
-
Index document:
- Save changes.
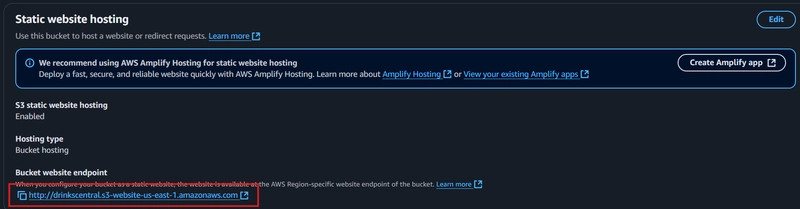
🌐 Step 7: Access Your Live Website!
You're done! 🎉
- Still in the Properties tab, scroll down to Static Website Hosting.
- Copy the Bucket Website Endpoint link.
- Paste it into your browser.
Boom 💥 your static site is live, hosted on AWS S3!

🆚 EC2 vs S3 for Static Websites
| Feature | EC2 Hosting | S3 Hosting |
|---|---|---|
| Server Management | Manual (configure OS, Apache, etc) | Serverless (no management) |
| Cost | Higher (pay per uptime) | Very low (pay per storage/requests) |
| Setup Complexity | Medium to High | Easy |
| Scalability | Manual scaling | Auto scales |
| Suitable For | Dynamic + static websites | Static websites only |
🏁 Final Thoughts
In our previous EC2 approach, we had to spin up servers, configure Apache, and manage everything.
Here on S3, it's simply upload → tweak permissions → launch. Easy, scalable, and super cost-effective.
S3 static hosting is good for portfolios, landing pages, and lightweight projects.
Stay tuned as I continue learning, maybe we'll set up CloudFront, SSL, and custom domains next. 👀
Thanks for following along!
Until next time,
- Oluwaseyi 😁✌️


Top comments (5)
S3 is a good call for the static site, it is straightforward and less stress to manage. Thank you for this piece!
s3 is my preferred choice.
Yup yup, you're welcome.
perfect, stuff like this always gets me wanting to rebuild my sites just to keep things simple - you ever feel like less tech sometimes makes for better focus?
You’re totally right! There’s something refreshing about stripping things back to the basics you know , no unnecessary bloat, just what works. I’ve definitely fallen into the trap of over engineering things only to realize later that simplicity often is the best feature. Anyways really glad the post resonated 😁