
As companies deal with more data than ever before, the need for real-time, scalable, and low-cost storage becomes critical. That's where Apache Iceberg shines. In this post, I’ll walk you through how to build a real-time data sync pipeline from MySQL to Iceberg using BladePipe—a tool that makes data migration ridiculously simple.
Let’s dive in.
Iceberg
What is Iceberg?
If you haven’t heard of Iceberg yet, it’s an open table format designed for large analytic datasets. It’s kind of like a smarter table format for your data lake—supporting schema evolution, hidden partitioning, ACID-like operations, and real-time data access.
It includes two key concepts:
- Catalog: Think of this as metadata—the table names, columns, data types, etc.
- Data Storage: Where the metadata and actual files are stored—like on S3 or HDFS.
Why Iceberg?
Iceberg is open and flexible. It defines clear standards for catalog, file formats, data storage, and data access. This makes it widely compatible with different tools and services.
- Catalogs: AWS Glue, Hive, Nessie, JDBC, or custom REST catalogs.
- File formats: Parquet, ORC, Avro, etc.
- Storage options: AWS S3, Azure Blob, MinIO, HDFS, Posix FS, local file systems, and more.
- Data access: Real-time data warehouses like StarRocks, Doris, ClickHouse, or batch/stream processing engines like Spark, Flink, and Hive can all read, process and analyze Iceberg data.
Besides its openness, Iceberg strikes a good balance between large-scale storage and near real-time support for inserts, updates, and deletes.
Here’s a quick comparison across several database types:
| Database Type | Relational DB | Real-time Data Warehouse | Traditional Big Data | Data Lake |
|---|---|---|---|---|
| Data Capacity | Up to a few TBs | 100+ TBs | PB level | PB level |
| Real-time Support | Millisecond-level latency, 10K+ QPS | Second-to-minute latency, thousands QPS | Hour-to-day latency, very low QPS | Minute-level latency, low QPS (batch write) |
| Transactions | ACID compliant | ACID compliant or eventually consistent | No | No |
| Storage Cost | High | High or very high | Very low | Low |
| Openness | Low | Medium(storage-compute decoupling) | High | Very high |
From this table, it’s clear that Iceberg offers low cost, massive storage, and strong compatibility with analytics tools—a good replacement for older big data systems.
And thanks to its open architecture, you can keep exploring new use cases for it.
Why BladePipe?
Setting up Iceberg sounds great—until you realize how much work it takes to actually migrate and sync data from your transactional database. That’s where BladePipe comes in.
Supported Catalogs and Storage
BladePipe currently supports 3 Iceberg catalogs and 2 storage backends:
- AWS Glue + AWS S3
- Nessie + MinIO / AWS S3
- REST Catalog + MinIO / AWS S3
For a fully cloud-based setup: Use AWS RDS + EC2 to deploy BladePipe + AWS Glue + AWS S3.
For an on-premise setup: Use a self-hosted relational database + On-Premise deployment of BladePipe + Nessie or REST catalog + MinIO.
One-Stop Data Sync
Before data replication, there's often a lot of manual setup. BladePipe takes care of that for you—automatically handling schema mapping, historical data migration, and other preparation.
Even though Iceberg isn't a traditional database, BladePipe supports an automatic data sync process, including converting schemas, mapping data types, adapting field lengths, cleaning constraints, etc. Everything happens in BladePipe.
Procedures
In this post, we’ll use:
- Source: MySQL (self-hosted)
- Target: Iceberg backed by AWS Glue + S3
- Sync Tool: BladePipe (Cloud)
Let’s go step-by-step.
Step 1: Install BladePipe
Follow the instructions in Install Worker (Docker) or Install Worker (Binary) to download and install a BladePipe Worker.
Step 2: Add DataSources
- Log in to the BladePipe Cloud.
- Click DataSource > Add DataSource.
-
Add two sources – one MySQL, one Iceberg. For Iceberg, fill in the following (replace
<...>with your values):- Address: Fill in the AWS Glue endpoint.
glue.<aws_glue_region_code>.amazonaws.com
- Version: Leave as default.
- Description: Fill in meaningful words to help identify it.
-
Extra Info:
- httpsEnabled: Enable it to set the value as true.
- catalogName: Enter a meaningful name, such as glue__catalog.
- catalogType: Fill in GLUE.
- catalogWarehouse: The place where metadata and files are stored, such as s3://_iceberg.
- catalogProps:
{
  "io-impl": "org.apache.iceberg.aws.s3.S3FileIO",
  "s3.endpoint": "https://s3.<aws_s3_region_code>.amazonaws.com",
  "s3.access-key-id": "<aws_s3_iam_user_access_key>",
  "s3.secret-access-key": "<aws_s3_iam_user_secret_key>",
  "s3.path-style-access": "true",
  "client.region": "<aws_s3_region>",
  "client.credentials-provider.glue.access-key-id": "<aws_glue_iam_user_access_key>",
  "client.credentials-provider.glue.secret-access-key": "<aws_glue_iam_user_secret_key>",
  "client.credentials-provider": "com.amazonaws.glue.catalog.credentials.GlueAwsCredentialsProvider"
}
Step 3: Create a DataJob
- Go to DataJob > Create DataJob.
- Select the source and target DataSources, and click Test Connection for both. Here's the recommended Iceberg structure configuration:
   {
     "format-version": "2",
     "parquet.compression": "snappy",
     "iceberg.write.format": "parquet",
     "write.metadata.delete-after-commit.enabled": "true",
     "write.metadata.previous-versions-max": "3",
     "write.update.mode": "merge-on-read",
     "write.delete.mode": "merge-on-read",
     "write.merge.mode": "merge-on-read",
     "write.distribution-mode": "hash",
     "write.object-storage.enabled": "true",
     "write.spark.accept-any-schema": "true"
   }

- Select Incremental for DataJob Type, together with the Full Data option. Use at least the 1 GB or 2 GB DataJob specification. Smaller specification may hit memory issues with large batches.

- Select the tables to be replicated. It’s best to stay under 1000 tables per DataJob.

- Select the columns to be replicated.
- Confirm the DataJob creation, and start to run the DataJob.

Step 4: Test & Verify
Generate some insert/update/delete operations on MySQL

Stop data generation.
Set up a pay-as-you-go Aliyun EMR for StarRocks, add the AWS Glue Iceberg catalog, and run queries.
-
In StarRocks, add the external catalog:
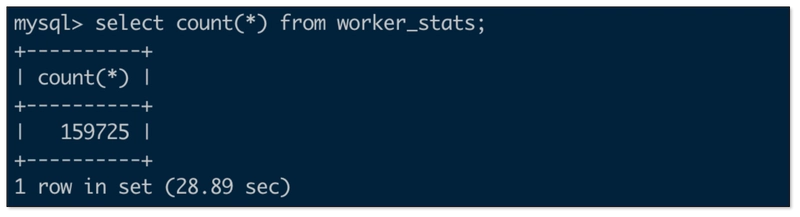
 CREATE EXTERNAL CATALOG glue_test
 PROPERTIES
 (
   "type" = "iceberg",
   "iceberg.catalog.type" = "glue",
   "aws.glue.use_instance_profile" = "false",
   "aws.glue.access_key" = "<aws_glue_iam_user_access_key>",
   "aws.glue.secret_key" = "<aws_glue_iam_user_secret_key>",
   "aws.glue.region" = "ap-southeast-1",
   "aws.s3.use_instance_profile" = "false",
   "aws.s3.access_key" = "<aws_s3_iam_user_access_key>",
   "aws.s3.secret_key" = "<aws_s3_iam_user_secret_key>",
   "aws.s3.region" = "ap-southeast-1"
 )

set CATALOG glue_test;

set global new_planner_optimize_timeout=30000;
MySQL row count

Iceberg row count
Summary
Building a robust, real-time data pipeline from MySQL to Iceberg used to be a heavy lift. With tools like BladePipe, it becomes as easy as clicking through a setup wizard.
Whether you're modernizing your data platform or experimenting with lakehouse architectures, this combo gives you a low-cost, high-scale option to play with.

Top comments (0)