Introduction
Kubernetes has revolutionized container orchestration, but as clusters grow in complexity, security becomes increasingly challenging. Enter Kyverno , a policy engine designed specifically for Kubernetes. Unlike traditional policy engines, Kyverno doesn’t require learning a new language — it uses familiar Kubernetes-style resources to define policies.
In this guide, we’ll explore how to deploy Kyverno in Amazon EKS using Helm charts managed with ArgoCD, providing a GitOps approach to policy management. By the end, you’ll have a fully functional policy enforcement system that can validate, mutate, and generate resources across your EKS clusters.
Kyverno installation

Kyverno Official Doc — Installation guide
Architecture
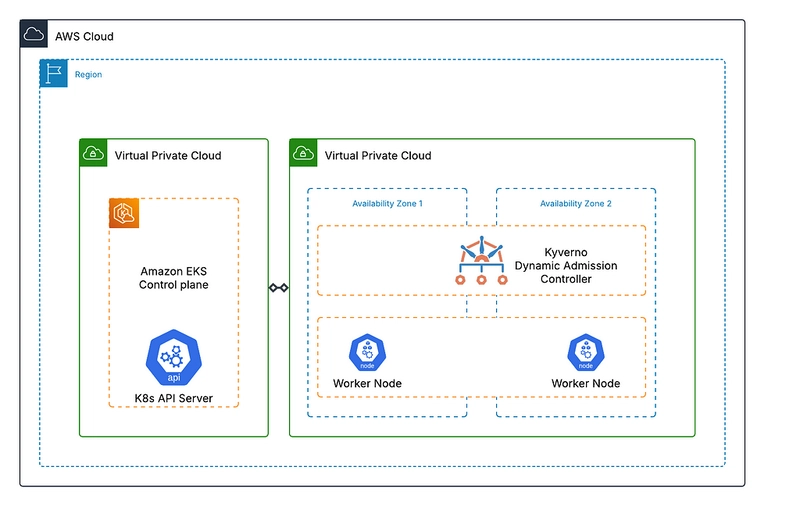
What is Kyverno?
Kyverno (derived from the Greek word “govern”) is a policy engine built specifically for Kubernetes. It allows cluster administrators to:
- Validate resources against policies before they’re admitted to the cluster
- Mutate resources to ensure they conform to organizational standards
- Generate related resources automatically when certain resources are created
- Clean up resources when their parents are deleted
All this is achieved using Kubernetes-native custom resources, making Kyverno intuitive for teams already familiar with Kubernetes.
Prerequisites
Before we begin, ensure you have:
- An EKS cluster up and running
- kubectl configured to communicate with your cluster
- Helm v3 installed
- ArgoCD installed in your cluster
- A Git repository for storing your Kyverno configurations
Deployment Architecture
We’ll follow a GitOps approach with three main components:
- Helm — To package and template the Kyverno installation
- ArgoCD — To sync configurations from Git and manage the deployment
- EKS — Our Kubernetes environment on AWS
Step 1: Setting Up the Git Repository Structure
First, let’s set up our Git repository with the necessary configuration files:
kyverno-gitops/
├── applications/
│ └── kyverno.yaml
└── helm-values/
    └── kyverno-values.yaml
Step 2: Creating the ArgoCD Application
Create the applications/kyverno.yaml file:
apiVersion: argoproj.io/v1alpha1
kind: Application
metadata:
  name: kyverno
  namespace: argocd
spec:
  project: default
  source:
    repoURL: https://kyverno.github.io/kyverno/
    targetRevision: 2.7.2
    chart: kyverno
    helm:
      valueFiles:
      - ../../helm-values/kyverno-values.yaml
  destination:
    server: https://kubernetes.default.svc
    namespace: kyverno
  syncPolicy:
    automated:
      prune: true
      selfHeal: true
    syncOptions:
    - CreateNamespace=true
Step 3: Configuring Kyverno with Helm Values
Now, let’s create the helm-values/kyverno-values.yaml file with our desired configuration:
replicaCount: 3

resources:
  limits:
    cpu: 1000m
    memory: 1Gi
  requests:
    cpu: 100m
    memory: 128Mi

serviceMonitor:
  enabled: true
  namespace: kyverno

extraArgs:
  - "--clientRateLimitQPS=25"
  - "--clientRateLimitBurst=50"

podSecurityContext:
  runAsNonRoot: true
  runAsUser: 1000
  fsGroup: 1000

metricsService:
  create: true
  type: ClusterIP

topologySpreadConstraints:
  - maxSkew: 1
    topologyKey: topology.kubernetes.io/zone
    whenUnsatisfiable: ScheduleAnyway
    labelSelector:
      matchLabels:
        app.kubernetes.io/name: kyverno
Step 4: Deploying with ArgoCD
With our configuration files ready, let’s deploy using ArgoCD:
# Apply the ArgoCD application
kubectl apply -f applications/kyverno.yaml

# Check the status
argocd app get kyverno
You can also use the ArgoCD UI to monitor the deployment progress.

Argocd deployment

Kyverno policies
Step 5: Verifying the Installation
Once ArgoCD reports the application as “Healthy” and “Synced,” verify the installation:
# Check if Kyverno pods are running
kubectl get pods -n kyverno

# Verify the CRDs are installed
kubectl get crds | grep kyverno
You should see the Kyverno pods running and several Kyverno-related CRDs installed.
Step 6: Creating Your First Policy
Let’s create a simple policy that requires all pods to have resource limits:
apiVersion: kyverno.io/v1
kind: ClusterPolicy
metadata:
  name: require-resource-limits
spec:
  validationFailureAction: enforce
  rules:
  - name: validate-resource-limits
    match:
      resources:
        kinds:
        - Pod
    validate:
      message: "Resource limits are required for all containers."
      pattern:
        spec:
          containers:
            - resources:
                limits:
                  memory: "?*"
                  cpu: "?*"
Save this as policies/require-resource-limits.yaml in your Git repository.
Step 7: Managing Policies with ArgoCD
Create another ArgoCD application to manage your policies:
apiVersion: argoproj.io/v1alpha1
kind: Application
metadata:
  name: kyverno-policies
  namespace: argocd
spec:
  project: default
  source:
    repoURL: https://github.com/yourusername/kyverno-gitops.git
    targetRevision: main
    path: policies
  destination:
    server: https://kubernetes.default.svc
    namespace: default
  syncPolicy:
    automated:
      prune: true
      selfHeal: true
Apply this application:
kubectl apply -f applications/kyverno-policies.yaml
Step 8: Testing the Policy
Let’s test our policy by trying to create a pod without resource limits:
cat <<EOF | kubectl apply -f -
apiVersion: v1
kind: Pod
metadata:
  name: test-pod
spec:
  containers:
  - name: nginx
    image: nginx
EOF
You should receive an error message indicating that the pod was rejected because it doesn’t specify resource limits.
Now, let’s create a pod that complies with our policy:
cat <<EOF | kubectl apply -f -
apiVersion: v1
kind: Pod
metadata:
  name: test-pod
spec:
  containers:
  - name: nginx
    image: nginx
    resources:
      limits:
        memory: "256Mi"
        cpu: "500m"
EOF
This pod should be created successfully.
Advanced Configuration: Multi-Cluster Policy Management
For organizations with multiple EKS clusters, you can use ArgoCD’s App of Apps pattern to deploy Kyverno consistently across all clusters:
apiVersion: argoproj.io/v1alpha1
kind: Application
metadata:
  name: kyverno-management
  namespace: argocd
spec:
  project: default
  source:
    repoURL: https://github.com/yourusername/kyverno-gitops.git
    targetRevision: main
    path: clusters
  destination:
    server: https://kubernetes.default.svc
    namespace: argocd
  syncPolicy:
    automated:
      prune: true
      selfHeal: true
Within your clusters directory, include a separate application for each cluster:
# clusters/prod-cluster.yaml
apiVersion: argoproj.io/v1alpha1
kind: Application
metadata:
  name: kyverno-prod
  namespace: argocd
spec:
  project: default
  source:
    repoURL: https://github.com/yourusername/kyverno-gitops.git
    targetRevision: main
    path: overlays/prod
  destination:
    server: https://prod-cluster-api.example.com
    namespace: kyverno
  syncPolicy:
    automated:
      prune: true
      selfHeal: true
Performance Tuning for EKS
When running Kyverno in a production EKS environment, consider these performance optimizations:
- Set appropriate resource requests and limits to ensure Kyverno pods have sufficient resources without over-provisioning.
- Implement pod topology spread constraints to distribute Kyverno pods across availability zones:
topologySpreadConstraints:
  - maxSkew: 1
    topologyKey: topology.kubernetes.io/zone
    whenUnsatisfiable: ScheduleAnyway
    labelSelector:
      matchLabels:
        app.kubernetes.io/name: kyverno
- Configure Kyverno’s rate limits to prevent it from overwhelming the Kubernetes API server:
extraArgs:
  - "--clientRateLimitQPS=25"
  - "--clientRateLimitBurst=50"
- Use webhooks failurePolicy wisely :
webhooks:
  failurePolicy: Ignore # Use "Fail" in production for critical policies
Monitoring and Alerting
To monitor Kyverno’s health and performance, enable Prometheus metrics:
serviceMonitor:
  enabled: true
  namespace: monitoring
Create a simple Prometheus rule to alert on policy violations:
apiVersion: monitoring.coreos.com/v1
kind: PrometheusRule
metadata:
  name: kyverno-alerts
  namespace: monitoring
spec:
  groups:
  - name: kyverno.rules
    rules:
    - alert: KyvernoPolicyViolations
      expr: sum(increase(kyverno_policy_results_total{result="fail"}[15m])) > 10
      for: 5m
      labels:
        severity: warning
      annotations:
        summary: "High number of Kyverno policy violations"
        description: "There have been more than 10 policy violations in the last 15 minutes."
Conclusion
In this guide, we’ve covered how to deploy Kyverno in an EKS environment using Helm and ArgoCD. By leveraging GitOps principles, we’ve created a scalable, version-controlled system for managing Kubernetes policies.
Kyverno provides a powerful yet easy-to-understand approach to policy enforcement in Kubernetes. Its native integration with Kubernetes resources makes it an excellent choice for teams looking to implement policy-as-code without learning complex domain-specific languages.
As you continue your Kyverno journey, explore more advanced policies for security, compliance, and operational best practices. Remember that effective policy management is an iterative process — start small, test thoroughly, and gradually expand your policy coverage as your team becomes more comfortable with the tool.


Top comments (0)