
Introduction
In our previous post, we explored securing API Gateway using a Lambda Authorizer with JWT tokens via Terraform.
Lambda Authorizer with JWT Token provides fine-grained access control by enabling custom logic, supports multiple identity providers, and allows additional validation before granting access. However, it introduces increased request latency due to execution time, requires additional infrastructure and maintenance, and can lead to higher AWS costs from Lambda invocation fees.
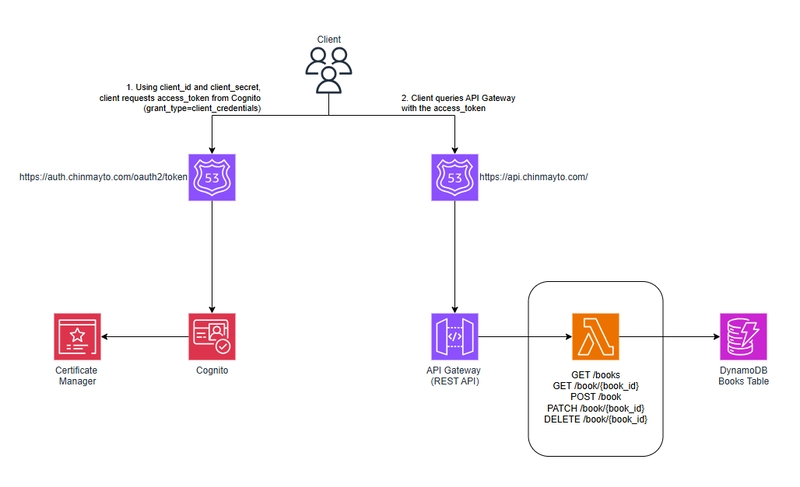
In this post, we will implement the same API Gateway but with Cognito authentication using OAuth 2.0. Additionally, we will set up custom authentication and API domains using Route 53 and ACM. The implementation will be done using Terraform.
What is an AWS Cognito User Pool?
AWS Cognito User Pool is a user directory service that enables authentication and authorization using industry-standard protocols such as OAuth 2.0, OpenID Connect (OIDC), and SAML.
Using a Cognito User Pool for OAuth token authentication allows API Gateway to validate access tokens without the need for a custom Lambda Authorizer, reducing complexity and improving performance.
What is OAuth 2.0 and Its Grant Types?
OAuth 2.0 is an authorization framework that allows applications to securely access user resources without exposing credentials.
OAuth 2.0 Grant Types:
- Authorization Code Grant: Used for server-side applications where tokens are retrieved via a separate authorization server.
- Implicit Grant: Suitable for single-page applications (SPA) where tokens are obtained directly from the authorization server.
- Client Credentials Grant: Used for machine-to-machine authentication where no user interaction is required.
- Resource Owner Password Grant: Deprecated but allows users to provide credentials directly to the application.
We will implement Client Credentials grant type of OAuth authorization.
Architecture
Follwing is the serverless architecture we will be dealing with.
Step 1: Create API Gateway, DynamoDB Table, and Lambda Function
Refer to our previous post for setting up API Gateway, DynamoDB, and Lambda using Terraform.
Step 2: Create ACM Certificate and Validate Against Custom Domains
To enable HTTPS for API Gateway and Cognito authentication endpoints, we need an SSL certificate from AWS ACM.
Create ACM Certificate: Request a new certificate for auth.chinmayto.com and api.chinmayto.com in ACM.
################################################################################
# Create an ACM certificate for the domain
################################################################################
resource "aws_acm_certificate" "my_api_cert" {
  domain_name               = var.domain_name
  subject_alternative_names = ["auth.${var.domain_name}", "api.${var.domain_name}"]
  validation_method         = "DNS"
}
Add Cert Validation CNAME Records in Route 53: AWS provides a CNAME record that must be added to Route 53 for validation.
################################################################################
# Create a certificate validation record for the domain
################################################################################
resource "aws_route53_record" "cert_validation_record" {
  for_each = {
    for dvo in aws_acm_certificate.my_api_cert.domain_validation_options : dvo.domain_name => {
      name   = dvo.resource_record_name
      record = dvo.resource_record_value
      type   = dvo.resource_record_type
    }
  }

  allow_overwrite = true
  name            = each.value.name
  records         = [each.value.record]
  ttl             = 60
  type            = each.value.type
  zone_id         = data.aws_route53_zone.my_domain.zone_id
}
DNS Validation of ACM Certificate: AWS will validate the domain automatically once the correct CNAME records are added.
################################################################################
# Validate the certificate
################################################################################
resource "aws_acm_certificate_validation" "cert_validation" {
  timeouts {
    create = "5m"
  }
  certificate_arn         = aws_acm_certificate.my_api_cert.arn
  validation_record_fqdns = [for record in aws_route53_record.cert_validation_record : record.fqdn]
}
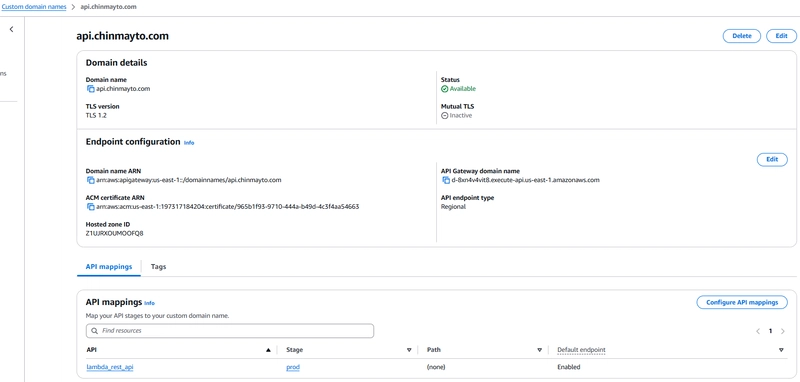
Step 3: Create Domain Name for API Gateway Endpoint
Next, we configure API Gateway with a custom domain api.chinmayto.com.
Create API Gateway Domain Name: Define a custom domain api.chinmayto.com for API Gateway.
################################################################################
# Create a domain name for the API Gateway endpoint
################################################################################
resource "aws_api_gateway_domain_name" "custom_domain" {

  depends_on = [aws_acm_certificate_validation.cert_validation]

  domain_name              = "api.${var.domain_name}"
  regional_certificate_arn = aws_acm_certificate.my_api_cert.arn

  endpoint_configuration {
    types = ["REGIONAL"]
  }
}
Create API Gateway Base Path Mapping: Associate the custom domain with API Gateway stages and paths.
################################################################################
# Create a base path mapping for the domain
################################################################################
resource "aws_api_gateway_base_path_mapping" "custom_domain_mapping" {
  domain_name = aws_api_gateway_domain_name.custom_domain.domain_name
  api_id      = aws_api_gateway_rest_api.API-gateway.id
  stage_name  = aws_api_gateway_stage.my-prod-stage.stage_name
}
Create CNAME Record in Route 53: Map api.chinmayto.com to the API Gateway distribution.
################################################################################
# Create a CNAME record for the API Gateway endpoint
################################################################################
resource "aws_route53_record" "custom_domain_record" {
  name = "api" # The subdomain (api.chinmayto.com)
  type = "CNAME"
  ttl  = "300" # TTL in seconds

  records = ["${aws_api_gateway_rest_api.API-gateway.id}.execute-api.us-east-1.amazonaws.com"]

  zone_id = data.aws_route53_zone.my_domain.zone_id
}
Step 4: Create API Gateway authorizer as Cognito User Pools
We next create API gateway authorizer and use COGNITO_USER_POOLS. (Cognito pool created in furher steps!)
################################################################################
# Cognito Authorizer
################################################################################
resource "aws_api_gateway_authorizer" "my_authorizer" {
  name                             = "my_authorizer"
  rest_api_id                      = aws_api_gateway_rest_api.API-gateway.id
  type                             = "COGNITO_USER_POOLS"
  provider_arns                    = [aws_cognito_user_pool.my_cognito_user_pool.arn]
  authorizer_result_ttl_in_seconds = 0
}
Step 5: Update API Gateway Methods to Use Cognito Authentication
Modify API Gateway methods to enforce authentication via Cognito User Pools.
Update Authorization to COGNITO_USER_POOLS and update Authorization Scope as myapi/all. Example API gateway method definition below:
################################################################################
## GET /book/{bookId}
################################################################################

resource "aws_api_gateway_method" "GET_one_method" {
  rest_api_id          = aws_api_gateway_rest_api.API-gateway.id
  resource_id          = aws_api_gateway_resource.API-resource-book.id
  http_method          = "GET"
  authorization        = "COGNITO_USER_POOLS"
  authorizer_id        = aws_api_gateway_authorizer.my_authorizer.id
  authorization_scopes = ["${var.authorization_scopes}"]
}
Step 6: Create Cognito User Pool
Set up AWS Cognito for user authentication and token generation.
Create Cognito User Pool: Define a user pool
################################################################################
# AWS Cognito User Pool
################################################################################
resource "aws_cognito_user_pool" "my_cognito_user_pool" {
  name = "my_cognito_user_pool"
}
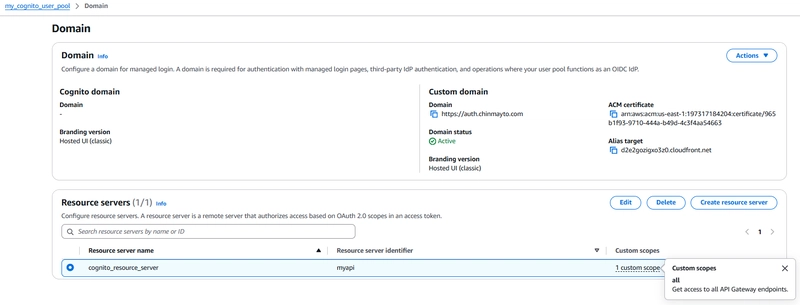
Create User Pool Domain: Configure Cognito to use auth.chinmayto.com as the authentication domain.
################################################################################
# Create a domain for the user pool
################################################################################
resource "aws_cognito_user_pool_domain" "user_pool_domain" {
  domain          = "auth.${var.domain_name}"
  certificate_arn = aws_acm_certificate.my_api_cert.arn
  user_pool_id    = aws_cognito_user_pool.my_cognito_user_pool.id

  depends_on = [aws_acm_certificate_validation.cert_validation]
}
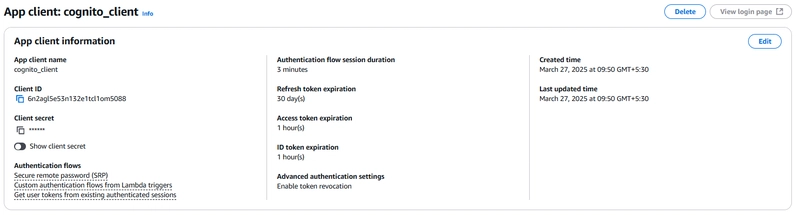
Create User Pool Client for Client Credentials Grant: Register an OAuth 2.0 client with the user pool.
################################################################################
# Create a user pool client
################################################################################
resource "aws_cognito_user_pool_client" "user_pool_client" {
  name                                 = "cognito_client"
  user_pool_id                         = aws_cognito_user_pool.my_cognito_user_pool.id
  generate_secret                      = true
  allowed_oauth_flows                  = ["client_credentials"]
  supported_identity_providers         = ["COGNITO"]
  allowed_oauth_flows_user_pool_client = true
  allowed_oauth_scopes                 = [aws_cognito_resource_server.resource_server.scope_identifiers[0]]

  depends_on = [aws_cognito_user_pool.my_cognito_user_pool, aws_cognito_resource_server.resource_server]
}
Create Cognito Resource Server: Define a resource server with scopes to match API Gateway requirements.
################################################################################
# Create a resource server
################################################################################
resource "aws_cognito_resource_server" "resource_server" {
  name         = "cognito_resource_server"
  identifier   = "myapi"
  user_pool_id = aws_cognito_user_pool.my_cognito_user_pool.id

  scope {
    scope_name        = "all"
    scope_description = "Get access to all API Gateway endpoints."
  }
}
Update Route 53 Records: Add A records for the custom authentication domain.
################################################################################
# Create a record for the domain name
# Required for Cognito Custom Domain validation
################################################################################
resource "aws_route53_record" "root_record" {
  name    = var.domain_name
  type    = "A"
  zone_id = data.aws_route53_zone.my_domain.id

  records         = ["8.8.8.8"] #This can be any dummy IP address
  allow_overwrite = true
}

resource "aws_route53_record" "auth-cognito-A" {
  name    = "auth.${var.domain_name}"
  type    = "A"
  zone_id = data.aws_route53_zone.my_domain.zone_id
  alias {
    evaluate_target_health = false

    name    = aws_cognito_user_pool_domain.user_pool_domain.cloudfront_distribution_arn
    zone_id = "Z2FDTNDATAQYW2" # CloudFront Zone ID
  }
}
Steps to Run Terraform
Follow these steps to execute the Terraform configuration:
terraform init
terraform plan
terraform apply -auto-approve
Upon successful completion, Terraform will provide relevant outputs.
Apply complete! Resources: 56 added, 0 changed, 0 destroyed.
Testing
API Authoriser as Cognito User Pool:

API Gateway Custom Domain with stage mapping:
Cognito User Pool:

Cogntio Custom Auth Domain with resource servers having same scope defined:
Cognito App Client having defined authentication flows:
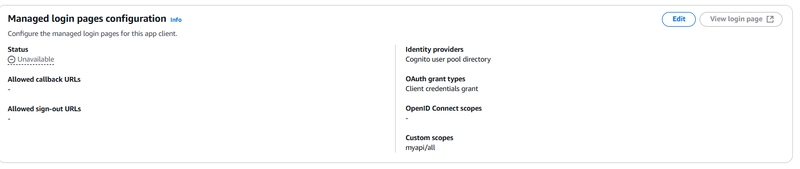
Cognito App Client login pages with OAuth 2.0 client_credentials grant:
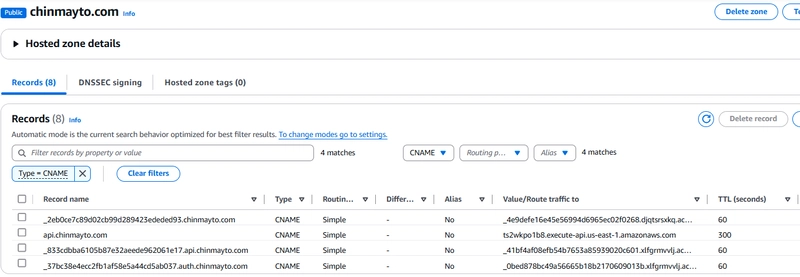
Route53 CNAME and A records (required for DNS validation, API endpoint custom domain and Cognito auth custom domain):

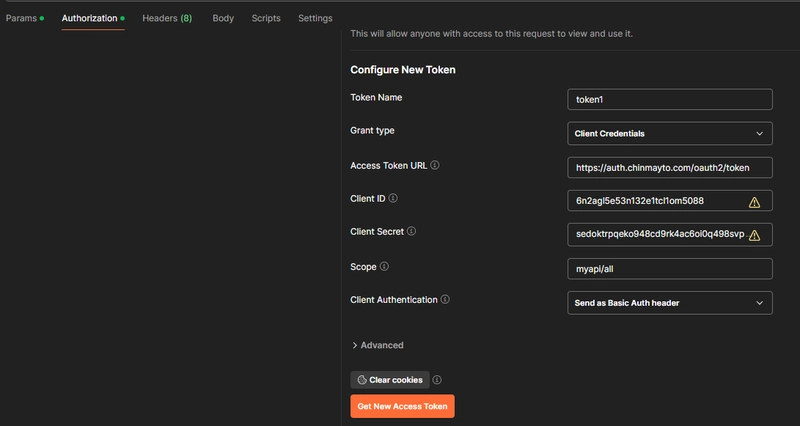
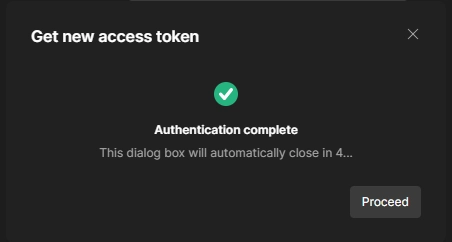
Get token using client_id and client_secret from Cognito Auth Endpoint on postman:
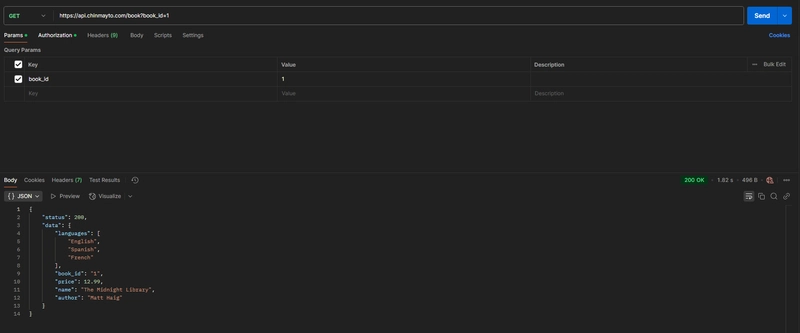
Use the token to call API Gateway using custom domain endpoint:
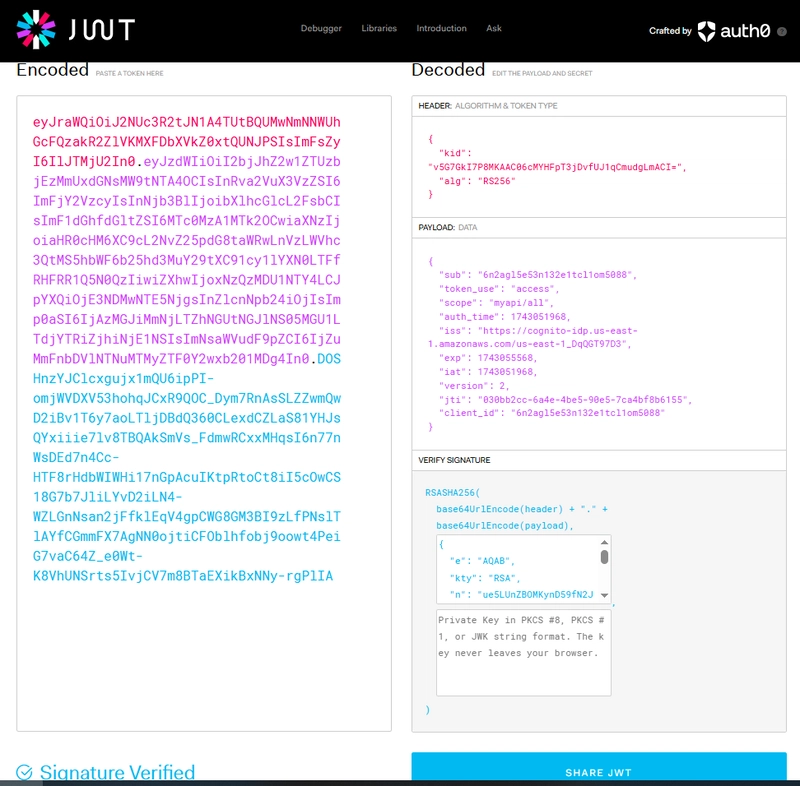
Token encoded in jwt.io
Cleanup
Remember to stop AWS components to avoid large bills.
terraform destroy -auto-approve
Conclusion
Using AWS Cognito with API Gateway provides a scalable and managed way to secure APIs with OAuth 2.0 authentication. Unlike Lambda Authorizers, Cognito improves performance, reduces cost, and integrates seamlessly with other AWS services. By implementing custom domains, we enhance security and branding for authentication and API endpoints.
References
- GitHub Repo: https://github.com/chinmayto/terraform-aws-api-gateway-cognito-authorizer
- AWS Blog: https://aws.amazon.com/blogs/security/how-to-use-oauth-2-0-in-amazon-cognito-learn-about-the-different-oauth-2-0-grants/
- OAuth 2.0 Grants: https://docs.aws.amazon.com/cognito/latest/developerguide/federation-endpoints-oauth-grants.html
- YouTube blog by Ravi: https://www.youtube.com/@raaviblog105


Top comments (1)
Great write-up, thanks for sharing!
We've recently tackled a related challenge - securing static WordPress frontends with Amazon Cognito + API Gateway + Lambda + CloudFront signed cookies.
It's a slightly different angle compared to API-only scenarios, but might be helpful if you're exploring Cognito for broader use cases:
dev.to/tothl74/static-wordpress-au...