
💡 Introduction
Welcome to the world of containers and automation! Today, we’re diving into a fun yet practical project—building a Tic-Tac-Toe game using Flask and deploying it on AWS ECS (Elastic Container Service).
Sounds exciting? That’s because it is.
This blog isn’t just about writing some Python code and spinning up a game. It’s about understanding how modern apps go from your local machine to the cloud using containers. We’ll cover the complete journey—from writing the game in Flask, containerizing it with Docker, pushing the image to AWS Elastic Container Registry (ECR), and finally deploying it on ECS.
If you’ve been meaning to get your hands dirty with Docker, Flask, AWS ECR, and ECS, this is your moment.
So, without further ado, grab your keyboard, open your terminal—and let’s build and ship something cool!
💡 Pre-Requisites
Before we jump into the fun part, let’s make sure your system is ready to roll. You don’t need a supercomputer—just a few tools installed and configured properly.
Here’s what you’ll need:
✅ Flask 3.x.x installed (this will power our Tic-Tac-Toe game)
🐳 Docker installed and running (we’ll use this to containerize our app)
☁️ AWS CLI installed and configured (we’ll use this to push our Docker image to ECR)
If all of the above are set up on your machine, awesome! You’re all geared up.
Let’s get coding 🚀
💡 Creating The Game
Alright, it’s time to build! Since this is a step-by-step guide, we’ll be creating our Flask-based Tic-Tac-Toe game from scratch—so you get to learn and see everything in action.
Let’s start by setting up the project structure.
🔧 Project Setup
First, open your terminal and run the following commands to create a project folder and set up a Python virtual environment:
mkdir tic-tac-toe-game
cd tic-tac-toe-game
python3 -m venv app-venv
source app-venv/bin/activate
With your virtual environment activated, go ahead and create a requirements.txt file with the dependencies we’ll need for our project:
blinker==1.9.0
certifi==2025.4.26
charset-normalizer==3.4.2
click==8.2.0
Flask==3.1.1
idna==3.10
itsdangerous==2.2.0
Jinja2==3.1.6
MarkupSafe==3.0.2
requests==2.32.3
urllib3==2.4.0
Werkzeug==3.1.3
Now install the required Python packages using pip:
pip install -r requirements.txt # or pip3 if pip doesn't work for you
🧠 Building the Flask App
Now we’ll create the game logic and backend using Flask.
In your project root, create a new file called app.py and add the following content:
from flask import Flask, render_template, request, jsonify
import json

app = Flask(__name__)

# Initialize game state
game_state = {
    "board": [""] * 9,  # 3x3 board as a flat list
    "current_player": "X",
    "winner": None,
    "game_over": False
}

def check_winner(board):
    # Winning combinations: rows, columns, diagonals
    wins = [
        [0, 1, 2], [3, 4, 5], [6, 7, 8],  # Rows
        [0, 3, 6], [1, 4, 7], [2, 5, 8],  # Columns
        [0, 4, 8], [2, 4, 6]              # Diagonals
    ]
    for win in wins:
        if board[win[0]] == board[win[1]] == board[win[2]] != "":
            return board[win[0]]
    if "" not in board:
        return "Draw"
    return None

@app.route('/')
def index():
    return render_template('index.html')

@app.route('/move', methods=['POST'])
def move():
    global game_state
    data = request.get_json()
    index = data['index']

    if game_state['game_over'] or game_state['board'][index] != "":
        return jsonify({"error": "Invalid move"}), 400

    # Update board
    game_state['board'][index] = game_state['current_player']

    # Check for winner
    winner = check_winner(game_state['board'])
    if winner:
        game_state['winner'] = winner
        game_state['game_over'] = True
    else:
        # Switch player
        game_state['current_player'] = "O" if game_state['current_player'] == "X" else "X"

    return jsonify({
        "board": game_state['board'],
        "current_player": game_state['current_player'],
        "winner": game_state['winner'],
        "game_over": game_state['game_over']
    })

@app.route('/reset', methods=['POST'])
def reset():
    global game_state
    game_state = {
        "board": [""] * 9,
        "current_player": "X",
        "winner": None,
        "game_over": False
    }
    return jsonify(game_state)

if __name__ == '__main__':
    app.run(debug=True)
This code handles the game logic, move validation, winner detection, and reset functionality.
🎨 Frontend with Tailwind CSS
Next up, let’s create a simple frontend so you can actually play the game.
Inside a new folder named templates, create a file called index.html and paste this:
(Note: Tailwind is included via CDN for ease of styling)
<!DOCTYPE html>
<html lang="en">
<head>
    <meta charset="UTF-8">
    <meta name="viewport" content="width=device-width, initial-scale=1.0">
    <title>Tic Tac Toe</title>
    <script src="https://cdn.tailwindcss.com"></script>
    <style>
        .cell {
            transition: all 0.3s ease;
        }
        .cell:hover {
            background-color: #e5e7eb;
        }
        .disabled {
            pointer-events: none;
            opacity: 0.5;
        }
    </style>
</head>
<body class="bg-gray-100 flex items-center justify-center h-screen">
    <div class="bg-white p-6 rounded-lg shadow-lg text-center">
        <h1 class="text-3xl font-bold mb-4 text-gray-800">Tic Tac Toe</h1>
        <div id="status" class="text-lg mb-4 text-gray-600">Player X's Turn</div>
        <div class="grid grid-cols-3 gap-2 w-64 mx-auto">
            <div class="cell bg-gray-200 h-20 flex items-center justify-center text-2xl font-bold cursor-pointer" onclick="makeMove(0)"></div>
            <div class="cell bg-gray-200 h-20 flex items-center justify-center text-2xl font-bold cursor-pointer" onclick="makeMove(1)"></div>
            <div class="cell bg-gray-200 h-20 flex items-center justify-center text-2xl font-bold cursor-pointer" onclick="makeMove(2)"></div>
            <div class="cell bg-gray-200 h-20 flex items-center justify-center text-2xl font-bold cursor-pointer" onclick="makeMove(3)"></div>
            <div class="cell bg-gray-200 h-20 flex items-center justify-center text-2xl font-bold cursor-pointer" onclick="makeMove(4)"></div>
            <div class="cell bg-gray-200 h-20 flex items-center justify-center text-2xl font-bold cursor-pointer" onclick="makeMove(5)"></div>
            <div class="cell bg-gray-200 h-20 flex items-center justify-center text-2xl font-bold cursor-pointer" onclick="makeMove(6)"></div>
            <div class="cell bg-gray-200 h-20 flex items-center justify-center text-2xl font-bold cursor-pointer" onclick="makeMove(7)"></div>
            <div class="cell bg-gray-200 h-20 flex items-center justify-center text-2xl font-bold cursor-pointer" onclick="makeMove(8)"></div>
        </div>
        <button id="reset" class="mt-6 px-4 py-2 bg-blue-500 text-white rounded hover:bg-blue-600 transition">Reset Game</button>
    </div>

    <script>
        async function makeMove(index) {
            const response = await fetch('/move', {
                method: 'POST',
                headers: { 'Content-Type': 'application/json' },
                body: JSON.stringify({ index })
            });
            const data = await response.json();

            if (response.ok) {
                updateBoard(data);
            } else {
                alert(data.error);
            }
        }

        async function resetGame() {
            const response = await fetch('/reset', {
                method: 'POST'
            });
            const data = await response.json();
            updateBoard(data);
        }

        function updateBoard(data) {
            const cells = document.querySelectorAll('.cell');
            cells.forEach((cell, i) => {
                // Clear previous styles and content
                cell.textContent = data.board[i];
                cell.classList.remove('text-blue-600', 'text-red-600', 'disabled');

                // Apply new styles based on board content
                if (data.board[i] === 'X') {
                    cell.classList.add('text-blue-600');
                } else if (data.board[i] === 'O') {
                    cell.classList.add('text-red-600');
                }
            });

            const status = document.getElementById('status');
            if (data.winner) {
                status.textContent = data.winner === 'Draw' ? "It's a Draw!" : `Player ${data.winner} Wins!`;
                cells.forEach(cell => cell.classList.add('disabled'));
            } else {
                status.textContent = `Player ${data.current_player}'s Turn`;
            }
        }

        document.getElementById('reset').addEventListener('click', resetGame);
    </script>
</body>
</html>
🧪 Run It Locally
Now the moment of truth—run your app locally and try it out:
flask run
Open your browser and head to http://localhost:5000. You should see your cleanly styled Tic Tac Toe game, ready to play!

🐳 Building a Docker Image & Pushing to ECR
After testing your Flask app locally, let’s containerize it using Docker and push it to AWS Elastic Container Registry (ECR).
✅ Step 1: Create a Dockerfile
Inside the project root directory, create a Dockerfile with the following content:
FROM python:3.10-alpine

WORKDIR /app

COPY requirements.txt /app

RUN pip3 install --no-cache-dir -r requirements.txt

COPY . .

EXPOSE 5000

CMD ["flask", "run", "--host", "0.0.0.0"]
✅ Step 2: Build the Docker Image
Now build your image using:
docker build -t flask-tic-tac-toe .
This command creates a Docker image tagged flask-tic-tac-toe.

✅ Step 3: Push to AWS ECR
3.1: Create a Private Repository in AWS ECR
Go to the ECR Console.
Click on “Create Repository”.
Name it something like
flask-tic-tac-toe.Leave the rest of the settings as default and click Create.

3.2: View Push Commands
Once the repository is created, click “View Push Commands”. AWS will show you 4 commands you need to run. They look something like this:

aws ecr get-login-password --region <your-region> | docker login --username AWS --password-stdin <your-account-id>.dkr.ecr.<your-region>.amazonaws.com

docker tag flask-tic-tac-toe:latest <your-account-id>.dkr.ecr.<your-region>.amazonaws.com/flask-tic-tac-toe

docker push <your-account-id>.dkr.ecr.<your-region>.amazonaws.com/flask-tic-tac-toe
Replace
<your-account-id>and<your-region>with your actual AWS values.

Once the docker push is done, your Flask app is now stored securely in AWS ECR and ready to be deployed using ECS, EKS, or even EC2.
🚀 Running the Flask App on ECS (Fargate)
We’ve got the Docker image in ECR — now let’s deploy it using ECS (Elastic Container Service) with Fargate as the compute engine.
✅ Step 1: Create an ECS Cluster
Go to the ECS Console:
https://console.aws.amazon.com/ecs/homeClick “Create Cluster”.
Choose "Networking only (Fargate)".
Cluster name:
great-kangaroo-45tapk(or your preferred name).Leave everything else as default and hit Create.
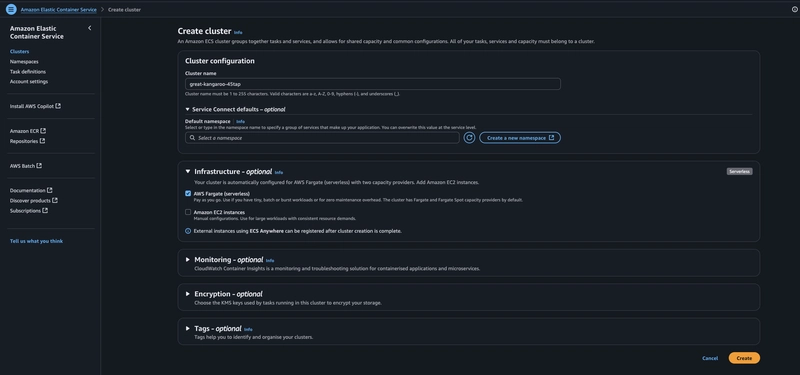
⏳ This will take around 5–10 minutes.
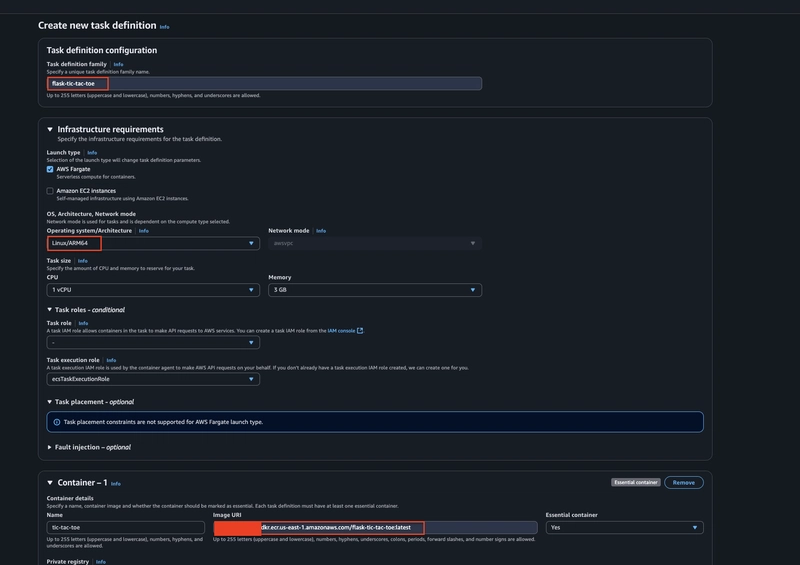
✅ Step 2: Create a Task Definition
Go to Task Definitions > Create new Task Definition.
Launch Type: FARGATE
Task Definition Name:
Flask-tic-tac-toeOperating System / Architecture:
* If you’re on MacOS (M1/M2): `Linux/ARM64`

* Else: `Linux/X86_64`
- Click Add container and configure:
* **Container name**: `tic-tac-toe`

* **Image URI**: Paste the full URI of the image from your ECR repo
    (e.g., `123456789012.dkr.ecr.us-east-1.amazonaws.com/flask-tic-tac-toe`)

* **Port mappings**:

    * Container Port: `5000`
- Click Add, then Create the task definition.
✅ Step 3: Create a Service on the Cluster
Go back to Clusters and select your cluster (
great-kangaroo-45tapk).Click “Create” under the Services tab.
Service configuration:
* **Launch type**: FARGATE

* **Task Definition**: Select `Flask-tic-tac-toe`

* **Service name**: anything like `flask-frontend-service`

* Leave the rest as default and click **Next** until the end.

⏳ This may take another 5–10 minutes to spin up.
✅ Step 4: Access the Application
- Inside the Cluster, go to the Tasks tab.

Click the running task.
Under Configuration, find the Public IP.
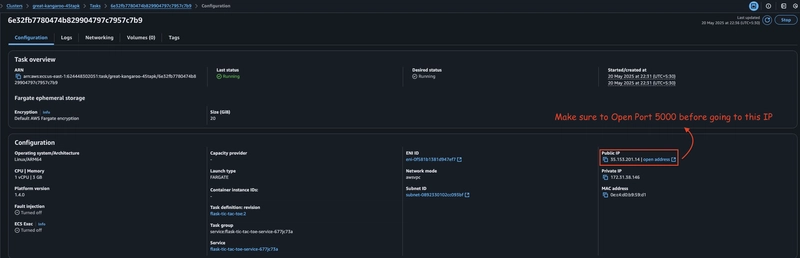
IMPORTANT: Before accessing the IP:
🔓 Go to EC2 > Security Groups and find the default security group (used by Fargate by default).
-
Edit Inbound Rules:
-
Add a rule:
- Type:
Custom TCP - Port Range:
5000 - Source:
0.0.0.0/0(for global access) (Optional: restrict to your IP for security)
- Type:
-

✅ Step 5: See Your App Live 🎉
Now open your browser and visit:
http://<your-public-ip>:5000
You should see your Flask Tic Tac Toe app running live on AWS ECS with Fargate!

🧹 Conclusion & Cleanup
And that brings us to the end of this journey! 🎉
Before wrapping up, let’s make sure we clean up our AWS resources to avoid any unexpected charges:
✅ Delete AWS Resources
Go to the CloudFormation console.
Look for the two stacks that were automatically created when setting up:
* The **ECS Cluster**

* The **Service + Task Definition**
- First Delete the Service, then the ECS Cluster
This ensures everything is torn down cleanly — no lingering resources, no surprise bills.
🎯 What We Did
In this blog, we:
Built a simple Flask Tic-Tac-Toe web app 🧠
Containerized it with Docker
Pushed the image to Amazon ECR
Deployed it on AWS ECS using Fargate
Accessed it live using the public IP
A complete DevOps deployment cycle — from local dev to cloud!
If you enjoyed this guide, make sure to follow me on my socials (LinkedIn, Twitter & Dev.to) for more DevOps goodness, real-world projects, and hands-on tutorials.
Till then —
Happy Automating! 🚀
~ Pravesh Sudha


Top comments (2)
can you provide the source code in a github repo?
Yeah, Here it is: github.com/Pravesh-Sudha/Python-pr...
Happy to help!