
Image Builder is a service that allows you to build AMIs and Docker images step-by-step using a recipe you define. This is an equivalent service to HashiCorp's Packer but completely AWS managed that you can use from your browser (AWS Console). However, as Infrastructure as Code is a best practice, we should rather consider writing every piece of Image Builder recipe using CloudFormation or as I chose for this post - Terraform.
Today, I am going to guide you through building an Amazon Machine Image with Docker and Nginx installed in a scheduled and automated fashion. But first I want you to understand how this whole service functions.
Visit the repository to see the code
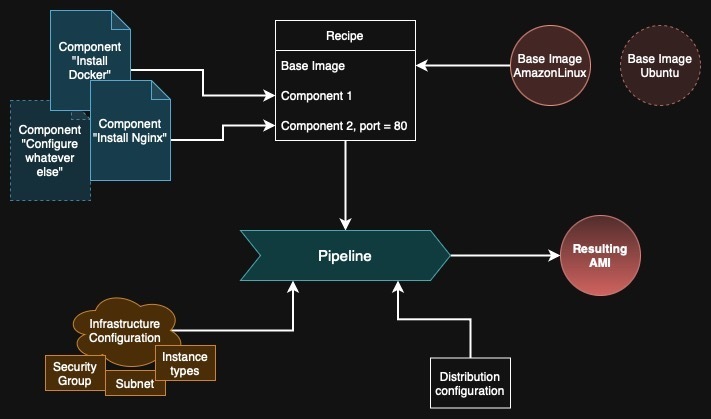
Image Builder's process
You choose a base image to build on, for example Amazon Linux 2 or Ubuntu 24.04. You define it in the recipe. Image Builder creates an EC2 instance with this image. What is important is that this image contains AWS Systems Manager Agent. The type of instance and in which subnet it should be created is defined in the Infrastructure Configuration.
EC2 Image Builder uses AWS Systems Manager to connect to the instance. Systems Manager Agent functions similar to SSH but is more featureful. Image Builder simply sends commands (SSM Documents) to the agent to execute. So the first command is to install AWS Task Orchestrator and Executor (AWSTOE). This is another agent but it runs locally, running scripts, modifying and validating the operating system that is running in the EC2 instance.
What you give to Image Builder (that it passes forward to AWSTOE during build) are Components. These are YAML documents that contain steps to perform, for example to install Nginx, configure an example website by copying the resources from an S3 bucket and validate that it runs at startup on port 8080. Recipe is just a set of components to install (and later automatically test) that should be installed on top of the base image.
After all components are executed by AWSTOE, Image Builder requests AWS to create an AMI from the EC2 instance. The instance is shut down and the EBS disk is saved into a snapshot. Afterwards, Image Builder created a new EC2 instance from this AMI and tests it based on the Test sections of the components to see if everything is installed and configured correctly.
In another piece called Distribution Configuration, you can specify to which regions and accounts to copy the AMI and which tags to attach. All these pieces together are used to form a pipeline.
Pipeline = Recipe + Distribution + Infrastructure.
Pipelines can be triggered manually in the console, via API/SDK/CLI or by schedule. There's also an option to integrate it with Systems Manager patch cycles or simply with EventBridge. You can customize the flow of the pipeline using workflows but it's out of scope for this post.
Creating components
The most elemental part of the process are components. These are the scripts that install and test the software on the image we want to create. There are three phases of an Image Builder component: build, validate and test. The build phase is for installing and configuring. validate is run before the base instance is shut down to check if everything is working as expected. test phase is run on the new instance created from the new AMI we just built to check if our expectations are correct, such as does the service start on boot.
Components are written using in YAML. They can accept parameters to customize how the component should be configured. Each phase of the component has multiple steps where you execute either raw Bash/PowerShell scripts or use some predefined actions such as CreateFile or S3Download. I won't cover all of them in this single post but you can look around here to find something interesting. What is more, they can also be executed in a loop or conditionally. (In general you can just write everything in Bash/PowerShell and call it a day 😁 but AWS gives us some actions to make YAML more readable.)
Our first component will be just installation of Docker. As I target Amazon Linux, we will use yum package manager and systemd for service startup. This is also pretty straightforward to test - just check if you can run a hello-world container. If Docker wasn't installed or started, this will just fail.
---
description: "This component installs latest Docker on Amazon Linux 2023"
schemaVersion: "1.0"
phases:
  - name: build
    steps:
      - name: InstallDocker
        action: ExecuteBash
        inputs:
          commands:
            - yum install docker -y
            - systemctl enable docker
            - systemctl start docker
  - name: validate
    steps:
      - name: ValidateDocker
        action: ExecuteBash
        inputs:
          commands:
            - sudo docker run hello-world
  - name: test
    steps:
      - name: TestDocker
        action: ExecuteBash
        inputs:
          commands:
            - sudo docker run hello-world
Next we can create a bit more complex component which is Nginx. It will be parametrized (port on which to run the service) and will be tested more thoroughly by checking if a static website is responding with the new location on a given port. In validation step we will only check if the port is serving anything and if the default files were modified.
---
description: "This component installs and configures latest Nginx on Amazon Linux 2023."
schemaVersion: "1.0"
parameters:
  - port:
      type: string
      description: "Port to forward to"
      default: "8080"
phases:
  - name: build
    steps:
      - name: InstallNginx
        action: ExecuteBash
        inputs:
          commands:
            - yum update -y
            - yum install nginx -y
            - systemctl enable nginx
            - systemctl start nginx
      - name: ConfigureNginxDefaults
        action: CreateFile
        inputs:
          - path: /etc/nginx/conf.d/default.conf
            overwrite: true
            content: |-
              server {
                listen {{ port }};
                server_name _;
                location / {
                  root   /usr/share/nginx/html;
                  index  index.html index.htm;
                }
              }
          - path: /usr/share/nginx/html/index.html
            overwrite: true
            content: |-
              <html> <body>
                <p>This Nginx instance was configured by Image Builder.</p>
              </body> </html>

  - name: validate
    steps:
      - name: ValidateNginx
        action: ExecuteBash
        inputs:
          commands:
            - systemctl restart nginx
            - CODE=$(curl -s -o /dev/null -w "%{http_code}" http://localhost:{{ port }})
            - DATA=$(curl -s http://localhost:{{ port }})
            - if [[ "$CODE" != "200" ]]; then exit 1; fi # Should be 200 because default page is served
            - if [[ "$DATA" != *"configured by Image Builder"* ]]; then exit 1; fi # Should contain the new string

  - name: test
    steps:
      - name: NewTestConfig
        action: CreateFile
        inputs:
          - path: /etc/nginx/conf.d/default.conf
            overwrite: true
            content: |-
              server {
                listen {{ port }};
                server_name _;
                location /api { return 200 "Hello api!"; }
                location / {
                  root   /usr/share/nginx/html;
                  index  index.html index.htm;
                }
              }
      - name: TestNginx
        action: ExecuteBash
        inputs:
          commands:
            - systemctl restart nginx
            - DATA=$(curl -s http://localhost:{{ port }})
            - if [[ "$DATA" != *"configured by Image Builder"* ]]; then exit 1; fi # Should contain the previous string
            - DATA=$(curl -s http://localhost:{{ port }}/api)
            - if [[ "$DATA" != *"Hello api"* ]]; then exit 1; fi # Should contain new location
We went though three steps above. First we installed and started Nginx. We also created some custom configuration. Then we validated if this configuration was picked up by Nginx. In the test phase, we check if modifications to the configuration are working and we can expose a new location. To create all the test files we use a built-in action CreateFile which makes it cleaner to modify files than bash.
Now we should load both components into Terraform and create them. I saved both of these YAML files in the components directory of our project. Assuming you have already imported the aws provider for Terraform/OpenTofu, we can create a new file components.tf in the project root.
resource "aws_imagebuilder_component" "docker_component" {
  name                  = "docker-component"
  platform              = "Linux"
  version               = "1.0.0"
  supported_os_versions = ["Amazon Linux 2023"]
  data                  = file("./components/docker.yaml")
}

resource "aws_imagebuilder_component" "nginx_component" {
  name                  = "nginx-component"
  platform              = "Linux"
  version               = "1.0.0"
  supported_os_versions = ["Amazon Linux 2023"]
  data                  = file("./components/nginx.yaml")
}
Creating the recipe, infrastructure and distribution
Recipe connects the above components and executes them on a base image. I'm going to use Amazon Linux 2023 but with the latest version of this image. For that I can use a data source that is specific to EC2 Image Builder. Connecting components is very easy by just referencing them by ARN and giving required parameters. You can also optionally change the EBS volume size and type here.
data "aws_region" "current" {}

data "aws_imagebuilder_image" "latest" {
  arn = "arn:aws:imagebuilder:${data.aws_region.current.name}:aws:image/amazon-linux-2023-arm64/x.x.x"
}

resource "aws_imagebuilder_image_recipe" "image_recipe" {
  component {
    component_arn = aws_imagebuilder_component.docker_component.arn
  }
  component {
    component_arn = aws_imagebuilder_component.nginx_component.arn
    parameter {
      name  = "port"
      value = "9001"
    }
  }
  name         = "my-image-recipe"
  parent_image = data.aws_imagebuilder_image.latest.build_version_arn
  version      = "1.0.0"
  description  = "This is a recipe that takes latest Amazon Linux 2023 and installs latest Docker, Nginx and configures it."
}
Next we can specify infrastructure so where will our image be built. I will use a vpc module to create a new VPC in which the image will be built. We also need a security group that allows access to the internet. To simplify things, I will just give the instance a public IP address. And let's not forget an IAM role for the instance with proper permissions for the Image Builder to function.
module "vpc" {
  source  = "aws-ia/vpc/aws"
  version = ">= 4.2.0"

  name       = "image-builder-vpc"
  cidr_block = "10.123.0.0/16"
  az_count   = 2
  subnets = {
    public  = { netmask = 24 }
    private = { netmask = 24 }
  }
}

module "security_group" {
  source  = "terraform-aws-modules/security-group/aws"
  version = "5.3.0"

  name         = "instance-sg"
  vpc_id       = module.vpc.vpc_attributes.id
  description  = "Security group for Image Builder"
  egress_rules = ["all-all"]
}

module "instance_profile" {
  source  = "terraform-aws-modules/iam/aws//modules/iam-assumable-role"
  version = "5.55.0"

  trusted_role_services   = ["ec2.amazonaws.com"]
  role_name               = "image-builder-role"
  create_role             = true
  create_instance_profile = true
  role_requires_mfa       = false
  custom_role_policy_arns = [
    "arn:aws:iam::aws:policy/EC2InstanceProfileForImageBuilder",
    "arn:aws:iam::aws:policy/AmazonSSMManagedInstanceCore"
  ]
}

resource "aws_imagebuilder_infrastructure_configuration" "infrastructure" {
  instance_types                = ["t4g.small", "t4g.medium"]
  security_group_ids            = [module.security_group.security_group_id]
  instance_profile_name         = module.instance_profile.iam_instance_profile_name
  subnet_id                     = values(module.vpc.public_subnet_attributes_by_az)[0].id
  name                          = "my-pipeline-infra"
  terminate_instance_on_failure = true
}
As the last step, we will create a distribution configuration. This is where we pick regions to copy the new AMI to. I will use the current region and Ireland (eu-west-1) as an example. I will also add tags to easily find the AMI later. Here you can also specify accounts to share with, create launch templates or even export the disk snapshot to S3. Look at this documentation.
resource "aws_imagebuilder_distribution_configuration" "distribution" {
  name = "distribution-configuration"

  distribution {
    region = data.aws_region.current.name
    ami_distribution_configuration {
      ami_tags = { "Name" = "my-pipeline-ami" }
    }
  }

  distribution {
    region = "eu-west-1"
    ami_distribution_configuration {
      ami_tags = { "Name" = "my-pipeline-ami" }
    }
  }
}
The central point: pipeline
Eventually we have to create a pipeline that will run the recipe on the infrastructure and distribute the new image. We can also schedule the pipeline to run automatically using a Cron expression.
resource "aws_imagebuilder_image_pipeline" "my_pipeline" {
  schedule {
    schedule_expression = "cron(0 0 ? * 7 *)" # Every Saturday at midnight
  }
  name                             = "my-pipeline"
  image_recipe_arn                 = aws_imagebuilder_image_recipe.image_recipe.arn
  infrastructure_configuration_arn = aws_imagebuilder_infrastructure_configuration.infrastructure.arn
  distribution_configuration_arn   = aws_imagebuilder_distribution_configuration.distribution.arn
}

However! You can also trigger a build without a pipeline directly from Terraform. Just use aws_imagebuilder_image resource and set appropriate parameters. The build process will start but Terraform will be locked until it's finished (or it times out), so be careful with that.
# This can take a loong time. Better use a pipeline 😉
resource "aws_imagebuilder_image" "image" {
  distribution_configuration_arn   = aws_imagebuilder_distribution_configuration.distribution.arn
  image_recipe_arn                 = aws_imagebuilder_image_recipe.image_recipe.arn
  infrastructure_configuration_arn = aws_imagebuilder_infrastructure_configuration.infrastructure.arn
}
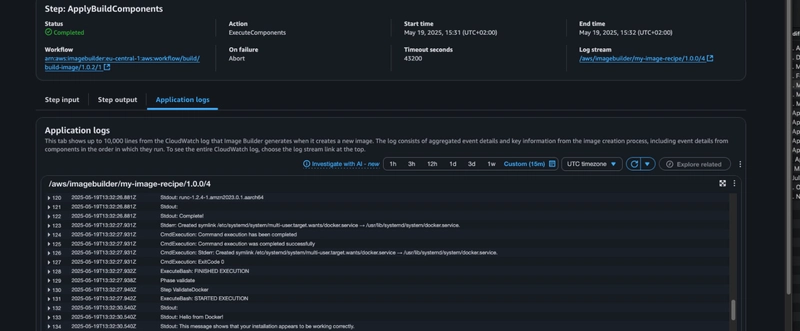
During the build process you can view the logs in the AWS Console. For example below are the steps of the default workflow and I even caught some logs from installation and validation of Docker. If the build succeeds, you can view the logs from testing in the same way.

Using the image
Let's create a new EC2 instance using this image. The tags we have associated with it earlier will help us find it using aws_ami data source. I will also create a new security group with port 8080 open and reconfigure Nginx in the user data. It will pass everything to a Caddy container with some default site. Everything is conditionally created only if you set the create_test_instance variable to true. Do it only after you have built the image.
variable "create_test_instance" {
  type    = bool
  default = false
}

data "aws_ami" "my_ami" {
  count       = var.create_test_instance ? 1 : 0
  most_recent = true
  owners      = ["self"]
  tags        = { "Name" = "my-pipeline-ami" }
}

locals {
  user_data = <<-EOF
    #!/bin/bash
    cat > /etc/nginx/conf.d/default.conf << EOT
        server {
            listen 8080;
            server_name _;
            location / {
                proxy_pass http://localhost:8888;
                proxy_set_header Host \$host;
                proxy_set_header X-Real-IP \$remote_addr;
            }
        }
    EOT
    if ! docker ps -a | grep -q caddy; then
      docker create --name caddy -p 8888:80 --restart=always caddy:latest
    fi
    docker start caddy
    systemctl restart nginx
    EOF
}

module "security_group_test" {
  source  = "terraform-aws-modules/security-group/aws"
  version = "5.3.0"

  name                = "test-instance-sg"
  vpc_id              = module.vpc.vpc_attributes.id
  description         = "Security group for Image Builder"
  egress_rules        = ["all-all"]
  ingress_rules       = ["http-8080-tcp"]
  ingress_cidr_blocks = ["0.0.0.0/0"]
}

resource "aws_instance" "test_instance" {
  count                  = var.create_test_instance ? 1 : 0
  ami                    = data.aws_ami.my_ami[0].id
  instance_type          = "t4g.micro"
  vpc_security_group_ids = [module.security_group_test.security_group_id]
  subnet_id              = values(module.vpc.public_subnet_attributes_by_az)[1].id # Use a different subnet because why not
  tags                   = { "Name" = "test-instance" }
  user_data              = local.user_data
}

output "test_instance_public_ip" {
  value = aws_instance.test_instance[0].public_ip
}
After applying the above example you will get a new EC2 instance and the IP in the output. Try connecting to it via the browser on port 8080.

There's more to EC2 Image Builder. You should ideally integrate it with your CI/CD pipeline to create images on Git merge. This service is simpler to use than Packer as it doesn't require you to install anything on your machine or on any build server. You can simply use any AWS CLI or SDK to integrate it with your Git provider or run it on a schedule to have the latest packages. However, Packer comes with other advantages such as being multi-cloud, integrating well with Ansible, etc.
I have already wrote this post once but decided to improve it


Top comments (0)