
AI is changing very fast and Large Language Models (LLMs) have made things a lot easier. Yet, they face a fundamental limitation: they forget everything between sessions.
What if there could be a way to have a personal, portable LLM “memory layer” that lives locally on your system, with complete control over your data?
Today, we will learn about OpenMemory MCP, a private, local-first memory layer built with Mem0 (memory layer for AI Agents). It allows persistent, context-aware AI across MCP-compatible clients such as Cursor, Claude Desktop, Windsurf, Cline and more.
This guide explains how to install, configure and operate the OpenMemory MCP Server. It also covers the internal architecture, the flow, underlying components and real-world use cases with examples.
Let's jump in.
What is covered?
In a nutshell, we are covering these topics in detail.
- What OpenMemory MCP Server is and why does it matter?
- Step-by-step guide to set up and run OpenMemory.
- Features available in the dashboard (and what’s behind the UI).
- Security, Access control and Architecture overview.
- Practical use cases with examples.
1. What is OpenMemory and why does it matter?
OpenMemory MCP is a private, local memory layer for MCP clients. It provides the infrastructure to store, manage and utilize your AI memories across different platforms, all while keeping your data locally on your system.
In simple terms, it's like a vector-backed memories layer for any LLM client using the standard MCP protocol and works out of the box with tools like Mem0.
Key Capabilities:
Stores and recalls arbitrary chunks of text (
memories) across sessions, so your AI never has to start from zero.Uses a vector store (
Qdrant) under the hood to perform relevance-based retrieval, not just keyword matching.Runs fully on your infrastructure (
Docker + Postgres + Qdrant) with no data sent outside.Pause or revoke any client’s access at the
app or memory level, with audit logs for every read or write.Includes a dashboard (
next.js & redux) showing who’s reading/writing memories and a history of state changes.
🔁 How it works (the basic flow)
Here’s the core flow in action:
You spin up OpenMemory (API, Qdrant, Postgres) with a single
docker-composecommand.The API process itself hosts an MCP server (using Mem0 under the hood) that speaks the standard MCP protocol over SSE.
Your LLM client opens an SSE stream to OpenMemory’s
/mcp/...endpoints and calls methods likeadd_memories(),search_memory()orlist_memories().Everything else, including vector indexing, audit logs and access controls, is handled by the OpenMemory service.
You can watch the official demo and read more on mem0.ai/openmemory-mcp!
2. Step-by-step guide to set up and run OpenMemory.
In this section, we will walk through how to set up OpenMemory and run it locally.
The project has two main components you will need to run:
-
api/- Backend APIs and MCP server -
ui/- Frontend React application (dashboard)
Step 1: System Prerequisites
Before getting started, make sure your system has the following installed. I've attached the docs link so it's easy to follow.
- Docker and Docker Compose
- Python 3.9+ - required for backend development
- Node.js - required for frontend development
- OpenAI API Key - used for LLM interactions
- GNU Make
GNU Make is a build automation tool. We will use it for the setup process.
Please make sure Docker Desktop is running before proceeding to the next step.
Step 2: Clone the repo and set your OpenAI API Key
You need to clone the repo available at github.com/mem0ai/mem0 by using the following command.
git clone <https://github.com/mem0ai/mem0.git>
cd openmemory
Next, set your OpenAI API key as an environment variable.
export OPENAI_API_KEY=your_api_key_here

This command sets the key only for your current terminal session. It only lasts until you close that terminal window.

Step 3: Setup the backend
The backend runs in Docker containers. To start the backend, run these commands in the root directory:
# Copy the environment file and edit the file to update OPENAI_API_KEY and other secrets
make env

# Build all Docker images
make build

# Start Postgres, Qdrant, FastAPI/MCP server
make up
The .env.local file will have the following convention.
OPENAI_API_KEY=your_api_key
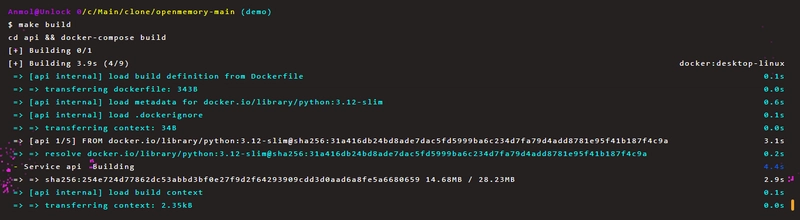

Once the setup is complete, your API will be live at http://localhost:8000.
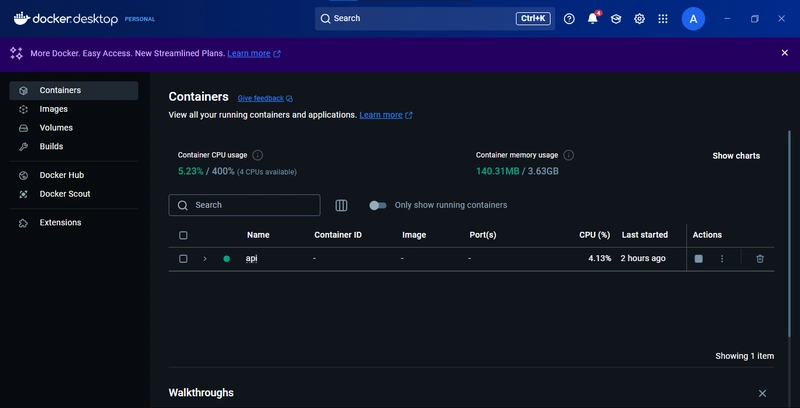
You should also see the containers running in Docker Desktop.
Here are some other useful backend commands you can use:
# Run database migrations
make migrate

# View logs
make logs

# Open a shell in the API container
make shell

# Run tests
make test

# Stop the services
make down
Step 4: Setup the frontend
The frontend is a Next.js application. To start it, just run:
# Installs dependencies using pnpm and runs Next.js development server
make ui

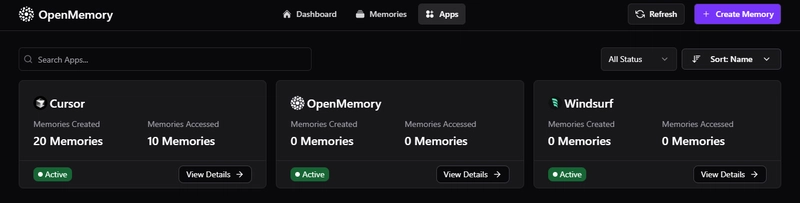
After successful installation, you can navigate to http://localhost:3000 to check the OpenMemory dashboard, which will guide you through installing the MCP server in your MCP clients.
Here's how the dashboard looks.

For context, your MCP client opens an SSE channel to GET /mcp/{client_name}/sse/{user_id}, which wires up two context variables (user_id, client_name).
On the dashboard, you will find the one-line command to install the MCP server based on your choice of preference of Client (like Cursor, Claude, Cline, Windsurf).
Let's install this in Cursor, the command looks something like this.
npx install-mcp i https://mcp.openmemory.ai/xyz_id/sse --client cursor
It will prompt you to install install-mcp if it's not already and then you just need to provide a name for the server.
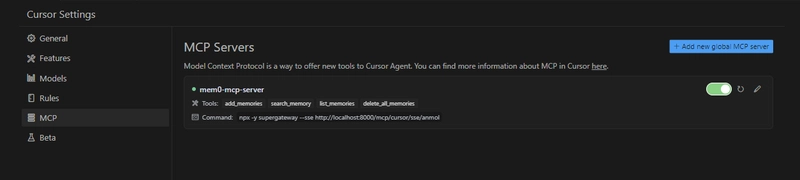
I'm using a dummy command for now, so please ignore that. Open the cursor settings and check the MCP option in the sidebar to verify the connection.
Open a new chat in Cursor and give a sample prompt like I've asked it to remember some things about me (which I grabbed from my GitHub profile).

This triggers the add_memories() call and stores the memory. Refresh the dashboard and go to the Memories tab to check all of these memories.
Categories are automatically created for the memories, which are like optional tags (via GPT-4o categorization).

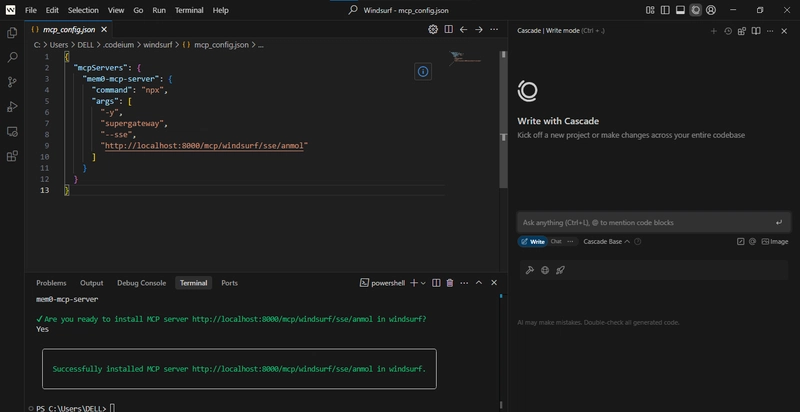
You can also connect other MCP clients like Windsurf.
Each MCP client can “invoke” one of four standard memory actions:
add_memories(text)→ stores text in Qdrant, inserts/updates aMemoryrow and audit entrysearch_memory(query)→ embeds the query, runs a vector search with optional ACL filters, logs each accesslist_memories()→ retrieves all stored vectors for a user (filtered by ACL) and logs the listingdelete_all_memories(): clear all memories
All responses stream over the same SSE connection. The dashboard shows all active connections, which apps are accessing memory and details of reads/writes.
3. Features available in the dashboard (and what’s behind the UI)
The OpenMemory dashboard includes three main routes:
-
/– dashboard -
/memories– view and manage stored memories -
/apps– view connected applications
In brief, let's see all the features available in the dashboard so you can get the basic idea.
1) Install OpenMemory clients
- Get your unique SSE endpoint or use a one-liner install command
- Switch between
MCP Linkand various client tabs (Claude, Cursor, Cline, etc.)
2) View memory and app stats
- See how many memories you’ve stored
- See how many apps are connected
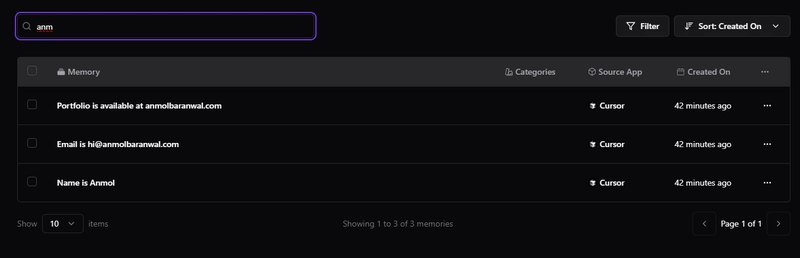
- Type any text to live-search across all memories (debounced)
The code is available at ui/components/dashboard/Stats.tsx, which:
- reads from Redux (
profile.totalMemories,profile.totalApps,profile.apps[]) - calls
useStats().fetchStats()on mount to populate the store - renders “Total Memories count” and “Total Apps connected” with up to 4 app icons
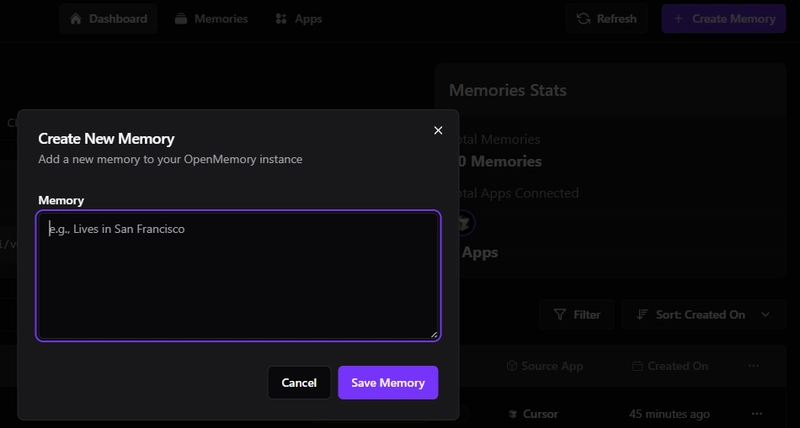
3) Refresh or manually create a Memory
-
Refresh button(re-calls the appropriate fetcher(s) for the current route) -
Create Memorybutton (opens the modal from CreateMemoryDialog)
5) You can open the filters panel to pick:
- Which apps to include
- Which categories to include
- Whether to show archived items
- Which column to sort by (Memory, App Name, Created On)
- Clear all filters in one click

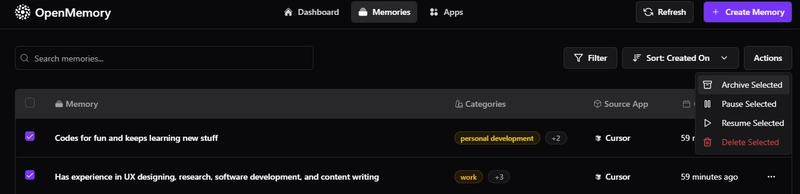
6) You can inspect and manage individual Memories
Click on any memory to:
- archive, pause, resume or delete the memory
- check access logs & related memories

You can also select multiple memories and perform bulk actions.
🖥️ Behind the UI: Key Components
Here are some important frontend components involved:
ui/app/memories/components/MemoryFilters.tsx: handles the search input, filter dialog trigger, bulk actions like archive/pause/delete. Also manages the selection state for rows.ui/app/memories/components/MemoriesSection.tsx: the main container for loading, paginating and displaying the list of memories.ui/app/memories/components/MemoryTable.tsx– renders the actual table of memories (ID, content, client, tags, created date, state). Each row has its own actions via MemoryActions (edit, delete, copy link).
For state management and API calls, it uses clean hooks:
-
useStats.ts: loads high-level stats like total memories and app count. -
useMemoriesApi.ts: handles fetching, deleting, and updating memories. -
useAppsApi.ts: retrieves app info and per-app memory details. -
useFiltersApi.ts: supports fetching categories and updating filter state.
Together, these pieces create a responsive, real-time dashboard that lets you control every aspect of your AI memory layer.
4. Security, Access control and Architecture overview.
When working with the MCP protocol or any AI agent system, security becomes non-negotiable. So, let's discuss briefly.
🎯 Security
OpenMemory is designed with privacy-first principles. It stores all memory data locally in your infrastructure, using Dockerized components (FastAPI, Postgres, Qdrant).
Sensitive inputs are safely handled via SQLAlchemy with parameter binding to prevent injection attacks. Each memory interaction, including additions, retrievals and state changes, is logged for traceability through the MemoryStatusHistory and MemoryAccessLog tables.
While authentication is not built-in, all endpoints require a user_id and are ready to be secured behind an external auth gateway (like OAuth or JWT).
CORS on FastAPI is wide open (allow_origins=["*"]) for local/dev, but for production, you should tighten that from their default open state to restrict access to trusted clients.
🎯 Access Control
Fine-grained access control is one of the core things focused on in OpenMemory. At a high level, the access_controls table defines allow/deny rules between apps and specific memories.
These rules are enforced via the check_memory_access_permissions function, which considers memory state (active, paused, so on), app activity status (is_active) and the ACL rules in place.
In practice, you can pause an entire app (disabling writes), archive or pause individual memories, or apply filters by category or user. Paused or non-active entries are hidden from tool access and searches. This layered access model ensures you can gate memory access at any level with confidence.
As you can see, I've paused the access to the memories, which results in an inactive state.

🎯 Architecture
Let's briefly walk through the system architecture. You can always refer to the codebase for more details.
1) Backend (FastAPI + FastMCP over SSE) :
- exposes both a plain-old REST surface (
/api/v1/memories,/api/v1/apps,/api/v1/stats) & - an MCP “tool” interface (
/mcp/messages,/mcp/sse/<client>/<user>) that agents use to call (add_memories,search_memory,list_memories) via Server-Sent Events (SSE). - It connects to Postgres for relational metadata and Qdrant for vector search.
2) Vector Store (Qdrant via the mem0 client) : All memories are semantically indexed in Qdrant, with user and app-specific filters applied at query time.
3) Relational Metadata (SQLAlchemy + Alembic) :
- track users, apps, memory entries, access logs, categories and access controls.
- Alembic manages schema migrations.
- Default DB is SQLite (openmemory.db) but you can point
DATABASE_URLat Postgres
4) Frontend Dashboard (Next.js) :
- Redux powers a live observability interface
- Hooks + Redux Toolkit manage state, Axios talks to the FastAPI endpoints
- Live charts (Recharts), carousels, forms (React Hook Form) to explore your memories
5) Infra & Dev Workflow
-
docker-compose.yml(api/docker-compose.yml) including Qdrant service & API service -
Makefileprovides shortcuts for migrations, testing, hot-reloading - Tests live alongside backend logic (via
pytest)
Together, this gives you a self-hosted LLM memory platform:
⚡ Store & version your chat memory in both a relational DB and a vector index
⚡ Secure it with per-app ACLs and state transitions (active/paused/archived)
⚡ Search semantically via Qdrant
⚡ Observe & control via a rich Next.js UI.
In the next section, we will explore some advanced use cases and creative workflows you can build with OpenMemory.
5. Practical use cases with examples.
Once you are familiar with OpenMemory, you can realize it can be used anywhere you want an AI to remember something across interactions, which makes it very personalized.
Here are some advanced and creative ways you can use OpenMemory.
✅ Multi-agent research assistant with memory layer
Imagine building a tool where different LLM agents specialize in different research domains (for example, one for academic papers, one for GitHub repos, another for news).
Each agent stores what it finds via add_memories(text) and a master agent later runs search_memory(query) across all previous results.
Technical flow can be:
Each sub-agent is an MCP client that:
- Adds summaries of retrieved data to OpenMemory.
- Tags memories using auto-categorization (GPT).The master agent opens an SSE channel and uses:
-search_memory("latest papers on diffusion models")to pull all related context.
The dashboard shows which agent stored what and you can restrict memory access between agents using ACLs.
If you're still curious, you can check this GitHub repo, which shows how to Build a Research Multi Agent System - a Design Pattern Overview with Gemini 2.0.
Tip: We can add a LangGraph orchestration layer, where each agent is a node and memory writes/reads are tracked over time. So we can visualize knowledge flow and origin per research thread.
✅ Intelligent meeting assistant with persistent cross-session memory
We can build something like a meeting note-taker (Zoom, Google Meet, etc.) that:
- Extracts summaries via LLMs.
- Remembers action items across calls.
- Automatically retrieves relevant context in future meetings.
Let's see what the technical flow looks like:
-
add_memories(text)after each call with the transcript and action items. - Next meeting:
search_memory("open items for Project X")runs before the call starts. - Related memories (tagged by
appropriate category) are shown in the UI and audit logs trace which memory was read and when.
Tip: Integrate with tools (like Google Drive, Notion, GitHub) so that stored action items link back to live documents and tasks.
✅ Agentic coding assistant that evolves with usage
Your CLI-based coding assistant can learn how you work by storing usage patterns, recurring questions, coding preferences and project-specific tips.
The technical flow looks like:
When you ask: “Why does my SQLAlchemy query fail?”, it stores both the error and fix via
add_memories.Next time you type: “Having issues with SQLAlchemy joins again,” the assistant auto-runs
search_memory("sqlalchemy join issue")and retrieves the previous fix.You can inspect all stored memory via the
/memoriesdashboard and pause any that are outdated or incorrect.
Tip: It can even be connected to a codemod tool, like jscodeshift, to automatically refactor code based on your stored preferences as your codebase evolves.
In each case, OpenMemory’s combination of vector search (for semantic recall), relational metadata (for audit/logging) and live dashboard (for observability and on-the-fly access control) lets you build context-aware applications that just feel
like they remember.
Now your MCP clients have real memory.
You can track every access, pause what you want and audit everything in one dashboard. The best part is that everything is locally stored on your system.
Let me know if you have any questions or feedback.
Have a great day! Until next time :)
| You can check my work at anmolbaranwal.com. Thank you for reading! 🥰 |
|
|---|


Top comments (18)
Great share Anmol! I will bookmark this and try it out 🙏
Thanks Ndeye! This took a huge effort because there was no docs, so I had to understand every part of the codebase to write it lol.
That is very impressive. Do you do content writing full time?
yeah pretty much.. I'm not a big fan of full-time jobs for some reason so I prefer doing this on a freelance basis.
Got it! That makes sense!
Really nice breakdown @anmolbaranwal
Thanks Saurabh! there was no docs this time so I had to figure everything from codebase... it was pretty tough. 😅
First time?
🙂
nah but the codebase felt a bit large this time + deadline was really tight.. that image reminds me of jack sparrow in Pirates of the Caribbean 🤣 (yeah, I can tell you have been through the same experience)
We learn this way mate!
Imagine going through Java 6 code with Freemarker template that was last updated in 2013 and there's no way that things builds on my local PC. 😁
This is too awesome!!!
Thank you 🙏
I'll be trying it all out after exams!
thanks Divya! the concept is definitely exciting.
It really is.
Thank you for sharing.
Really appreciate the clear breakdown of the local setup — it’s well-structured and easy to follow. The behind-the-scenes architecture of OpenMemory MCP is particularly interesting, especially how it manages context and client communication through SSE. Looking forward to exploring more of its potential for local-first, privacy-focused AI workflows!
what do you mean Nevo? sorry I didn’t quite understand .. Mem0 launched OpenMemory MCP and this tutorial breaks it down.
Crazy how far this is going, I kinda love the idea of keeping memory local and all under my control.
Yeah.. you're totally in control of your data and it also gives a sense of trust as well. You can read more here: mem0.ai/openmemory-mcp
So much wild stuff is happening in tech right now, it's exciting :)
Some comments may only be visible to logged-in visitors. Sign in to view all comments.